Page 1 of 1
Fixing up my new 4020PS
Posted: Sun Oct 11, 2026 9:59 pm
by MattA
I'm kicking off a new thread for fixing up my new 4020PS. I've been working on it on the side for a week and a half now. Below is my growing list of things I'd like to get done on the 4020PS and the status. I'll post up some pictures separately from my phone.
Maintenance done by previous owner(s)
300CCA battery
Oil change with filter
Added oil filter gasket
Hydraulic steering cylinder rebuild
Amazon replacement starter (sounds like crap)
New set of high lift RM48 blades
New RM48 deck adjustment rod
Replaced rear fender light assembly
Green = Done
Yellow/Orange = In progress
Clean up list
Give it a good washing - Washed twice. Looks much better.
Tractor is filthy underneath and in the tower - Cleaned out belly pan + about three dust pans worth of dirt/oil from under the tractor.
Clean and scrape both RM48 decks - Done.
Fix it list
RM48 deck #3 is very loud. Spindle bearings and pulleys replaced.
RM48 deck #4 spindle bearings and pulleys replaced. Deck lowering mechanism unseized.
Onan needs its carburetor cleaned. -Done for now
Replace the air filter. I swear the previous owner showed me a new filter installed in the tractor. This one looks like it got wet and should have been replaced years ago. - Done
Replace fuel filter.
Replace spark plugs - Done
Fix the hood. Its not closing completely and latching. Bottom mount appears to be bent slightly. -Bent hinge area fixed. Hood still doesn't latch down tight.
Grease and lube tractor as required - Done
Change hydraulic oil - In the process. 3-4 quarts changed.
Change transaxle oil - Done. Used 1 quart of Valvoline 75W-90 gear oil. -Done
Install Ingersoll battery tray C48415 from late model tractors (I already have the tray) - Done.
Future fix it list
Swap back in OEM starter (seller had it rebuilt)
Front end alignment?
Figure out if anything is leaking in the tower. Hydraulic filter was loose. -Done for now.
Buy a decent quality 350CCA battery like 4016 has? My 4016's battery is 6 years old and still cranks that little vanguard great >>>
https://www.oreillyauto.com/detail/c/la ... ssb1/u1luh
Onan valve adjustment?
Seal intake manifold + new gaskets?
Mods lists
Power steering mod for improved turning radius - Done.
Swap it over from my 4016 list
Swap over front axle pin - Done. Made a huge difference.
Swap fenders (already drilled for my cab)
Swap over the cab mounting hardware (longer bolts in the steering tower and foot rests)
4016 list
Tighten up the steering gear and double nut it - Done. Works great.
Fix the jumpy travel - Filled with 1+ quart of oil. Oil was 7" down from the top of the tank filler neck. -Done
Check status on my old RM48 deck and reassemble the mule drive - Center spindle bearing top bearing was pretty much seized and chute side top bearings was noisy. Both bearings replaced. Mule drive reassembled. -Done
Fix leaking return lines by the hydraulic filter
Stuff to paint
SB48 bottom
Berco bottom
Weight box bracket
Re: Fixing up my new 4020PS
Posted: Sun Oct 11, 2026 10:05 pm
by MattA
C48415 battery tray installed
Re: Fixing up my new 4020PS
Posted: Sun Oct 11, 2026 10:08 pm
by MattA
Fixed the bend in the hood by the hinge. Hood still doesn't latch down tight.
Before
After
Re: Fixing up my new 4020PS
Posted: Sun Oct 11, 2026 10:14 pm
by MattA
I drained out a few quarts of hydraulic oil through the case drain return. Takes a while. Took the family out to dinner while it drained. Should have put the filter on my parts order. Bob has the filters at half price.
Also drained and refilled the transaxle with 1qt 75w90. The valvoline flex fill package makes filling very easy.
https://shop.valvolineglobal.com/produc ... sae-75w-90
Re: Fixing up my new 4020PS
Posted: Wed Oct 14, 2026 11:18 am
by propane1
You’re a busy fella Matt. She’ll be just like new.

Noel
Re: Fixing up my new 4020PS
Posted: Wed Oct 14, 2026 9:24 pm
by MattA
propane1 wrote: ↑Wed Oct 14, 2026 11:18 am
You’re a busy fella Matt. She’ll be just like new.
Noel
Yeah I've got some extra vacation at work this year to burn. Been using it to fix up my tractors and do projects around the house.
First pass quick carburetor clean with just removing cover and cleaning what I could get at seemed to help. The engine idles and runs better now. After about 10 seconds at idle with no load the engine starts to hunt a little. Goes away with some load. I didn't have the intake gaskets/carb gaskets/tons of free time to pull the intake and clean the carb. That rabbit hole may include resealing the intake manifold and adjusting the valves while everything is apart. I'll save that for another time.
Power steering mod where the spindle arm hole is redrilled to decrease the turning radius didn't go well. I started a small pilot hole with a 1/16" bit carefully... and I broke the bit in the hole

I must have wasted an hour trying to get the bit out. I bought some steel center punches off Amazon to try and break up the bit. Hopefully I can get the broken bit out this weekend. No luck drilling from the bottom side and knocking out the broken bit. I ruined a couple of bits and punches trying to that.
This weekends task is to change out the spindle bearings on RM48 decks #3 and #4 (the new to me later model decks). Hopefully I can get those decks finished up. RM48 decks #1 and #2 (Massey Ferguson MF248) will be sold with my 4016. Deck #4 lowering mechanism is rusted in place. Its never been greased. I'm going to pull the grease fitting out and spray PB blaster inside the pivot and see if that will help loosen it up.
Re: Fixing up my new 4020PS
Posted: Fri Oct 16, 2026 10:30 pm
by MattA
This afternoon I started the rebuild of RM48 decks 3 and 4.
I had previously washed the decks off. Deck 3 had a sloppy mess inside. It's a good idea to clean a deck out before washing it.
The spindles in deck 3 had been greased so much that grease was leaking past the top and bottom spindle bearings. Bearings came right out and the new bearings pressed in with no issues. I'm hoping to clean up the pulleys and reassemble the deck this weekend. The mulching kit will go back in this deck.
New bearings installed
Deck 4 was stored outside. The spindle bearings and idler pulley all needed replacement. Water must have been getting in the center spindles housing. It was rusted inside and had minimal grease. Both center spindle bearings were also seized. New bearings were pressed in. I need to clean up the pulleys for this deck.Also need to try and free up the lowering mechanism.
Both mule drives will also get serviced.
Re: Fixing up my new 4020PS
Posted: Sat Oct 17, 2026 5:34 am
by DavidBarkey
Do you have some rust converter to deaden the rust ?
Re: Fixing up my new 4020PS
Posted: Sat Oct 17, 2026 6:19 am
by MattA
DavidBarkey wrote: ↑Sat Oct 17, 2026 5:34 am
Do you have some rust converter to deaden the rust ?
I do not but I'm certainly open to recomendations.
Deck 3 underneath isn't too bad
Deck 4 has more rust underneath
Re: Fixing up my new 4020PS
Posted: Sat Oct 17, 2026 5:01 pm
by DavidBarkey
I use "Krud Kutter a must for rust "
POR 15 has a good product as well .
there are others, but have not tried them .
Re: Fixing up my new 4020PS
Posted: Mon Oct 19, 2026 8:29 am
by Harry
I’ve used the Rustoleum rust converter. It’s readily available but not sure how well it actually works.
Re: Fixing up my new 4020PS
Posted: Mon Oct 19, 2026 12:21 pm
by propane1
I remember people would use lemon or orange juice on rust. The juice right out of the lemon or orange. It will turn the rust black.
Now, I’m old and can’t remember well,

, so I could be wrong. Do your research on that.
Noel.
Re: Fixing up my new 4020PS
Posted: Thu Oct 22, 2026 9:06 pm
by MattA
I picked up some rustoleum rust reformer that I can brush on. It also comes in a spray can. I also picked up some rustoleum reform and seal spray for the under side of the deck.Youtube channel "Project Farm" has a lot of good reviews including rust reformers.
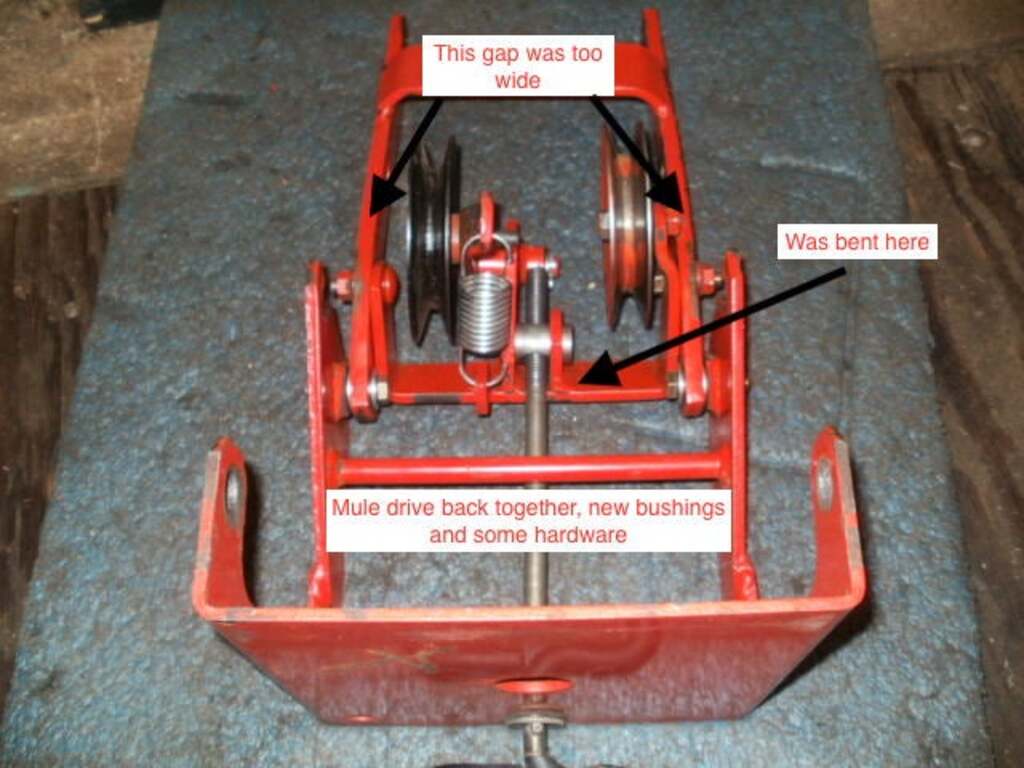
Progress has been slow in the past week due to other time and energy consuming home projects. RM48 mule drive #1 was reassembled. RM48 mule drive #4 was rebuilt. RM48 mule drive #3 will be finished up tomorrow. The tensioner springs for mule drives 3, 4 & 5 (spare unit) are all stretched out and will get replaced.
RM48 deck #3 will get my relatively new set of spindles (pulleys) including the RM38 center drive. The mulching kit will go back in this deck. RM48 deck #4 will get RM48 deck #3's spindles (pulleys) since deck #4's spindles are quite rusty from being outside.
Hopefully on the list this weekend is getting the plow setup ready to sell + my weight box.
Re: Fixing up my new 4020PS
Posted: Sun Oct 25, 2026 9:19 pm
by MattA
RM48 mule drive #3 is finished up aside from a new spring.
Mulching kit reinstalled in RM48 deck #3.
RM48 deck #4 raising/lowering mechanism on the front of the deck has been freed up. I tried some PB Blaster but had no luck. Would have helped if the grease fitting was removable. I ended up pumping grease through the grease fitting and gently working the mechanism back and forth with a 18" adjustable wrench. It didn't want to accept much grease. I just kept working at it until it freed up. Its not perfectly smooth like Deck #3. It binds up a little but I can move it by hand. Its probably good enough and hopefully will loosen up on its own.
I think I found the hydraulic leak. The hydraulic filter had previously been wet but not covered in dirt. I had a feeling it was loose and it was. It took a good 1/8 turn to tighten up the hydraulic filter.
The last thing I worked on was modifying the power steering for a better turning radius. I had previously broken off a 1/8" drill bit in the hole and spent a good hour and a half failing at getting the drill bit out. I bought some hardened center punches and with a lot of effort was able to get the broken bit out of the hole. New hole has been drilled. I was working on adjusting the power steering hydraulic cylinder rod end when the girls got home. The rod end doesn't want to turn on the cylinder rod. I can see marks where someone (possibly the previous owner) used a pair of pliers or vice grips on the very end of the rod
I don't want to be that guy so I quit for the day and will do some research. I also need to set the steering stops.
New Chile drilled. Rod end isn't secured.
Re: Fixing up my new 4020PS
Posted: Mon Oct 26, 2026 5:37 am
by DavidBarkey
Use your biggest pair of curved jaw vise grips . Place aluminum strips between the teeth and the rod . Tight down the grips as hard as you can . Support the grips on a block of wood . Now you can put some force on the tie rod end . If it still is tough . Extend the rod, wrap it with a wet rag and apply some BTUs with a torch or induction heater to the rod end . and try again .
Nice progress .. Hope this helps .
Re: Fixing up my new 4020PS
Posted: Mon Oct 26, 2026 8:50 am
by dhitching
The less invasive process I've used in the past:
- Tighten lock nut against the cylinder rod
- Place one wrench on the lock nut (which now cannot move) and the other on the rod end
- Loosen rod end
- Remove lock nut (worst case double nut the threads to break the lock nut free)
Re: Fixing up my new 4020PS
Posted: Tue Oct 27, 2026 12:57 pm
by MattA
The rod end seemed to turn just fine with a wrench on it. Guess I should have tried harder the other day. I did see that you can buy soft jaw pliers that might be able to grip the cylinder rod.
I adjusted the rod end so that the wheels are now straight like they were before I changed the cylinder rod end mount in the spindle. The cylinder rod is only extended about 2.125" out of what I assume is a 6" stroke. I thought it would be closer to half the cylinder stroke.
The power steering cylinder mount at the frame has a decent amount of play in it. I assume this is by design?
I've still got to look up the spec for toe.
I'm hoping to do some work with my Johnny bucket later this week and next week.
Re: Fixing up my new 4020PS
Posted: Sun Nov 01, 2026 9:13 pm
by MattA
Slow progress again this weekend due to other projects.
-Rear tire pressure lowered from 18psi to 7psi.
-Front tire pressure dropped from 12psi to 7psi.
-Removed rear tires, fenders and seat. More OCD cleaning... probably close to another dust pan of dirt and crap removed. Looks nice when done. Up next is swapping over my 4016's fenders which are in better shape and already drilled for my cab mounts.
Glad I put a drop cloth down for this project.
Re: Fixing up my new 4020PS
Posted: Mon Nov 02, 2026 5:44 am
by DavidBarkey
Looking good , It will be a great tractor when you are finished .
Re: Fixing up my new 4020PS
Posted: Thu Nov 05, 2026 9:02 pm
by MattA
Tractor is back together
Both mowing decks are still partially assembled. I was planning to seal up the rust before reassembling the decks. Running out of nice weather here. I also would like to to put the Johnny bucket on this weekend. Not sure I'll get to use it. I've got to put new brakes on my parents Kia Sorrento.
Re: Fixing up my new 4020PS
Posted: Sat Nov 07, 2026 8:16 pm
by MattA
I went to start the 4020PS today and it protested starting and running for a few seconds. The Linamar cranks kind of slow. It's still got the Amazon starter in it. I haven't swapped the rebuilt Linamar starter in yet. Battery is 300CCA dated 2025. I've also cleaned the wiring ring terminals. I'll bring home an oscilloscope from work at some point and measure for voltage drops while cranking at some point.
Anyways I went to move the tractor and it stalled. Seat switch is plugged in. I checked out the PTO switch and made an adjustment. No change. Turns out when I swapped the seats, the 4020PS has a normally open seat switch while my 4016 Vanguard has a normally closed switch. I'll get the switches swapped at some point soon. Hopefully that's quick and easy.
I did jumper the wire harness so that I could move the tractor and put the Johnny Bucket on. The wire harness I built for my 4016 fits the 4020PS.
Re: Fixing up my new 4020PS
Posted: Sun Nov 08, 2026 9:18 am
by dhitching
I'm sure you'll really appreciate the power steering when you have weight in the Johnny Bucket! Have you seen the threads about voltage boosting the Johnny Buckets? I know when I had one I felt like it was painfully slow to use.
Re: Fixing up my new 4020PS
Posted: Sun Nov 08, 2026 9:03 pm
by MattA
I swapped over the seat switches today. Pretty straight forward process. I wasn't able to find much info on the forums so here is the cliff notes version.
1. Unplug the seat switch. The seat switch connector does not appear to have a latch. I grabbed each half of the connector and gently pulled/wiggled the connector and it came right apart.
2. Unbolt the seat rails from the tractor and remove the seat from the tractor.
3. Flup the seat over and note where the spring under the seat attaches and remove the spring.
4. Move the seat adjustment mechanism over remove the white switch assembly. The seat switch assembly must be unclipped and pulled out of the seat.
5. Replacement seat switch is inserted into the seat and clipped into place.
6. Reconnect the seat spring, reinstall the seat on the tractor and plug in the connector.
Re: Fixing up my new 4020PS
Posted: Sun Nov 08, 2026 9:26 pm
by MattA
dhitching wrote: ↑Sun Nov 08, 2026 9:18 am
I'm sure you'll really appreciate the power steering when you have weight in the Johnny Bucket! Have you seen the threads about voltage boosting the Johnny Buckets? I know when I had one I felt like it was painfully slow to use.
I had the poor man's power steering installed on my 4016. Made quite a difference with my SB48 snowcaster installed. The Johnny Bucket with a load of dirt wasn't too bad off road but when driving down my street, I sure had to put some effort into fight the crown of the road.
I came across the JB voltage double in the past. I'll have to look into it some more. At one point I was looking into a DIY setup but started looking into the K2XG20 series linear actuator. It's much faster and lifts more. My JB has the K20G-12V-BR-0490JP linear actuator. The problem with the K2XG20 is the retracted length is longer which limits the lifting height. I've also looked into getting a K2G30 series linear actuator. This bumps the internal gear ratio from 20:1 to 30:1 increasing lift capacity from 700lbs to 1100lbs. The 30:1 quite a bit slower at no load but is actually faster at full load.
I've looked into buying the K2G30-48V-BRL-08 listed below in the past. Its now cheap enough that I could buy it to experiment with. I'm thinking I could swap the parts between them to make a K30G-12V-BR-0490JP.
https://www.ebay.com/itm/392085458791?_ ... R4a_5dW3aA
Re: Fixing up my new 4020PS
Posted: Sun Nov 08, 2026 9:29 pm
by MattA
Wheel weights are on and so are the suitcase weights. JB tooth bar is also on. I've got to find someone to weld the replacement tooth back on.
Re: Fixing up my new 4020PS
Posted: Sun Nov 08, 2026 9:35 pm
by MattA
I also got replacement springs installed on both RM48 mule drives. The original springs were stretched out. I also had to stretch the new springs to install them. It's hard to see in the photo I took but the spring is presently stretched. I could probably fit a quarter or nickel between the coils. Does anyone know if the idler is setup correct? The pulley bolt hits the bracket on both mule drives.
Re: Fixing up my new 4020PS
Posted: Mon Nov 09, 2026 5:37 am
by DavidBarkey
If memory serves me correct it should be a nickle between coils . Rule of thumb with that kind of spring is . Full tension is when the gap between coils is equal to the thickness of the wire it is made from . I usually try for a gap between 1/2 and full thickness of the wire diameter once the belt has seated if I can not find a manufacturers spec.
Re: Fixing up my new 4020PS
Posted: Mon Nov 09, 2026 7:15 am
by MattA
DavidBarkey wrote: ↑Mon Nov 09, 2026 5:37 am
If memory serves me correct it should be a nickle between coils . Rule of thumb with that kind of spring is . Full tension is when the gap between coils is equal to the thickness of the wire it is made from . I usually try for a gap between 1/2 and full thickness of the wire diameter once the belt has seated if I can not find a manufacturers spec.
I do the same David. I forgot to mention in my post that the spring is already stretched that much and the idler mounting bolt is hitting the mule drive frame. I'm pointing to the bolt with a screwdriver in the picture. I'm realizing now that I may just need to turn the adjustment handle. Its presently at one end of the threads.
I found a better picture from Bob Macgregor and his mule drive is doing the same thing.
- P3180073.jpeg (76.43 KiB) Viewed 220 times
Re: Fixing up my new 4020PS
Posted: Mon Nov 09, 2026 12:26 pm
by myerslawnandgarden
MattA wrote: ↑Sun Nov 08, 2026 9:35 pm
I also got replacement springs installed on both RM48 mule drives. The original springs were stretched out. I also had to stretch the new springs to install them. It's hard to see in the photo I took but the spring is presently stretched. I could probably fit a quarter or nickel between the coils. Does anyone know if the idler is setup correct? The pulley bolt hits the bracket on both mule drives.
20261108_165504.jpg20261108_165805.jpg
On the newer style mule drive that you have, you adjust the tension until there is 3/8" between the bolt and the bracket. Yes, the spring will be slightly stretched as soon as it's installed.
Bob
Re: Fixing up my new 4020PS
Posted: Mon Nov 09, 2026 6:42 pm
by MattA
myerslawnandgarden wrote: ↑Mon Nov 09, 2026 12:26 pm
MattA wrote: ↑Sun Nov 08, 2026 9:35 pm
I also got replacement springs installed on both RM48 mule drives. The original springs were stretched out. I also had to stretch the new springs to install them. It's hard to see in the photo I took but the spring is presently stretched. I could probably fit a quarter or nickel between the coils. Does anyone know if the idler is setup correct? The pulley bolt hits the bracket on both mule drives.
20261108_165504.jpg20261108_165805.jpg
On the newer style mule drive that you have, you adjust the tension until there is 3/8" between the bolt and the bracket. Yes, the spring will be slightly stretched as soon as it's installed.
Bob
image.png
Thanks Bob. My other RM48 decks are both the older style mule drives.