Page 1 of 1
1961 Ford F500 project.
Posted: Sun Sep 04, 2022 11:47 pm
by JSinMO
This thread will primarily be about my efforts to bring this truck back into service and back on the road. If you will indulge me I’d like to start this with the story of the truck.
To do that we have to start at the beginning, or as close as we can get. February of 1970 to be exact. That’s when a farmer bought this truck from the original owner for use on his farm. The truck had been rolled on its passenger side by the original owner. How or why I don’t know. But the farmer made what repairs were needed including beating the fender back into shape.
The truck spent its life on the farm primarily as a flat bed in the hay fields around the area bringing bales to the barn with the occasional trip to town of course. As time went on and the farming operation changed and grew. The truck had less and less work to do and spent more and more time in the shed until it was finally retired and didn’t leave the shed again. The last time it was licensed to be on the road was in 1987.
That brings us to today and my trip to Mr Gamms’s farm to bring the truck to my house. He relayed this information to me and now I relay it to you. He apologized for his poor body work. I told him had nothing to apologize for, nowadays they call that patina! He thanked me for purchasing his truck. He told me the man I was bidding against was a scrapper, had I not placed a bid at the last minute this truck would have been on its way to the scrap yard! He was greatful that I wanted to bring it back to life.
We had rain showers most of the day today and the field the truck was parked in was wet and the hill leading out of the field was muddy and rutted. Mr Gamm’s son said I’ll pull you up the hill, I said I know the brakes don’t work, but what about the emergency brake? Mr Gamm said yea it works. I’ll try to drive it up then. He just shook his head.
With that I walked to the truck and cranked it up. With some feathering of the clutch and throttle I started across the field. As I reached the bottom of the muddy embankment I gave the truck more throttle and the engine roared. As we made are way up, the rear end fishtailed as the bald tires pawed at the mud. The truck clawed it’s way to the top of the hill where Mr Gamm was sitting. His son said “ I can’t believe Herbie made it up the hill”! I said what did you call it? He said we have always call him Herbie.
Then I will too.
So this is Herbie the 1961 Ford that was 1 bid away from the scrap yard.
I hope I can do Herbie justice and get him back on the road. I’d love to drive over to Mr Gamm’s farm for a visit!
I hope you didn’t mind the long winded story. That’s the longest rambling I’ve had yet!
To be continued…..
Re: 1961 Ford F500 project.
Posted: Mon Sep 05, 2022 5:27 am
by propane1
Just a great ramble. Great story. Nice that it runs and moves. That’s a good start.
Noel
Re: 1961 Ford F500 project.
Posted: Mon Sep 05, 2022 7:36 am
by DavidBarkey
Not everything can or is worth saving , but when the opportunity to save something of that age from scrap and have the story to go with it .


Re: 1961 Ford F500 project.
Posted: Mon Sep 05, 2022 8:52 am
by Spike188
First the Case started and runs and now Herby. You really scored at the auction.
Re: 1961 Ford F500 project.
Posted: Mon Sep 05, 2022 9:24 am
by JSinMO
Spike188 wrote: ↑Mon Sep 05, 2022 8:52 am
First the Case started and runs and now Herby. You really scored at the auction.
I feel incredibly fortunate! It’s always a crap shoot when buying old equipment especially at auction. The Case and Herbie both need a fair amount of work, but so far they both appear to be great candidates to bring back into service.
Re: 1961 Ford F500 project.
Posted: Mon Sep 05, 2022 9:59 am
by Eugen
Very nice story and great save from the dump. Even all the lights work! Great!

Re: 1961 Ford F500 project.
Posted: Mon Sep 05, 2022 11:08 pm
by JSinMO
Since I need to go to town for some parts on the 446 before I continue, I decided to spend some time doing a clean up / evaluation on the truck. Firstly I was corrected by Mr Gamm yesterday. This engine is a 272 Y block with a 2 barrel carburetor
So the list stars.
Definitely needs the carburetor rebuild, the Excelerator pump is non existent, and the choke is sticky.
I didn’t bother to pull a spark plug I’m replacing them. I need to at least dress the points if not replace them.
Next item: the hoist.
It does function. However the PTO shaft and pump are covered in 60 years of grease and dirt so it’s hard to see what I have. The hoist controls are very stiff and difficult to move. So at least a clean up and lube and fluid check.
I think the cab cleaned up well
I knew I wanted a flatbed. The gran box can be handy but it will be an obstruction for most of our uses. I had to use big brother for this job.
The panels are almost 13 feet long and are much heavier than I had anticipated. Thankfully the 648 was up to the task.
I like the look of Herbie as a flatbed!
. The drivers side glass is cracked but it might live for a while yet. It needs 6 tires for sure. And of course it needs brakes. I didn’t dig into them today but I’m already considering a full replacement from master cylinder to wheels.
So I’d say mostly typical stuff for an old vehicle so far.
Re: 1961 Ford F500 project.
Posted: Tue Sep 06, 2022 4:49 am
by propane1
I like the look of the flat bed too. Looks great. Wouldn’t be a whole lot of difference in hp between the 292 of the 272, I wouldn’t think. The 272 will work just fine.
Thanks for the pictures.
Noel
Re: 1961 Ford F500 project.
Posted: Tue Sep 06, 2022 5:53 am
by Chad
Looks great! That's a nice story and that you were able to save it - gotta feel good about that (you and the previous owner). Overall it looks to be in very good shape considering the age and backstory. Looking forward to your progress.
Sent from my Pixel 4a using Tapatalk
Re: 1961 Ford F500 project.
Posted: Tue Sep 06, 2022 8:24 am
by propane1
Saw this this morning at Canadian tire. 3/4 ton.
Noel

Re: 1961 Ford F500 project.
Posted: Tue Sep 06, 2022 10:43 am
by Jancoe
Looks like a fun project. Good luck replacing those tires. A family member has a 1950 F6 he just got going down the road. All original, sat outside for years and has nice patina. We ended up cutting the centers of the wheels out and it is now running on 22.5 instead of the original 20" 2 piece wheels that nobody will touch.
Sent from my SM-S906U using Tapatalk
Re: 1961 Ford F500 project.
Posted: Tue Sep 06, 2022 2:04 pm
by JSinMO
@Propane57 That truck really look great! Can you head back over there and get the drivers Side glass out of it?
@Jancoe
I have no clue what I’m going to do about tires and wheels yet. At this point they hold air so I’m kicking that can down the road until I get the brakes fixed! I’d love to see a picture of the F6 if you have the opportunity
Re: 1961 Ford F500 project.
Posted: Tue Sep 06, 2022 2:47 pm
by propane1
JSinMO wrote: ↑Tue Sep 06, 2022 2:04 pm
@Propane57 That truck really look great! Can you head back over there and get the drivers Side glass out of it?
No problem, next time I see it, I’ll snag the window out of it.

Noel
Re: 1961 Ford F500 project.
Posted: Wed Sep 07, 2022 5:35 pm
by puttputt
Good looking truck you found. I like it when someone decides to save these "vintage" trucks. I had a 47 Dodge dump truck, 50 Dodge 1 ton with factory fender type box with hoist and a 52 Dodge 2 ton with box and hoist. I parted ways with them in the last 3 years. I have left a 50 Dodge tow truck and a 56 Dodge 1 ton with flat deck and hoist.
Re: 1961 Ford F500 project.
Posted: Wed Sep 07, 2022 8:24 pm
by DavidBarkey
puttputt wrote: ↑Wed Sep 07, 2022 5:35 pm
Good looking truck you found. I like it when someone decides to save these "vintage" trucks. I had a 47 Dodge dump truck, 50 Dodge 1 ton with factory fender type box with hoist and a 52 Dodge 2 ton with box and hoist. I parted ways with them in the last 3 years. I have left a 50 Dodge tow truck and a 56 Dodge 1 ton with flat deck and hoist.
You have some pic.s of those ?
Re: 1961 Ford F500 project.
Posted: Wed Sep 07, 2022 8:54 pm
by puttputt
DavidBarkey wrote: ↑Wed Sep 07, 2022 8:24 pm
puttputt wrote: ↑Wed Sep 07, 2022 5:35 pm
Good looking truck you found. I like it when someone decides to save these "vintage" trucks. I had a 47 Dodge dump truck, 50 Dodge 1 ton with factory fender type box with hoist and a 52 Dodge 2 ton with box and hoist. I parted ways with them in the last 3 years. I have left a 50 Dodge tow truck and a 56 Dodge 1 ton with flat deck and hoist.
You have some pic.s of those ?
I don't have any on hand except for the 50 1 ton I sold. The fellow restored it over winter the fall that he bought it from me. The truck only had 24,000 original miles and had the fluid drive transmission.
![Image]()
Re: 1961 Ford F500 project.
Posted: Wed Sep 07, 2022 9:07 pm
by puttputt
Actually found a pic of the 50 tow truck and 56 1 ton. The tow truck belonged to the Chrysler dealership I worked for years ago. It has a crude winch on it that the owner had the guys in the shop fabricate in the 50's. I bought a 54 foot highway trailer for storage that I had to move a mile to my place. It was cheaper for me to buy the tow truck to move it than hire someone. I got the truck for $200.00 and have used it several times for lifting things or moving something. Sure got my monies worth. It also has a pump and set up for a snow blade.
The 56 1 ton is my work truck around the cabin. Sure comes in handy with the flat deck and hoist. I keep thinking about restoring it but so far haven't had the ambition. Mind you it was not my intent to restore them when I acquired them.
[url][/
]
Re: 1961 Ford F500 project.
Posted: Wed Sep 07, 2022 9:11 pm
by JSinMO
@puttputt That truck is beautiful! I’m with Dave if you can get some pictures of your others sometime I’d love to see them. I don’t think my old truck will look that sharp!
Re: 1961 Ford F500 project.
Posted: Wed Sep 07, 2022 9:28 pm
by Eugen
Wow, such great looking trucks guys, thanks for showing them!
Re: 1961 Ford F500 project.
Posted: Wed Sep 07, 2022 11:24 pm
by JSinMO
I took a look at the brakes on the truck and the master cylinder is junk for sure. I’m still debating on how to proceed. This has a hydro-boost system so it has a slave cylinder / booster under the truck. It may be fine but this is looking like a scenario where you change one thing and the dominos start falling. So far I’m not finding a lot of info out there.
@puttputt Do your Dodge trucks have this type of braking? If so do you have a parts source? It seems some of these items are starting to get hard to find.
Re: 1961 Ford F500 project.
Posted: Thu Sep 08, 2022 12:06 am
by Timj
Take a picture of the hydro vac. Curious if it is similar to the newer ones.
I don't have time for the whole story right now, but I've been down with a 78 Chevy trying to get one. The company that rebuilds them can't get cores to rebuild. I got the last one O'Reilly's had in the US, it arrived broken in the box. Carquest, Advanced Auto, Napa, and Weaver couldn't find one.
Hopefully they get the part that was broken shipped out to fix the new one.
Re: 1961 Ford F500 project.
Posted: Thu Sep 08, 2022 7:20 am
by Jancoe
Does your truck have a 2 speed rear axle on it? These trucks used vaccum to actuate it. The brake system is weird on these old trucks. We replaced the master cyl on the '50 f6 and several other parts as needed. Our master had 5 lines to hook up to it. I'll have to ask where my mothers boyfriend bought his parts from. That parts place he used was extremely helpful finding the parts that he needed for it.


Sent from my SM-S906U using Tapatalk
Re: 1961 Ford F500 project.
Posted: Thu Sep 08, 2022 7:48 am
by DavidBarkey
@puttputt , Those are some great looking trucks .
Thanks for sharing the pics.
Re: 1961 Ford F500 project.
Posted: Thu Sep 08, 2022 8:40 am
by puttputt
JSinMO wrote: ↑Wed Sep 07, 2022 11:24 pm
I took a look at the brakes on the truck and the master cylinder is junk for sure. I’m still debating on how to proceed. This has a hydro-boost system so it has a slave cylinder / booster under the truck. It may be fine but this is looking like a scenario where you change one thing and the dominos start falling. So far I’m not finding a lot of info out there.
@puttputt Do your Dodge trucks have this type of braking? If so do you have a parts source? It seems some of these items are starting to get hard to find.
Yes, the 50 tow truck has a 2 speed axle and hydro-boost brakes. I never really looked up a parts source in regards to the booster as a fellow gave me a 50 Dodge 3 ton truck for parts that I stripped. It had the same booster on it so I have a spare. The brakes currently aren't working on the tow truck but I think cylinder rebuilds will cure that. I will replace the booster if need be. I believe there are outfits that can rebuild these units though. Likely isn't cheap. And that's the problem. I was lucky when the fellow offered me a complete parts truck.
Re: 1961 Ford F500 project.
Posted: Thu Sep 08, 2022 4:33 pm
by JSinMO
@Timj here’s the pictures of my setup.
@Jancoe My truck is just a straight rear end. It not a 2 speed. If you come up with a source for parts That would be awesome. I love the look of your truck. It looks like it’s in pretty good shape.
I did find some information today. I checked O’Reilly and they looked at me like I had 3 heads! I stopped by a couple of repair shops, no luck. My last stop was at Advanced and they said we can have it rebuild no problem!
It’ll takes 10 to 20 days to get it back to you. I asked what if it not repairable? They told me I’m not out anything. So I’m going for it, we’ll see what happens. They gave me a price of $138.00 rebuild and back in my hands.
@puttputt you got really lucky to get a good parts truck!
Re: 1961 Ford F500 project.
Posted: Thu Sep 08, 2022 5:04 pm
by propane1
JSinMO, I saw that truck again today, but he was driving the other way, so I couldn’t get the window.
Sounded like it was a 6 cylinder.
Noel
Re: 1961 Ford F500 project.
Posted: Thu Sep 08, 2022 5:08 pm
by puttputt
$138.00 to have the booster rebuilt sounds very reasonable to me. Would never happen for that price where I am.
Re: 1961 Ford F500 project.
Posted: Thu Sep 08, 2022 6:06 pm
by JSinMO
Propane57 wrote: ↑Thu Sep 08, 2022 5:04 pm
JSinMO, I saw that truck again today, but he was driving the other way, so I couldn’t get the window.
Sounded like it was a 6 cylinder.
Noel
Tell him he can keep the engine, we just want the glass!
Re: 1961 Ford F500 project.
Posted: Thu Sep 08, 2022 7:49 pm
by Timj
JSinMO wrote: ↑Thu Sep 08, 2022 4:33 pm
@Timj here’s the pictures of my setup. 93651C54-DC00-4AB0-A0B6-47F992AF3D6E.jpeg761C94BC-1802-41B5-B6BC-FD6FBCAB0573.jpeg
@Jancoe My truck is just a straight rear end. It not a 2 speed. If you come up with a source for parts That would be awesome. I love the look of your truck. It looks like it’s in pretty good shape.
I did find some information today. I checked O’Reilly and they looked at me like I had 3 heads! I stopped by a couple of repair shops, no luck. My last stop was at Advanced and they said we can have it rebuild no problem!
It’ll takes 10 to 20 days to get it back to you. I asked what if it not repairable? They told me I’m not out anything. So I’m going for it, we’ll see what happens. They gave me a price of $138.00 rebuild and back in my hands.
@puttputt you got really lucky to get a good parts truck!
Yep, pretty much the same thing, mine just has the double chambers for heavier gvw. Cardone is the company that rebuilds them. Mine was just over $200 with the core return.
Re: 1961 Ford F500 project.
Posted: Tue Sep 13, 2022 7:55 pm
by JSinMO
Jancoe wrote: ↑Tue Sep 06, 2022 10:43 am
Looks like a fun project. Good luck replacing those tires. A family member has a 1950 F6 he just got going down the road. All original, sat outside for years and has nice patina. We ended up cutting the centers of the wheels out and it is now running on 22.5 instead of the original 20" 2 piece wheels that nobody will touch.
Sent from my SM-S906U using Tapatalk
You are spot on. I have search and searched for tires and rims. So far no go. Even if I could find the tires the rims on the truck are the old “widow maker” split rims. Nobody will touch them and I can’t blame them.
I must admit I’m pretty down after hitting nothing but dead ends so far.
I have a good welder that would weld up new rims on my centers if I end up going that route. Can you tell what rims you used on your F6?
I really appreciate your information. Thanks!
Re: 1961 Ford F500 project.
Posted: Tue Sep 13, 2022 8:22 pm
by propane1
Any type of tractor rims fit maybe. Just guessing.
Noel
Re: 1961 Ford F500 project.
Posted: Tue Sep 13, 2022 9:06 pm
by JSinMO
Good thought Noel. Hadn’t thought of that. At the very least it’s another avenue to explore. Thank you.
Re: 1961 Ford F500 project.
Posted: Wed Sep 14, 2022 7:00 am
by DavidBarkey
Re: 1961 Ford F500 project.
Posted: Wed Sep 14, 2022 8:32 am
by JSinMO
The ones I’ve checked so far either don’t make the size I need or it’s cost prohibitive for me. There are still options. I haven’t hit the salvage yards yet and there are some heavy truck repair shops in my area I need to check with. I still have the option of making what I need also. It’s just a little disheartening to keep hearing “sorry those are obsolete”. But I guess we’re all kind of into taking things that are deemed obsolete and keeping them alive.
Re: 1961 Ford F500 project.
Posted: Wed Sep 14, 2022 10:53 am
by Toolslinger
If you run into any additional oddball brake issues, I used White Post Restorations to rebuild/sleeve my obscure wheel cylinders on the '48 Diamond T. All done in brass, so I don't have to worry about that again... I recall they also did the hydro boost systems, but I didn't need that at the time. (probably should have done it just because)
I'm still very slowly trying to get the '65 F750 to the point I could get it on the road. Air brakes, so different problems... Tires, however, are the same kinda headache. No problem finding rubber, but the cost is crazy. The wheels are lock ring, so not the same issue as widow makers. Hoping I can just come up with some 22.5's and be done with it... At least I have Dayton's, so it should be relatively simple once I get some cash set aside for it.
Re: 1961 Ford F500 project.
Posted: Wed Sep 14, 2022 10:57 am
by Eugen
Jeff, I have a little story that might help, or not. When I got the Massey Harris 33 it was in pretty rough shape. Some things I found after long searches, at a more reasonable price. But the exhaust manifold was not to be found anywhere, at any price. This model, the 33, was nowhere as popular as the 44 or the 55, for which there are plenty of aftermarket parts, including the exhaust manifold. I had joined the Facebook group named Massey Harris Tractor Collectors previously, and noticed that people are helping each other there. So I posted that I'm looking for a manifold. There were many replies like "go to xyz.com" but I have already exhausted all new and old parts I could find on the net. But two people replied that they may have an old one in the barn, they'll look. The third person that said he has one was in Quebec, and it was a refreshed manifold, in amazing shape. Not only, but the price was extremely decent, and low shipping.
My point is that you may find someone that has some parts for your machine, in a similar group on facebook. I do not like facebook, but the reality is that it is another place where people get together and you never know.
As you probably realized already, what you're doing requires patience. I was able to find a manifold many months after I first started. Hope you can find what you need faster!
Re: 1961 Ford F500 project.
Posted: Wed Sep 14, 2022 11:08 am
by Toolslinger
Eugen wrote: ↑Wed Sep 14, 2022 10:57 am
As you probably realized already, what you're doing requires patience. I was able to find a manifold many months after I first started. Hope you can find what you need faster!
I'll second the patience...
Before I went to White Post, I spent a year or more trying to track down new wheel cylinders... Found that International also used those cylinders on a few models pre WWII. That lead me to finding those same wheel cylinders were used on International made half tracks. All those made their way to Israel eventually apparently... So after a lot of digging, I found the PN assigned to the half track, and then found a NOS packed, and preserved back in the 40's for the US, Israeli military surplus wheel cylinder on Ebay.
That let me kick the brake project down the road a bit, but then the other side went, and I didn't have as much luck with the other side...
Re: 1961 Ford F500 project.
Posted: Wed Sep 14, 2022 7:56 pm
by JSinMO
@Eugen. I kinda tuned this into a “I can’t see the forest because of all these tress” situation! I know I’m in the beginning stages of this project but sometimes patients is a virtue that flat out escapes me. I have had long duration projects as I’m sure most of us have. I think my frustration on this one comes from seeing how close this truck could be to running down the road again but yet so far! So all that to say yes your story helps. I needed some perspective, and maybe a reminder that all projects don’t just fall into place! Thank you, I appreciate it.
Re: 1961 Ford F500 project.
Posted: Wed Sep 14, 2022 8:15 pm
by JSinMO
Toolslinger wrote: ↑Wed Sep 14, 2022 10:53 am
If you run into any additional oddball brake issues, I used White Post Restorations to rebuild/sleeve my obscure wheel cylinders on the '48 Diamond T. All done in brass, so I don't have to worry about that again... I recall they also did the hydro boost systems, but I didn't need that at the time. (probably should have done it just because)
I'm still very slowly trying to get the '65 F750 to the point I could get it on the road. Air brakes, so different problems... Tires, however, are the same kinda headache. No problem finding rubber, but the cost is crazy. The wheels are lock ring, so not the same issue as widow makers. Hoping I can just come up with some 22.5's and be done with it... At least I have Dayton's, so it should be relatively simple once I get some cash set aside for it.
Thank you, I’ll keep White Post in mind. I talked to a fellow yesterday about rims and brake parts. I believe he’s in Connecticut. So I think at this point I have at least sourced everything thing I should need for the brake system. He specializes in the old Fords so if you still need thing for your F750 maybe he could help. Here’s a link to his website, I called his shop number.
http://www.chuckstrucksllc.com/startframe.htm
I would also like to run the 22.5 tires. I can’t commit to that until I’m sure of what rims I’m going with, but yes the price is a bit painful! I don’t plan on putting a ton of miles on the truck so I’m hoping the price is worth it to have tires that will last quite awhile.
Re: 1961 Ford F500 project.
Posted: Wed Sep 14, 2022 11:25 pm
by Timj
I think I would plug away at what you can come up with for wheels first. If you can get into a common sized wheel, then you may be able to find good used take offs for tires.
I've been able to get some good take offs from a couple of tire outfits. My drill rigs don't get many miles on them, tires fail from age with full tread so, good take offs has been good for me.
Re: 1961 Ford F500 project.
Posted: Thu Sep 15, 2022 7:15 am
by Toolslinger
Take offs are likely a good choice. The Diamond T is on the 3rd set of new tires since we owned it. Probably the 4th since it was new. Gotta be at least 20 years since we did them last time, and they're starting to crack. Tread is perfect. I think we've put 25, or 30k on those 3 sets of tires. Unfortunately, those are 10.00-20's as well. Those I would probably pony up the cash for the same tires rather than swapping rims, and for sure those would be the last set that I would need.
The Ford, I don't really care what it's running as long as they hold, and can drive. They could be bald, as I'll probably just run chains on the rears when I'm moving around the farm. (my folks bought brand new chains for the Diamond T when they got it, and they've never been used, so might as well get some use out of them) That rig isn't going down the road except to a truck show at some point, and that's only 20 miles. Nobody will be looking at the truck, it'll be there for the crane.
It would have been nice if my interior was as nice as yours though. Battle scars on the exterior are fine, but the interior has been attacked by mice, mud wasps, and water from holes in the roof from where they had beacon lights I guess. Tape and silicone has stopped the water for now. My driver door glass is shattered as well. Don't know why it's still holding, but I close that door VERY gently. Entire electrical system is a train wreck as well. Not looking forward to that project.
Re: 1961 Ford F500 project.
Posted: Thu Sep 15, 2022 12:06 pm
by Jancoe
Don't waste your time looking for wheels. You are not going to find them. I spent countless hours searching. We purchased 22.5 wheel blanks. I think we did 7 wide on front and 8 wide on rear. Cut the centers of original wheels out and they will be snug right into place on the 22.5.. we went with 235/85r22.5 with the f6. Tack weld it and spin it on a front hub of the car to make sure it's straight and weld them up. We did ours and it drives great down through road. My phone crashed a few weeks ago so I've lost all my pictures of the process.the 22.5 are the way to go.
Sent from my SM-S906U using Tapatalk
Re: 1961 Ford F500 project.
Posted: Thu Sep 15, 2022 12:26 pm
by Jancoe
Here's a few photos I found when we started the process.


Sent from my SM-S906U using Tapatalk
Re: 1961 Ford F500 project.
Posted: Thu Sep 15, 2022 9:53 pm
by JSinMO
Thanks @Jancoe I’m glad you had those pictures
Re: 1961 Ford F500 project.
Posted: Fri Sep 16, 2022 12:21 pm
by puttputt
I'm in the same boat regarding my tow truck. It is badly in need of all 4 tires. Sure doesn't warrant new tires.
Re: 1961 Ford F500 project.
Posted: Sat Sep 17, 2022 1:38 pm
by Jancoe
I should clarify a little as to what we did to the wheels. We essentially left a band of metal that's riveted to the center of the wheel. The bead seal lip was cut off up close to the center. The same for the back side. Cut off the inner half of 2 piece flange. One of those pics we ground off the rivets attempting to remove the outside ring on the wheel center. We left the rivets alone and created a "metal band" and plug welded those and is a spare now. This band that was left made the wheel center slip perfectly tight into the wheel blank. Set it to our desired offset and kept tacking it and spinning it on the front hub. A little jig wat made to hold true. It worked good. Find some used rv motorhome 22.5" tires. When I eventually get back over to their place I can get you finished photos. This 5 on 8" lug pattern is difficult to find.
Sent from my SM-S906U using Tapatalk
Re: 1961 Ford F500 project.
Posted: Sat Sep 17, 2022 11:06 pm
by JSinMO
Jancoe wrote: ↑Sat Sep 17, 2022 1:38 pm
I should clarify a little as to what we did to the wheels. We essentially left a band of metal that's riveted to the center of the wheel. The bead seal lip was cut off up close to the center. The same for the back side. Cut off the inner half of 2 piece flange. One of those pics we ground off the rivets attempting to remove the outside ring on the wheel center. We left the rivets alone and created a "metal band" and plug welded those and is a spare now. This band that was left made the wheel center slip perfectly tight into the wheel blank. Set it to our desired offset and kept tacking it and spinning it on the front hub. A little jig wat made to hold true. It worked good. Find some used rv motorhome 22.5" tires. When I eventually get back over to their place I can get you finished photos. This 5 on 8" lug pattern is difficult to find.
Sent from my SM-S906U using Tapatalk
Thank you Jancoe. I’ve got feelers out all over the place to see if I can come up with rims. I have several places to call next week too. I don’t hold much hope, but you never know. I appreciate the knowledge on this. I’ll be referring to it if and when I make a set.
Re: 1961 Ford F500 project.
Posted: Fri Sep 30, 2022 10:22 pm
by JSinMO
I’m slowly but surely collecting pieces and parts to get back on the road. A lot came in today. I thought we would do an unboxing and see what we got.
The brake booster finally came in. It’s rebuilt and ready to go back on the truck! The price was as quoted, $137.99.
New master cylinder arrived as well. So now I’m down to lines and hoses. Then I’ll make a decision on the wheel cylinders.
The 3/4 drive extension and Budd socket with 1 1/2 hex for the outer lug nuts and 13/16 square for the inner lug arrive from Amazon this after noon.
Along with something on the end in the picture that I’ve been wanting to add to shop for awhile.
@Eugen mentioned awhile back that he picked up a plasma cutter I’ve really been thinking it would be quite handy to have one around here too. This one was on sale so I grabbed it! I need to wire in a 220 outlet but it will also run on house current so I tried it, looks like it will be a nice addition!
I also picked up spark plugs, plug wires, and filters. I ordered and carburetor kit that should be in next week.
So we’re getting close to being ready to dive in and get this project going!
Except for the wheels, I’ve said before that
@Jancoe was right about not finding rims anywhere. But I’ve kept on trying anyway in the hopes I would stumble onto some. I’ve made contact with individuals and companies all over North America, but just as he said would happen I’ve come up empty. I still have a couple of calls out there I’m waiting to here back on but I’m not expecting good news. So I’ve also been developing my plan B. I’m going to try taking a different approach. I’ve spoke with mechanics, tire and wheel guys, and a custom car builder. They all agree that if I can find modern rims with the right setback they can be redrilled for my bolt pattern. The customer car guy gave me a lead for a retired machinist and old school hot rodder. I met with him today and asked his opinion. He says it will work fine and he’s willing to help me. So now the search will be expanded to look for modern rims to fit a 9R22.5 tire with the right setback that we can redrill to look like this.
.
I’ll end this update / truck ramble here for now. It was quite an exciting day for me with all this arriving at once!
Too be continued….
Re: 1961 Ford F500 project.
Posted: Sat Oct 01, 2022 3:35 pm
by Eugen
That is great progress I would say. One step at a time you get that truck in great shape!
I hope you find that cutter decent. I still haven't tried it on 220V. Looking forward to you trying it!
Re: 1961 Ford F500 project.
Posted: Tue Oct 04, 2022 9:20 pm
by JSinMO
I’ve had the lug nuts soaking in Deep Creep for three weeks. I though I’d try to see if they would come loose tonight. Nope, they are STUCK.
.
Now I get to see if Craftsman still warranties there tools. A 1/2 inch bar is all I had . I was hoping they would come loose with out getting rough with them. I may have to step up to a 3/4 breaker bar. I didn’t want to use heat because I was worried about taking the temper out of the lug nuts. It’s looking like I will have too.
Do you guys have any tricks to loosen stuck rusty nuts and bolts?
Re: 1961 Ford F500 project.
Posted: Tue Oct 04, 2022 10:13 pm
by Eugen
Jeff, heat it up with a plumber propane torch or with your regular torch but don't let it go red at all, you just want to get it hot like muffins out of the oven hot. That way tempering doesn't change. You only need the metal to expand a tiny bit. It's how I got that backhoe cylinder open, and it was torqued at1000 ft-lb.
If you have an impact gun some hammering also helps. Otherwise some careful knocking with a hammer would also help.
But just a little heat might be enough. Then the 3/4 breaker bar (with cheater pipe maybe) will open it, I'm 100% sure.

Re: 1961 Ford F500 project.
Posted: Wed Oct 05, 2022 12:25 pm
by Jancoe
I do believe torque spec was 450-500 ft lbs on the lug nuts but I can't remember for sure. I do recall having left hand threads on drivers and right hand on pass side. Although I think that was for the dual rear wheels with the 2 piece lug nuts. I can't remember. Good luck getting them off. We had trouble servicing the stock brakes. There is a process to follow to ensure proper brake shoe contact with the drums. Make sure to get your shoes in spec.
Sent from my SM-S906U using Tapatalk
Re: 1961 Ford F500 project.
Posted: Wed Oct 05, 2022 8:38 pm
by JSinMO
Thanks guys! Just in case anybody has Craftsman tools Lowes does honor the lifetime warranty. I swapped out for a new breaker bar today. I also swung by Hobo Fright and grabbed a 3/4 drive breaker bar. So when I get time to work on the truck again I will try some heat, maybe an impact gun. I also have an air hammer with a flat body dolly attachment I might try that too.
@Jancoethe drivers side front studs are clearly marked with an L. I assume the rear drivers side duals are left hand threads as well. I know the passenger side front is a right hand thread I got for out of five of them loose. That 450 to 500 ft lbs sounds right.
Re: 1961 Ford F500 project.
Posted: Thu Oct 06, 2022 12:10 pm
by puttputt
The rear wheels on the left hand side will be left hand threads as well. But, maybe somebody changed them to right hand thread at some point. I know when I worked at the Chrysler dealership back in the day, they did away with the left hand threaded studs and you could only get right hand as a replacement. Which made it fun if a person didn't replace the whole set when one was damaged. It could be that it was the same way at Ford, in that you had to buy right hand replacement studs. If they aren't marked with an L like the front, it makes one wonder. I know on my Dodge they are the original studs and the rear are marked with an L as well as the front.
Re: 1961 Ford F500 project.
Posted: Sat Oct 08, 2022 8:02 pm
by JSinMO
I decided to give it a go this afternoon and see if these lug nuts would budge. I pulled out the torch set, electric impact, air impact, and the 3/4 breaker and a pipe.
I heated 2 lug nuts on the passenger side and still no luck.

so I moved to the drivers side and just gave it a go with the breaker bar and pipe. I can confirm all on the drivers side are left hand threads because that all came loose!

I went back to the passenger side and got three of them loose. The two that are left I can’t budge. I guess for now I’ll go back to soaking them and see what happens.
The next problem will be getting the inner lugs loose, they look rusty! Also the socket I ordered was supposed to handle the outer hex lug and inner square lug but it’s too deep for my lugs so I’ll have to come up with some thing else.
The problem with working with bigger stuff is you have to have bigger heavier tools. Have I mentioned lately having a loader is mighty handy?!
Now that I have one of the duals off I can bring it in and get some measurements and make a pattern for the lug holes and center hole, then I think I can start searching for for rims I can make work.
So as it stands today I have 3 of 6 wheels loose. Im gonna call it a partial victory.
Re: 1961 Ford F500 project.
Posted: Sat Oct 08, 2022 11:26 pm
by Eugen
That's good progress in my books, Jeff. Like you, I had to get bigger tools to work on the backhoe. I'm curious about those two lug nuts that wouldn't budge. Did you decide to not force the breaker bar, was it bending?
Re: 1961 Ford F500 project.
Posted: Sun Oct 09, 2022 12:18 am
by JSinMO
Eugen wrote: ↑Sat Oct 08, 2022 11:26 pm
That's good progress in my books, Jeff. Like you, I had to get bigger tools to work on the backhoe. I'm curious about those two lug nuts that wouldn't budge. Did you decide to not force the breaker bar, was it bending?
I gave it all the force I could muster. I could feel the bar starting to flex with no movement of the nuts. It was the end of the day so I decided to stop there. I thought about putting the backhoe on it and giving it the weight of the 648, but I sure don’t want to break a stud and I’d rather not break the bar so I’m not sure what’s next at this point.
Re: 1961 Ford F500 project.
Posted: Sun Oct 09, 2022 6:57 am
by DavidBarkey
@JSinMO
Have you tried ? hitting the face of the nut ? Take a piece of pipe that will fit over the nut tightly enough to hold it self in place . ( you may need to hold it in place with a clamp or something . This pipe will hold and centre the next pipe/bar with a re-leaf hole in the end/old socket . So as not to damage the thread in the nut or on the stud . This will allow you to swing a sledge and strike it hard . The shock will help fracture the hold of rust loosen the grip of the taper on the nut . If your aim is like mine , place wood block in front of the other stud to protect them .
Re: 1961 Ford F500 project.
Posted: Sun Oct 09, 2022 7:51 am
by Toolslinger
Every time I see/read about people struggling with old, stuck studs, I'm glad I have Dayton hubs/rims. Lots lower torque involved... They have their own headaches, but not usually the studs.
And now I'm sure I've cursed myself on the day I have to pull the F 750's wheels off.
Re: 1961 Ford F500 project.
Posted: Sun Oct 09, 2022 9:45 am
by Harry
I have a book that I purchased by a man from Quebec. I can't remember his name at the moment, but the book was about using heat to expand and shrink metal. The application for removing a nut was as follows. Heat the nut in one area only not the whole nut. Heating the whole nut would add heat to the bolt also. He referred to the heating as giving it a hot shot, which was making it red hot. Heating in only one area expands the nut. You have to act quickly so I would suggest using an oxy acetylene torch heating to red hot then quickly use your impact to remove the nut. I also have found that sometimes the impact does not work, and I use a breaker bar with a piece of pipe on the handle.
I hope this helps you in your application.
Keep the Peace


Harry
Re: 1961 Ford F500 project.
Posted: Sun Oct 09, 2022 11:18 am
by Eugen
Great point @Harry , about heating the nut only on the outside, so that the nut expands around the stud.
@JSinMO , here's another couple of tricks I used. One, go with the impact gun forward and backwards, several times.
The other one is to touch weld some pieces of metal on your socket, all around it. There are sockets with a very thick wall to make the momentum of the impact larger. The heavier the socket becomes the bigger the impact. This is what I used to get the crankshaft bolt undone on the truck.
I think the main idea with rust frozen nuts is to apply great force only AFTER the nut was shaken a bit from the stud, otherwise the stud just snaps.
Re: 1961 Ford F500 project.
Posted: Sun Oct 09, 2022 4:21 pm
by Eugen
Jeff, look up weighted socket. Lisle Harmonic Balancer Socket is such a thing.
Re: 1961 Ford F500 project.
Posted: Sun Oct 09, 2022 5:10 pm
by JSinMO
I wanted to thank all of you for your knowledge and comments, and tell you how much I appreciate them!

I decided to try the percussive maintenance path first. I used sockets and a 3 lbs hammer to strike the nut and then the rim. Next I got the air hammer out and went around the lugs.
Success! They came loose. I took some measurements and made a couple of templates to take with me when I start looking for rims.
So now I have the 10 inner lugs to fight with and then I can move on. I have to wait till I come up with a square 13/16” socket then we’ll see how they come out. Thanks again guys!
Re: 1961 Ford F500 project.
Posted: Fri Oct 21, 2022 9:56 pm
by JSinMO
I started making the hard lines for Herbie this evening. Been quite some time since I made brake lines.
Sure enough I rightly and properly kinked this one beyond use


Oh well I’ll save the fittings and try again. I have the brake hoses ordered so hopefully I’ll be mounting things soon and seeing if we have brakes!
I’ve found 2 old salvage yards close to me looks like they have stuff stuff from the 1930s to at least the 1980s. I missed a set of rims that would have bolted right on the truck by 3 days at the first one!


He does have a set of rims for 19.5 tires that I could modify fairly easily but that’s a much shorter tire I’m afraid it would affect my top speed on a truck that already will be slow. There’s a lot of cool stuff there and he said I could come and dig around anytime. I’m headed to the 2nd one first thing in the morning it looks promising. Keep your fingers crossed for me! I’m hoping I’ll be coming home with some workable rims!
Re: 1961 Ford F500 project.
Posted: Sat Oct 22, 2022 12:07 am
by Eugen
Fingers crossed Jeff, hope you find something useful there. I'm sure you'll find what you need eventually.
I never flared hard lines but I'm sure if I did I'd screw some of them.
Re: 1961 Ford F500 project.
Posted: Sat Oct 22, 2022 6:14 am
by DavidBarkey
Eugen wrote: ↑Sat Oct 22, 2022 12:07 am
Fingers crossed Jeff, hope you find something useful there. I'm sure you'll find what you need eventually.
I never flared hard lines but I'm sure if I did I'd screw some of them.
It does take practice and the right tools for bending makes all the difference in the world .
Re: 1961 Ford F500 project.
Posted: Sat Oct 22, 2022 10:14 pm
by JSinMO
DavidBarkey wrote: ↑Sat Oct 22, 2022 6:14 am
Eugen wrote: ↑Sat Oct 22, 2022 12:07 am
Fingers crossed Jeff, hope you find something useful there. I'm sure you'll find what you need eventually.
I never flared hard lines but I'm sure if I did I'd screw some of them.
It does take practice and the right tools for bending makes all the difference in the world .
I really does take practice. I had forgotten the “feel” of it when making bends. I’m starting to come back around. Like a lot of things good flairs are made in the prep. I took a small piece and practiced. Made a few ugly ones before I got back in the swing!
No rims today but I did come away with some more ideas. And I may go after those 19.5’s I’d be about 3” shorter than the current tires not sure how much difference that would really make.
Re: 1961 Ford F500 project.
Posted: Sat Oct 22, 2022 11:12 pm
by Eugen
I can't think of any serious downside with the shorter rims. Perhaps there's a tire with taller wall for the shorter rims?
Re: 1961 Ford F500 project.
Posted: Sun Oct 23, 2022 6:04 am
by DavidBarkey
@JSinMO measure the circumference of the old tire and the 19.5 " tire . Divide one into the other and you have a factor to multiply mph with to find what it will be with a shorter tire .
Re: 1961 Ford F500 project.
Posted: Sun Oct 23, 2022 8:18 pm
by JSinMO
DavidBarkey wrote: ↑Sun Oct 23, 2022 6:04 am
@JSinMO measure the circumference of the old tire and the 19.5 " tire . Divide one into the other and you have a factor to multiply mph with to find what it will be with a shorter tire .
Thank you Dave. I took some measurements but I’m not sure about the 19.5 tire. I looked at some charts online. It looks like I will lose 5 to 8 MPH at highway speed. Not too worried about that on the back roads. I’ll just have to stay in the slow lane on the occasions I have to get on the 4 lane highway.
I continued working on the brakes today looking at the numbers I think I will have over 30 feed of hard line!
I thought I should make sure the check valve was working so I hooked my little vacuum pump up and it wouldn’t hold a vacuum. I took the valve apart and cleaned it up. On a side note this is another reason I like working on old stuff, you can fix a lot of components instead of just replacing them.
I reassembled and bench tested and it works fine. Hook everything back up and no vacuum! Upon further inspection I see the problem
the hard line has a hole rubbed in it! This thing hasn’t had power breaks in a long time. I’m gonna pitch it and run a hose to the booster.
Theres todays old truck ramble!
Re: 1961 Ford F500 project.
Posted: Mon Oct 24, 2022 6:12 am
by DavidBarkey
@JSinMO The ability to rebuild or repair is so much more satisfying than throughing parts at it .
Re: 1961 Ford F500 project.
Posted: Mon Oct 24, 2022 9:29 am
by Eugen
Good work Jeff! Will you use some type of hose that's resistant to collapse under vacuum instead of the steel line?

Re: 1961 Ford F500 project.
Posted: Mon Oct 24, 2022 12:52 pm
by Jancoe
Its great when you just disassemble a part, clean it up, maybe replace a bushing or small piece if needed and put it back together and it works.
As for those wheels hopefully your on track finding some replacements. There was a write up somewhere on the net that had listed all vehicles with that bolt pattern. I can't find it now.
The wheel blanks we used were from
www.heywheel.com. If I was close to you I'd have helped you get those wheels welded up.
I found out the source of parts we used was from
http://www.chuckstrucksllc.com/. These guys were great.
Sent from my SM-S906U using Tapatalk
Re: 1961 Ford F500 project.
Posted: Mon Oct 24, 2022 9:17 pm
by JSinMO
Eugen wrote: ↑Mon Oct 24, 2022 9:29 am
Good work Jeff! Will you use some type of hose that's resistant to collapse under vacuum instead of the steel line?
I don’t have the numbers in front of me, but I don’t think it’s pulling that much vacuum so I’m going with the easiest first. Just standard 1/2” ID vacuum hose and we’ll see what happens.
@Jancoe i got my brake hoses from chucks trucks! Your right he is great to work with. I may be getting some other things from him as well.
I appreciate that you would help if we were closer. Reading what you wrote and looking at your pictures I see how it should go. My welding ability is not good enough at this point to pull it off. I may still go that route and hire the welding out. I’ll come up with a solution, just not quite there yet!
Re: 1961 Ford F500 project.
Posted: Mon Oct 24, 2022 11:19 pm
by Spike188
Thinking back 40 years ago and with a bit foggy memory, on Chevy 60 series trucks we used a short piece of hose to connect the vacuum lines when modifying trucks. If the F500 solid line integrity is good enough , we would have cut out the bad section, supported the steal line ends near the cut sections, and jumped the gap with a length of vacuum hose. We usually robbed the hose off of a Surge milker.
 Viewed 6585 times")
We had a 61 235 Chevy set up a with a petcock tapped into the intake manifold and 30 feet of milker hose run to the stalls. When the electrical power was out the pick was pulled up to the barn and attached to barn vacuum system. 2 pail milkers could be ran off of the engine manifold vacuum if the milker was turned on s.l.o.w.l.y. The 5 gallon milker pail vacuum had to draw down. When the engine rpm levelled out the suction cups could be gently moved to the cows' teets while avoiding opening the suction line to the teet cups. Do it wrong, the pickup dies, and the milker falls off the other cow. If your lucky the milker on the second cow didn't open and cause you to cry over spilt milk. If the milker dumped the cats would love you and dad would go

.
Re: 1961 Ford F500 project.
Posted: Tue Oct 25, 2022 4:56 am
by Toolslinger
Vacuum runs all over the place on the '48 Diamond T. Shifts the rear, shifts the speedometer, brake booster, wipers, air horn pump etc... Anyplace I can get away from hose, and put in a hard line, I'd put in a hard line. Every little bit of flex in a hose is going to add to any delay or weakness in vacuum.
I kinda prefer the air system on the F750 over the vacuum on the T. Not that I've sorted out that mess yet, but at least I can hear those leaks a lot easier...
Re: 1961 Ford F500 project.
Posted: Tue Oct 25, 2022 7:41 am
by Timj
Spike188 wrote: ↑Mon Oct 24, 2022 11:19 pm
Thinking back 40 years ago and with a bit foggy memory, on Chevy 60 series trucks we used a short piece of hose to connect the vacuum lines when modifying trucks. If the F500 solid line integrity is good enough , we would have cut out the bad section, supported the steal line ends near the cut sections, and jumped the gap with a length of vacuum hose. We usually robbed the hose off of a Surge milker. image.png We had a 61 235 Chevy set up a with a petcock tapped into the intake manifold and 30 feet of milker hose run to the stalls. When the electrical power was out the pick was pulled up to the barn and attached to barn vacuum system. 2 pail milkers could be ran off of the engine manifold vacuum if the milker was turned on s.l.o.w.l.y. The 5 gallon milker pail vacuum had to draw down. When the engine rpm levelled out the suction cups could be gently moved to the cows' teets while avoiding opening the suction line to the teet cups. Do it wrong, the pickup dies, and the milker falls off the other cow. If your lucky the milker on the second cow didn't open and cause you to cry over spilt milk. If the milker dumped the cats would love you and dad would go
.
I remember my father and grandfather doing this with my Dad's old Ford pickup when the power was out.
Re: 1961 Ford F500 project.
Posted: Tue Oct 25, 2022 8:13 pm
by JSinMO
Spike188 wrote: ↑Mon Oct 24, 2022 11:19 pm
Thinking back 40 years ago and with a bit foggy memory, on Chevy 60 series trucks we used a short piece of hose to connect the vacuum lines when modifying trucks. If the F500 solid line integrity is good enough , we would have cut out the bad section, supported the steal line ends near the cut sections, and jumped the gap with a length of vacuum hose. We usually robbed the hose off of a Surge milker. image.png We had a 61 235 Chevy set up a with a petcock tapped into the intake manifold and 30 feet of milker hose run to the stalls. When the electrical power was out the pick was pulled up to the barn and attached to barn vacuum system. 2 pail milkers could be ran off of the engine manifold vacuum if the milker was turned on s.l.o.w.l.y. The 5 gallon milker pail vacuum had to draw down. When the engine rpm levelled out the suction cups could be gently moved to the cows' teets while avoiding opening the suction line to the teet cups. Do it wrong, the pickup dies, and the milker falls off the other cow. If your lucky the milker on the second cow didn't open and cause you to cry over spilt milk. If the milker dumped the cats would love you and dad would go
.
Great story spike! That’s a great example of ingenuity at work! And it reminds me of being at home as a kid, i can think of only a few things that broke , stopped working, etc that my dad couldn’t find a way to get it going to get the job done.
In the F500’s case the hard line is pretty bad. I had the idea to cut out the bad section but I need to poke around on it and see how solid the rest of it is.
@Toolslinger I think the brake booster is the only thing that needs vacuum on this truck, luckily. I don’t blame you for running hard line, I sure wouldn’t want to keep chasing all that hose!
Re: 1961 Ford F500 project.
Posted: Sat Oct 29, 2022 9:47 pm
by JSinMO
We have been having pretty good weather so I figured I’d keep doing what I can on the truck since it’s outside, and continue on the 446 in the shop once it gets cold.
I’ve got all the lug nuts loose and the wheels ready to come off.
The brake hoses came in and are installed alone with 33 feet of brake like. I still need 4 or 5 feet of line to make it to the passenger rear wheel, then it will be time to start bleeding the system and looking for leaks and/or bad wheel cylinders.
I took
@Spike188 advice and checked over the vacuum hard line to the booster. Other than the rub hole it’s pretty solid. So I just cut out the bad spot and placed a hose in the line. Installed it on the truck and tested it and now I’m holding vacuum from the check valve down to the booster!
You guys know how it is when you get into a project. It can take you down roads you didn’t expect, this one is no exception. I was working in a small town about 40 minutes away last week and guess what I drove past sitting on an empty lot? An early 1970’s Winnebago Chieftain! And guess what was on it? 8.00x19.5 rims with my bolt pattern! Lucky I had some time to spare so I started knocking on doors till I found the owner. Long story short I’m now the semi-proud owner of a worn out RV!
 Viewed 6404 times")
The gentleman sold me the rims but I have to take the RV with me! I paid $500 for 7 rims that can bolt right on Herbie. So $71.42 a rim I don’t think I could beat that price building rims for it. The left and right lugs nuts are the same so I’ll have an extra set, 2 headlights that I think will fit, as well as, 2 brake boosters that will go on the shelf as spares! The rest of the Winnebago is going for scrap. I haven’t looked at the engine but I think these came with Chrysler V8’s unfortunately it went through a flood so its probably junk. Here’s one of the 19.5’s setting next to the 8.25x20 on the truck.
I found a set of tires that have a 34”diameter, so if I did the calculations right depending on vehicle speed I should only loose 3 to 5 MPH with the smaller tire, I’m quite happy with that!
So there’s todays truck update / ramble.
Quite an exciting week, with some progress!
Thank you guys for following Herbie’s story!
Re: 1961 Ford F500 project.
Posted: Sat Oct 29, 2022 11:34 pm
by Timj
awe, you gotta fix the camper.

. tell
you are going to take up camping.

you may need a place to live.

Re: 1961 Ford F500 project.
Posted: Sat Oct 29, 2022 11:44 pm
by Eugen
He he, I told you it may take time but look, you found rims and more! I predict that camper will have more parts to donate! Nice find!
Re: 1961 Ford F500 project.
Posted: Sun Oct 30, 2022 12:30 am
by JSinMO
Timj wrote: ↑Sat Oct 29, 2022 11:34 pm
awe, you gotta fix the camper.
. tell
you are going to take up camping.
you may need a place to live.

unfortunately this one is well past rehabilitation, but your right, if I keep showing up with stuff I probably will need a place to sleep!
I actually thought about selling the body to some one that wanted to park it and use it at deer camp until I took a look inside.


Im just going for the parts and staying away from the mold!
Re: 1961 Ford F500 project.
Posted: Sun Oct 30, 2022 12:40 am
by JSinMO
Eugen wrote: ↑Sat Oct 29, 2022 11:44 pm
He he, I told you it may take time but look, you found rims and more! I predict that camper will have more parts to donate! Nice find!
You were right, And I’m glad you were!
I wish I was more patient, but then again it may be the lack of that virtue that helps me push projects forward! I don’t know.
I’m kind of excited the get the body off to see if there is any rusty gold underneath that could be useful to me!
Re: 1961 Ford F500 project.
Posted: Sun Oct 30, 2022 6:21 am
by DavidBarkey
Re: 1961 Ford F500 project.
Posted: Sun Oct 30, 2022 5:58 pm
by Eugen
JSinMO wrote: ↑Sun Oct 30, 2022 12:40 am
You were right, And I’m glad you were!
I wish I was more patient, but then again it may be the lack of that virtue that helps me push projects forward! I don’t know.
I’m kind of excited the get the body off to see if there is any rusty gold underneath that could be useful to me!
I don't know Jeff, patience is not something that I got naturally, but I was sure you would eventually find the parts. It’s good progress!
Re: 1961 Ford F500 project.
Posted: Sat Nov 12, 2022 6:41 pm
by JSinMO
Well disassembly started on the old RV today. 30F with snow flurries motivated me to get going before winter sets in! I think this is a Dodge 440, it went under water and I’d be shocked if it wasn’t locked up, what a shame.
.
The wheels on the bus no longer go round and round!
For now the go in the back of the truck and back to the shop to get the old tires off, prepped, painted, and eventually new tires on.
I also got headlights, blinkers, a full set of R and L lug nuts, and a few other things. Not a bad haul.
1 down, 6 to go!
I must be getting older, this little away mission kicked my butt! I quit for the day!

Re: 1961 Ford F500 project.
Posted: Sat Nov 12, 2022 7:09 pm
by Eugen
Lots of goodies you can use Jeff. Taking a risk paid off. But yeah, working in the cold and especially tire irons is not easy going. More rewarding to rest at night!
Re: 1961 Ford F500 project.
Posted: Sun Nov 27, 2022 4:04 pm
by JSinMO
Haven’t made much progress on Herbie the truck lately. Believe it or not the the dust covers on the front hubs are stuck! They screw in and they won’t budge. Getting the hubs off it the next step I don’t want to pressurize the brake system until I get the bearings greased or replaced. So the covers are soaking and the search is on for a reasonably priced 2 3/8 socket to fit them. I did get all the old tires off the 19.5 rims I’ll be using for the truck.
It’s a shame I couldn’t use them as they have great tread yet, but they are so dry rotted they’re useless.
How long has it been since you could get Sears branded tires?!
I hate having old tires laying around, we were trying to think of something useful to do with them before I take them to the dump. My wife suggested we get goats and let them climb on the tires!
Her idea was certainly creative, but does anybody have a better use for old tires?
Re: 1961 Ford F500 project.
Posted: Sun Nov 27, 2022 4:29 pm
by DavidBarkey
@JSinMO How many large trees do you have . There are a lot of swings there . Or you could just Re-tire .
Said The Re-tread
Re: 1961 Ford F500 project.
Posted: Sun Nov 27, 2022 4:56 pm
by JSinMO
DavidBarkey wrote: ↑Sun Nov 27, 2022 4:29 pm
@JSinMO How many large trees do you have . There are a lot of swings there . Or you could just Re-tire .
Said The Re-tread
forget the swings, I like the Re-tire idea!
Re: 1961 Ford F500 project.
Posted: Sun Nov 27, 2022 8:31 pm
by Eugen
JSinMO wrote: ↑Sun Nov 27, 2022 4:04 pm
So the covers are soaking and the search is on for a reasonably priced 2 3/8 socket to fit them.
When you work on big stuff you suddenly realize there's a whole universe out there of big tools. This is how I felt when I started working on the big backhoe. Then I found a whole bunch of big sockets on clearance at a local store, for prices like 1.99 and up to 3.99. Except the 1-7/8 which I really needed! Got that at regular price.
I hate having old tires laying around, we were trying to think of something useful to do with them before I take them to the dump. My wife suggested we get goats and let them climb on the tires!
I like how your wife thinks Jeff! Get goats!
Re: 1961 Ford F500 project.
Posted: Sun Nov 27, 2022 9:08 pm
by Spike188
Line your yard with them half buried vertical and paint white.
Present them to your spouse as a Christmas present.
Re: 1961 Ford F500 project.
Posted: Sun Nov 27, 2022 11:22 pm
by JSinMO
Eugen wrote: ↑Sun Nov 27, 2022 8:31 pm
JSinMO wrote: ↑Sun Nov 27, 2022 4:04 pm
So the covers are soaking and the search is on for a reasonably priced 2 3/8 socket to fit them.
When you work on big stuff you suddenly realize there's a whole universe out there of big tools. This is how I felt when I started working on the big backhoe. Then I found a whole bunch of big sockets on clearance at a local store, for prices like 1.99 and up to 3.99. Except the 1-7/8 which I really needed! Got that at regular price.
I hate having old tires laying around, we were trying to think of something useful to do with them before I take them to the dump. My wife suggested we get goats and let them climb on the tires!
I like how your wife thinks Jeff! Get goats!
I know what you mean about a universe of big tools out there. I knew they existed but I don’t want to have to buy them!
My wife has always wanted goats. I can probably think of a dozen reasons why it’s not a good idea, but the biggest one is she only see livestock as pets. We’re trying to work towards getting some cattle…someday. I told her she’s only allowed to name them Breakfast, Lunch, and Dinner!
@Spike188 i like that tire coffee table!
Re: 1961 Ford F500 project.
Posted: Mon Nov 28, 2022 11:40 am
by Gordy
We’re trying to work towards getting some cattle…someday. I told her she’s only allowed to name them Breakfast, Lunch, and Dinner!
My buddy names his T- Bone, Roast, Hamburger, Steak....
For the tires, I do what you are not supposed to, hang them on fence posts and keep them full of water
OH I also put mosquito dunks (intended for bird baths and small fish ponds) in them, mama mosquito lays her eggs in the tires and the young don't make it out alive
Gordy
Re: 1961 Ford F500 project.
Posted: Sun Dec 04, 2022 3:48 pm
by JSinMO
After looking around and pricing sockets to fit the front hubs I decided in the long run it was more cost effective and handier to have a large socket set. Harbor Freight to the rescue!
This is a 1” set and for those of us who don’t use this size often, they’re rather large! Here a picture of a 1/2” drive ratchet next to a 1”
On another note if I ever get into a project where I need a 3 1/2” socket would one of you be kind enough to try and talk me down off the ledge as I may have gotten in over my head!
Now then, with a little heat, a little penetrating oil, some tapping, and a wrench that fits, the hub caps came off!
The next step as time allows will be to get the front drums off the truck, re grease the bearings and at least inspect the brakes.
Since it was a nice day I got my trusty work platform out and cleaned up one of the 19.5 rims that will be going on the truck.
Here’s a question for the group. What temperature is too cold to paint in? I’m not going for a showroom finish, these are old rims going on an even older truck. The criteria is the paint has to stick and they have to be black. I usually try to plan painting for spring or summer but I’m not sure I can wait to mount up the tires! What are your thoughts on painting in cold weather?

Re: 1961 Ford F500 project.
Posted: Sun Dec 04, 2022 3:57 pm
by thebuildist
It's all about sprayability and drying time. The rattle cans recommend 50°. And if that temperature it will easily spray and fairly quickly dry.
But you can get away with down near freezing. It will take three or four times longer to dry, but for something like this it should be fine.
But as you get down below freezing, it just doesn't spray very well.
If you're talking about brush painting oil based paint, I'm afraid I can't help. I don't have much experience with that in colder temperatures.
Bob
Re: 1961 Ford F500 project.
Posted: Sun Dec 04, 2022 4:32 pm
by DavidBarkey
That 3 1/2 socket would make a great cup holder .
As for painting in the winter . Here is a trick for small parts . For a sunny day have a small tent made out of what ever clear plastic . Paint parts , close up tent and leave in the sun for the day .
Re: 1961 Ford F500 project.
Posted: Sun Dec 04, 2022 4:54 pm
by Eugen
that is mighty impressive Jeff! Oh, and a set like that would cost an arm and a leg up here, I think.
Well, guess what. I painted a few parts for the basket case 644 the last few days, in subzero temperatures. Not for looks, but protection. I decided that I can always paint it better later. So I wire wheeled the parts, applied some rust treatment, let it dry well, then spray painted. The paint dried up to touch in about 18 hours, maybe faster but I didn't check. I'll show pics when I get home. Note that it was very late at night and had no patience to do multiple thin coats, so it was pretty runny.
Re: 1961 Ford F500 project.
Posted: Sun Dec 04, 2022 6:04 pm
by propane1
My thoughts. 50 degrees. Even above that this is what I do. But some times I forget. But I normally heat the part I’m going to paint by a propane torch or hair dryer. I don’t mean to get it hot or warm to the touch, just to heat it to get the moisture off it. Have the paint ready as soon as you stop heating. Helps paint to set up a little quicker so lessen the chance of runs. Just what I do. Sometimes.
There now, there’s a uneducated painting ramble.
Noel
Re: 1961 Ford F500 project.
Posted: Sun Dec 04, 2022 6:08 pm
by Eugen
propane1 wrote: ↑Sun Dec 04, 2022 6:04 pm
My thoughts. 50 degrees. Even above that this is what I do. But some times I forget. But I normally heat the part I’m going to paint by a propane torch or hair dryer. I don’t mean to get it hot or warm to the touch, just to heat it to get the moisture off it. Have the paint ready as soon as you stop heating. Helps paint to set up a little quicker so lessen the chance of runs. Just what I do. Sometimes.
There now, there’s a uneducated painting ramble.
Noel
That's a good tip Noel, thanks. I will apply this next time.
Re: 1961 Ford F500 project.
Posted: Sun Dec 04, 2022 7:23 pm
by MattA
Might help to have the paint at room temp before painting?
Re: 1961 Ford F500 project.
Posted: Sun Dec 04, 2022 7:56 pm
by JSinMO
Thanks guys, great tips! I should have mentioned this will be a rattle can paint job. I think a conglomeration of your ideas should make this work.
I’ll keep the paint in the house, and once I’m done cleaning the rims up I could put them in the basement to get them to a good temp. This all depends on the weather of course but a sunny day in the 30sF and my shop heater should get the temp inside into the 60s. I could paint in the shop but I prefer to do it outside, it doesn’t take long for the paint fumes to become intolerable. I do have a roll of clear plastic sheeting so a makeshift tent is doable. I may even get fancy and duct some warm air into it from the shop!
Eugen the price for that socket set here was a little painful too! But once I started pricing out pieces individually, getting the set was cheaper. I was surprised that Harbor Freight had a lifetime warranty as well so even though it is lower quality it made sense to get it.
Thanks again guys, I appreciate it!
Re: 1961 Ford F500 project.
Posted: Sun Dec 04, 2022 9:36 pm
by Eugen
I promised to post a pic. I think this should show that if I got this result without warming up anything you should get better results with the good tips from the guys.
Re: 1961 Ford F500 project.
Posted: Mon Dec 05, 2022 12:38 am
by propane1
Nothing wrong with that paint job Eugen.
Noel
Re: 1961 Ford F500 project.
Posted: Sat Dec 10, 2022 5:01 pm
by DavidBarkey
Re: 1961 Ford F500 project.
Posted: Sat Dec 10, 2022 7:04 pm
by Eugen
DavidBarkey wrote: ↑Sat Dec 10, 2022 5:01 pm
image.png
interesting idea.
Interesting idea. It's all about getting the force to the spot you needed. Good leverage!
Re: 1961 Ford F500 project.
Posted: Sat Dec 10, 2022 7:16 pm
by JSinMO
DavidBarkey wrote: ↑Sat Dec 10, 2022 5:01 pm
image.png
interesting idea.
That would be a great idea to keep with the truck for roadside trouble. I used a jack-stand as a cradle for the wrench and adjusted the height to get mine loose.
Re: 1961 Ford F500 project.
Posted: Sun Dec 11, 2022 6:13 am
by DavidBarkey
Thought it was a neat idea . Like the jack stand idea too. Working in an automotive shop most of my life my go to was always an impact gun and blue flame spanner for the "stuck" ones .
Re: 1961 Ford F500 project.
Posted: Sun Dec 11, 2022 8:49 pm
by JSinMO
DavidBarkey wrote: ↑Sun Dec 11, 2022 6:13 am
Thought it was a neat idea . Like the jack stand idea too. Working in an automotive shop most of my life my go to was always an impact gun and blue flame spanner for the "stuck" ones .
I see a lot of guys using cordless ratchets and impacts a lot. I’m sure it’s more efficient, especially if you’re trying to make a living. My air impact doesn’t have the guts to move the big stuff!
I’ve been very cautious about using heat on lug nuts for years. My dad had a 1969 Chevy single axel dump truck. He heated the lugs up to get them off. Once everything was back together he had a full load going down the highway and every lug either backed off or broke. The duels on the passenger side came off and passed in the median! All we could figure is he got them to hot and took the temper out of them. I do know know that was a hefty tow bill!
That’s been probably close to 40 years ago and it still makes me nervous putting heat on lug nuts!
I found this wrench in the RV. It fits the lugs. But of course it’s broke. Pretty much useless like this. I don’t have the missing pieces. I was thinking about trying to fix it but it might be a fool’s errand.
Re: 1961 Ford F500 project.
Posted: Mon Dec 12, 2022 12:48 am
by Eugen
If you think there's a chance to fix it, why not? Maybe not for the heavy duty stuff but it could still be useful.
As for power tools, I look at it as a time saver. Once my wife convinced me to bring back the cheep no name drill plus impact kit and buy a Milwaukee set. Over time I added a mid-torque 1/2" drive impact, and a ratchet, and a few batteries. The impact can make the difference between a 1/2 day trying to get a bolt off, or a few minutes. This would happen on the car, when sometimes there was no good leverage for power. Not to talk about the frustration when that bolt just doesn't come off. The ratchet is really useful too. You know when you have a lot of bolts to undo, or do? A few seconds per bolt with the power ratchet, instead of half a minute or more. This ratchet I use a lot! No way I want to go back to doing everything manually. Just my preference.
Re: 1961 Ford F500 project.
Posted: Mon Dec 12, 2022 6:11 am
by DavidBarkey
@JSinMO , Yes when the torch comes out , they get replaced . But more often than not , lugs coming loose is one of two things . Lube used on the lugs ,or rust / corrosion on the hub and / or the rim not allowing to seat 100% . Usually all of the above .
Re: 1961 Ford F500 project.
Posted: Mon Dec 12, 2022 6:16 am
by DavidBarkey
@JSinMO
Quote"I found this wrench in the RV. It fits the lugs. But of course it’s broke. Pretty much useless like this. I don’t have the missing pieces. I was thinking about trying to fix it but it might be a fool’s errand.
Get a impact socket the correct size . Cut the bad end off and grind a square that will just fit . The tighter the better and hold it in place with a bit of weld from inside the socket . Then you have something you can keep in truck .
Re: 1961 Ford F500 project.
Posted: Wed Dec 14, 2022 3:34 pm
by JSinMO
DavidBarkey wrote: ↑Mon Dec 12, 2022 6:16 am
Get a impact socket the correct size . Cut the bad end off and grind a square that will just fit . The tighter the better and hold it in place with a bit of weld from inside the socket . Then you have something you can keep in truck .
Excellent idea Dave! It’s a two way wrench so I have to have a hole in both ends for the rod to go through.
So I’m thinking of something like this. Maybe I could weld a socket in and weld in a piece where it’s missing.
So I have a few vacation days I have to take before the end of the year. We’re having a couple of above average temperature days before it gets cold again so I decided to get the rims painted. I had them and the paint in the basement so they wouldn’t be too cold to paint.
As it turned out the temperature was warm enough to open the shop door and give them 2 good coats of paint! Now they can sit till I’m ready to mount tires!
There not perfect by any stretch, but they’ll be the shiniest things on the truck!
Re: 1961 Ford F500 project.
Posted: Wed Dec 14, 2022 4:08 pm
by Eugen
It's coming along nicely Jeff, the rims look good!
Re: 1961 Ford F500 project.
Posted: Wed Dec 14, 2022 4:27 pm
by DavidBarkey
Try a file on the side of the socket . You might be able to drill the socket if you use lube and go slower speed .
Re: 1961 Ford F500 project.
Posted: Wed Dec 14, 2022 4:30 pm
by DavidBarkey
Why is it that every automotive project gets shinny rims and tire before anything else ?
I have to say I too have been guilty of this back in the day .
Re: 1961 Ford F500 project.
Posted: Wed Dec 14, 2022 6:49 pm
by JSinMO
DavidBarkey wrote: ↑Wed Dec 14, 2022 4:30 pm
Why is it that every automotive project gets shinny rims and tire before anything else ?
I have to say I too have been guilty of this back in the day .
[/quote
that does seem to be the way it is! I can only speak for me. In this case it can look like crap and still drive, but not with out wheels and tires!
When I find another socked I’ll try and file it and see if I can drill it.
Re: 1961 Ford F500 project.
Posted: Sat Dec 31, 2022 5:48 pm
by JSinMO
It was a pretty nice day today so I spent some time on Herbie.
Today I pulled a brake drum and took a look at things.
The bearings look fine to me. A clean up and repack with a new seal and back in they go!
The brakes don’t look bad either. The shoes still have some life so I’m gonna run them for now. Anybody want to place a bet on how many wheel cylinders leak when I start bleeding brakes?
A quick cleanup and a Craigslist rebuild pant job and it almost looks like new…from 15 feet away!
I just had time to do one side today, but not a bad way to spend a nice New Year’s Eve!
Re: 1961 Ford F500 project.
Posted: Sat Dec 31, 2022 8:05 pm
by Eugen
A fine job on that Jeff!
Re: 1961 Ford F500 project.
Posted: Sat Dec 31, 2022 8:54 pm
by DavidBarkey
looks good Jeff , all or none will leaks . If none ,quickly go out and play the lottery before your luck runs out .
Re: 1961 Ford F500 project.
Posted: Sat Jan 28, 2023 2:28 pm
by JSinMO
I’m in the shop today trying to get to the wheel cylinders to see how bad it is. Just to recap I have replaced the master cylinder, hydoboost vacuum booster, and all brake lines and hoses so wheel cylinders are basically the last components to go through on the brake system.
I alway get a little nervous when I crib something up to work on. These first two pictures are of my setup. If you see something I should do differently to be more safe please, please point it out.

I have the truck in gear with the brake set, wheels chocked, 1 floor jack, 1 bottle jack, and 1 jack stand at each wheel.
So far I’ve got the front wheel cylinder off and I’m glad I didn’t try to pressurize the system. It’s stuck and it’s a ball of rust
I’ve got it soaking, but it doesn’t look promising. I was hoping to rebuild these since availability of new one are getting kinda scarce, but even if I get the piston out I’m not sure I’ll have anything to work with.
I’m moving to the he back now. I know some of you guys probably have more experience with free float axles than I
do, just wondering if you have a trick to get the cones loose to slide the axel out?
Any tips, suggestions, or comments are sure welcome and appreciated!
Re: 1961 Ford F500 project.
Posted: Sat Jan 28, 2023 2:49 pm
by DavidBarkey
@JSinMO loosen all the nuts off but leave them on a few turns so you do not have to chase the cones . brass drift or hammer and hit the side of the axle flange in a rotating manner until the come loose . Have a catch pan under it so less to clean up after .
Have fun .
Re: 1961 Ford F500 project.
Posted: Sat Jan 28, 2023 5:30 pm
by Eugen
I always felt unsafe with those jacks under the car, what if there's a small earthquake? I use some thick pieces of ash, just thicker than me, just roll them under. I figure if anything happens the car can't fall lower than the logs.
Re: 1961 Ford F500 project.
Posted: Sat Jan 28, 2023 8:36 pm
by JSinMO
It’s been kind of an exciting afternoon!
@DavidBarkey your advice was perfect, some rapping on and around the axle flange and they all popped out! Thank you!
I removed the axel and wrapped the splines in bubble wrap so they don’t get dinged up. I got the brake drum off and cleaned up a little, then removed the 2 wheel cylinder off the back. They were both stuck, but I got them apart pretty easily. I stared to clean them up, and I am thinking these may be able to be rebuilt! The dust boots on the outside and rubber cups on the inside aren’t dry rotted or split and they’re still pliable! I still have a lot of clean up and checking but these may work fine! The front one though, it’s still stuck not sure if it’s gonna come loose.
I had pictures to add but for some reason they won’t upload this evening. If I can I’ll add them later.
@Eugen i here you, I never feel safe enough. I think it’s good I just didn’t like having my jack stands and bottle jacks so spaced out. I tried shaking the truck before I started and it wouldn’t budge. You could probably have a dance party on the bed and it would be fine, but I’m not gonna try!
Pictures are loading now so I’ll try to add them in order.
Re: 1961 Ford F500 project.
Posted: Sat Jan 28, 2023 11:28 pm
by Gordy
JSinMO wrote: ↑Sat Jan 28, 2023 8:36 pm
It’s been kind of an exciting afternoon!
@DavidBarkey your advice was perfect, some rapping on and around the axle flange and they all popped out! Thank you!
I removed the axel and wrapped the splines in bubble wrap so they don’t get dinged up. I got the brake drum off and cleaned up a little, then removed the 2 wheel cylinder off the back. They were both stuck, but I got them apart pretty easily. I stared to clean them up, and I am thinking these may be able to be rebuilt! The dust boots on the outside and rubber cups on the inside aren’t dry rotted or split and they’re still pliable! I still have a lot of clean up and checking but these may work fine! The front one though, it’s still stuck not sure if it’s gonna come loose.
I had pictures to add but for some reason they won’t upload this evening. If I can I’ll add them later.
@Eugen i here you, I never feel safe enough. I think it’s good I just didn’t like having my jack stands and bottle jacks so spaced out. I tried shaking the truck before I started and it wouldn’t budge. You could probably have a dance party on the bed and it would be fine, but I’m not gonna try!
I don't have jack stands, but I do have a bunch of lumber, 6x6 4x4 2x4. I start with the 6x6's 2 wide, then 2 4x4's and 2x4's. Always alternate each layer N-S and E-W
With the stuck brake cylinder. I found out the hard way, the first thing to do is see if you can get the bleeder out. If they snap off they are a Royal PITA to get out without wrecking the threads in the cylinder. If that will loosen up, buy or make an adapter to screw into the hole for the brake line and the other end needs to be threaded for a grease zerk. A grease gun with the long handle should provide enough pressure to get one of the pistons out. Then use a large wooden dowel to drive the other piston out. The dowel should just barely fit in the cylinder to apply the force to the pistons skirt, too small and you run the risk of knocking a hole in the center of the piston.
Gordy
Re: 1961 Ford F500 project.
Posted: Sat Jan 28, 2023 11:49 pm
by JSinMO
@Gordy Thank you for the tips! I was able to get the rear cylinders apart without much trouble, but the fronts are a single piston design so it’s only coming out one way! Great idea using grease to move the piston. I’ll have to dig around the empire of dirt and see if I can come up with some fittings. Thank you!
Re: 1961 Ford F500 project.
Posted: Sun Jan 29, 2023 6:22 am
by DavidBarkey
quote
The front one though, it’s still stuck not sure if it’s gonna come loose.
@JSinMO Pull the dust cover off and immerse it in brake fluid . Do not use diesel fuel or penetrates as it will damage the seal inside . Use a tin can just big enough to fit it in . put that can it another can /pot of hot water . Do not try to heat the brake fluid with a flame , but you can put the pot of water on a hot plate to keep it warm . This will help loosen things up from both sides . when using a grease gun to separate the cylinder use only synthetic grease , petroleum will damage the seal .
Re: 1961 Ford F500 project.
Posted: Thu Feb 02, 2023 9:59 pm
by JSinMO
I spent some time this evening fiddling around the shop.
I haven’t tried to get getting the front caliper loose yet but I cleaned it up and I can see some numbers on it. I’m going to see if I can find replacements. I also need new seals on the rear drums.
I fought with that thing for 2 hours and I still don’t have it out. I’ve started to cut it out with a cold chisel, don’t know what else to do. I’ve pretty well mangled it at this point.
I wouldn’t care except I at least need some of it intact to size a new one since I don’t see any numbers on it.
I give up for tonight, time to go in and get cleaned up!
Re: 1961 Ford F500 project.
Posted: Fri Feb 03, 2023 12:49 am
by Gordy
JSinMO wrote: ↑Thu Feb 02, 2023 9:59 pm
I spent some time this evening fiddling around the shop.
B4BD36C7-32D1-4925-B38F-E0F26CFFCDED.jpeg
I haven’t tried to get getting the front caliper loose yet but I cleaned it up and I can see some numbers on it. I’m going to see if I can find replacements. I also need new seals on the rear drums. EFCD4BE1-1446-48CF-BF8C-CFD9E917E423.jpeg
I fought with that thing for 2 hours and I still don’t have it out. I’ve started to cut it out with a cold chisel, don’t know what else to do. I’ve pretty well mangled it at this point.
I wouldn’t care except I at least need some of it intact to size a new one since I don’t see any numbers on it.
I give up for tonight, time to go in and get cleaned up!
Seal pullers are not used often, but handy as hell when you need them. There are a few different styles, this is one I have. On a bigger seal like that I have had to use some cribbing (2, 1/4" key stock) on the casting next to the seal, with some flat stock across them, to make clearance for the seal to start lifting out.
https://www.northerntool.com/shop/tools ... lsrc=aw.ds
Another thing that worked for me. I have a slide hammer with a tip that excepts a sheet metal screw. Drill a couple holes in the seal close to the outer edge 180 degrees apart, and insert the self tapping screw. Then tug the seal out with the slide hammer. lacking a slide hammer a claw hammer should work.
Gordy
Re: 1961 Ford F500 project.
Posted: Fri Feb 03, 2023 10:18 am
by RoamingGnome
x2 for the self tapping screw and prybar/crowbar/clawhammer suggestion... bonus trick for drilling the hole is to put a small blob of grease on seal and drill your pilot hole through the grease blob - the grease will hold all the swarf (chips) so they are easier to clean up and less likely to go into the bearing behind the seal.
Re: 1961 Ford F500 project.
Posted: Fri Feb 03, 2023 7:38 pm
by JSinMO
@Gordy ,
@RoamingGnome Thanks guys! I’ll probably give it shot tomorrow. I called Chuck over at Chucks Trucks this afternoon he has the front wheel cylinders at a reasonable price, I couldn’t find them locally so I’m not going to mess with the old ones. They have Ford part numbers stamped in them so I’m guessing there the originals. I have to call him in the morning to give him measurements for the drum seals, so hopefully the last of the brake parts will be in the way shortly.
Re: 1961 Ford F500 project.
Posted: Fri Feb 03, 2023 8:34 pm
by Jancoe
I typically take a screwdriver to the outside edge of the seal where it meets the hub. A few drives of the hammer and it will push the seal in 1/8" there. Then you can pop it out opposite edge with the seal puller. I do this method when they are stuck.
Sent from my SM-S906U using Tapatalk
Re: 1961 Ford F500 project.
Posted: Sat Feb 04, 2023 6:11 pm
by JSinMO
Made a little more progress today!
I used a little heat and two self tapping screws and walked the old seal out!
I feel like I should have thought of that, but then again I never said I was the sharpest knife in the drawer!
Thanks again guys, it’s so nice to be able to come here for help!
I also assembled the two rear wheel cylinders and installed them back on the truck, and cleaned up the drum and painted it.
So now I wait for parts to come in. I have 2 front wheel cylinders, 2 rear drum seals, and 2 axel gaskets that hopefully can be order on Monday and arrive by next weekend.
I’m excited for the parts to come, I might actually finally have working brakes!
Re: 1961 Ford F500 project.
Posted: Sat Feb 04, 2023 8:38 pm
by Eugen
You're unstoppable Jeff! Nice progress! Keep it coming!
Re: 1961 Ford F500 project.
Posted: Sun Feb 12, 2023 5:29 pm
by JSinMO
Here’s todays truck ramble.
Since I’m waiting for parts to finish up the brakes I thought I’d start the engine tune up beginning with this.
The truck runs but it definitely has fuel delivery issues. So I pulled the carburetor off the truck and tore it down to rebuild. I had purchased a rebuild kit for this awhile back and sure enough it’s not the right one
crap!
And the float has a hole in it so I’ll try to source one since I’m not finding the hole
crap!
Oh well I’ll move on the the electrical system. I replaced the plugs and the old one were pretty much as expected. Fouled with pretty obvious valve seal leaks. I don’t think im going to worry about that for now. I think I’ll see how long it takes to foul the new plugs before I get worked up about it.
Moved on the replacing the plug wires since the ones in the truck are pretty crusty. Here too I bought a set awhile back…
Yup they’re way to short
crap!
Ok I might as well take a look at the points while I’m here.
Pulled the distributor cap off and yep it looks terrible, so does the rotor
crap! That ones my fault, I should have figured on that.
So now im at a stand still till parts come in, and that’s not really a bad thing, kind of the way these projects go unless you’re impatient like me!
On a side note this truck is equipped with a high idle cable that runs to the dash board. I think the idea is you can pull the cable to set the engine speed up some when you’re stopped and running the bed hoist. Is not connected to the carburetor and I’m not seeing where it goes. Anybody have experience with where it goes? It’s the cable laying by the valve cover in the first picture. Here’s what it looks like in the cab.
Thank you guys for following along with Herbie!
Re: 1961 Ford F500 project.
Posted: Sun Feb 12, 2023 7:11 pm
by propane1
I’m just guessing here Jeff. But I wonder if it goes to the fast idle cam an the choke linkage. ? Just guessing.
Noel
Re: 1961 Ford F500 project.
Posted: Sun Feb 12, 2023 7:41 pm
by Gordy
If the way back machine in my head is working

See the red in the picture there should be a bracket mounted in those holes to mount the bracket on the cable to. The blue circle is were a chain was held on with a C clip, the other end of chain was mounted to the core of the cable. The chain I remember was the big brother of the little ball chain found on old finger nail clippers.
There could be other designs of coarse and your long cable core makes me think yours may have been different, but in the picture I don't see any holes where the cable core could slide through. But it has to be free floating and non binding as to not interfere with normal foot pedal operation, but you probably knew that

Gordy
Re: 1961 Ford F500 project.
Posted: Sun Feb 12, 2023 7:59 pm
by propane1
I got another guess. The cable is hooked to a flat bar or rod poivts. This flat bar or rod hits on the front side of the throttle linkage, when you pull the cable the flat bar or rod pushes on the throttle linkage and opens the throttle. And you lock it where you want on the cab with the throttle knob. When released it would have no interference with the operate of the gas pedal. Just a guess.
Noel
Re: 1961 Ford F500 project.
Posted: Sun Feb 12, 2023 8:40 pm
by JSinMO
@propane1 ,
@Gordy Thank you guys that helps!
Gordy, I wish I could say “well of course it has to free float”, but the truth is I hadn’t thought of it till now!
As soon as I read your post it came back to me. I can remember the chain set up you’re talking about, but it’s literally hurting my head trying to remember the details!
and as you said this may have been different.
Either way I’m missing parts to it.
Noel im thinking your idea may be closer to how this was set up. I’ll have to wait till I get the carburetor back on the engine but I think I can make that work. It may be a bit cobbled as seriously doubt those parts are readily available.
Another example once again that we have some of the most knowledgeable, helpful people around! I appreciate it guys!
Re: 1961 Ford F500 project.
Posted: Sun Feb 12, 2023 8:50 pm
by Eugen
My brain hurts just trying to follow the discussion
you guys keep going, it's like I'm watching star trek, don't understand it but I like it!

Re: 1961 Ford F500 project.
Posted: Sun Feb 12, 2023 9:35 pm
by RoamingGnome
It's an interesting question - so I did some googling... I'd hate to add any more confusion to the mix - but does this video help any? In a generic sort of way?
https://www.youtube.com/watch?v=Sm13JA3XYaI
I've been a little spoiled in 40+ yrs of owning vehicles they have almost all exclusively been small, Japanese and used throttle cables to connect pedal to linkage (I've almost completely managed to block out memories of the 302 in my Dad's '72 Ford Econoline
)
When I used to go off-roading with my Suzuki Samurai buddies years ago a few of them improvised a cruise control so they could "idle up" when using a winch or crawling along a forest trail. They used a shift lever from a 10 speed bicycle - attached the cable end to the throttle linkage at the carb and put the lever on the tranny shifter so it was handy, but out of the way...
Re: 1961 Ford F500 project.
Posted: Sun Feb 12, 2023 10:28 pm
by JSinMO
@RoamingGnome The video is kinda, sort of, in the ballpark. What your friends were doing on their 4X4 is exactly what this is. It’s just a cable attached to the throttle at the carburetor that you can pull and lock inside the cab to raise the engine RPM. In my case this truck has a power take off on the side of the transmission which controls the hydraulic pump for the bed hoist. So the engine RPM directly controls the speed at which the truck bed raises. You can control the hoist speed with the foot throttle so I assume the extra throttle cable is there so you can set the RPM with out over revving the engine. Some one with more experience would have to chime in for the other uses of this cable.
Re: 1961 Ford F500 project.
Posted: Sun Feb 12, 2023 10:45 pm
by JSinMO
Re: 1961 Ford F500 project.
Posted: Mon Feb 13, 2023 7:32 am
by propane1
The propane company I worked for in the late seventy’s had a truck that had a power lift gate. It was hydraulic, was operated by an pto from the transmission. 1973 Ford F-350 , you would put the transmission in neutral, push the clutch in, turn a lever to engage the transmission pto, let the clutch back out and you could operate the lift tail gate. I don’t remember if it had a throttle to rasie the engine rpm of not.
Just a useless information ramble, but thought you’d like the read.
Noel
Re: 1961 Ford F500 project.
Posted: Mon Feb 13, 2023 8:29 am
by DavidBarkey
@JSinMO If you can find a old timer mechanic that had a tow truck . They will know what you need . to hook that up .
Re: 1961 Ford F500 project.
Posted: Mon Feb 13, 2023 9:18 am
by Gordy
Eugen wrote: ↑Sun Feb 12, 2023 8:50 pm
My brain hurts just trying to follow the discussion
you guys keep going, it's like I'm watching star trek, don't understand it but I like it!
Think of it as a poor man's /primitive cruise control
Gordy
Re: 1961 Ford F500 project.
Posted: Mon Feb 13, 2023 9:53 am
by Gordy
JSinMO wrote: ↑Sun Feb 12, 2023 10:28 pm
@RoamingGnome The video is kinda, sort of, in the ballpark. What your friends were doing on their 4X4 is exactly what this is. It’s just a cable attached to the throttle at the carburetor that you can pull and lock inside the cab to raise the engine RPM. In my case this truck has a power take off on the side of the transmission which controls the hydraulic pump for the bed hoist. So the engine RPM directly controls the speed at which the truck bed raises. You can control the hoist speed with the foot throttle so I assume the extra throttle cable is there so you can set the RPM with out over revving the engine. Some one with more experience would have to chime in for the other uses of this cable.
I did find a couple pictures of the throttle cable set up, but on a f700 and a different / holley carb
I'll look some more

It may be helpful to get a better side shot picture of your carb linkage.
I forgot about your float before

Put it in a ziplock bag, then in the freezer for a few hours. The air in it will condense and hopefully draw in more air through the hole. Then submerge it in near boiling water, this will cause the air to expand and come out the hole, watch for bubbles.
If the hole is really tiny it may be necessary to drill it out to 1/64" to drain the gas out.
Soldering a float can be a PITA you have to be quick, too much heat and the air expands quickly pushing the solder out and it also cools quick and sucks the solder in before it solidifies.
Gordy
Re: 1961 Ford F500 project.
Posted: Mon Feb 13, 2023 9:55 am
by propane1
Gordy wrote: ↑Mon Feb 13, 2023 9:18 am
Eugen wrote: ↑Sun Feb 12, 2023 8:50 pm
My brain hurts just trying to follow the discussion
you guys keep going, it's like I'm watching star trek, don't understand it but I like it!
Think of it as a poor man's /primitive cruise control
Gordy
Exactly Gordy. I would think someone somewhere did use it for that.
Noel
Re: 1961 Ford F500 project.
Posted: Mon Feb 13, 2023 9:58 am
by propane1
I’ve put a little tab of Seal All Glue on floats before too fix holes. Worked good.
Noel
Re: 1961 Ford F500 project.
Posted: Mon Feb 13, 2023 10:04 am
by Gordy
propane1 wrote: ↑Mon Feb 13, 2023 9:58 am
I’ve put a little tab of Seal All Glue on floats before too fix holes. Worked good.
Noel
Knowing how aggressive gas is I never got the courage to try a glue
Gordy
Re: 1961 Ford F500 project.
Posted: Mon Feb 13, 2023 11:58 am
by propane1
Seal All Glue resists oil and gasoline. I fixed a aluminum block oil leak on my MF7 years ago. The oil was seeping through the block. No leak since.
My father showed me this stuff 50 or so years ago.
Noel
Re: 1961 Ford F500 project.
Posted: Mon Feb 13, 2023 3:30 pm
by DavidBarkey
propane1 wrote: ↑Mon Feb 13, 2023 11:58 am
Seal All Glue resists oil and gasoline. I fixed a aluminum block oil leak on my MF7 years ago. The oil was seeping through the block. No leak since.
My father showed me this stuff 50 or so years ago.
Noel
Have you ever fixed a fuel tank with it ?
Re: 1961 Ford F500 project.
Posted: Mon Feb 13, 2023 5:08 pm
by propane1
I did. But it was 35 or so years ago. On a Subaru Brat. Was on the bottom of the tank. And it was rusty. I think from what I can remember it fixed it for a while. But I don’t remember what I did to fix it permanently.
Noel
Re: 1961 Ford F500 project.
Posted: Mon Feb 13, 2023 7:35 pm
by JSinMO
I was able to do some research today and I have a bit of a convoluted tale to tell. When you get into a project it really doesn’t matter if it’s an old tractor, or vehicle, or whatever it seems it’s not only about turning wrenches, but also about investigating! So down the rabbit hole we go!
If you remember when I started this I said the engine was a 292 and the previous owner Mr. Gamm corrected me and said it was a 272. Well I called Chuck at Chuck’s Truck and picked his brain. He confirmed what I had looked up when I started Ford stopped using the 272 engine by 1961 and only used the 292 in trucks. But the PO is correct because he put the 272 in years ago. That’s why my carburetor kit was wrong. I bought a kit for an Autolight 2100 but a later version. I need a kit for an early 2100 from the 1950’s! This also explains why the auxiliary throttle cable is laying there. The mounting bracket and linkage left with the 292 engine and carburetor when they did the engine swap. I guess they didn’t need it. Why they put an older engine in I have no idea, probably what was available at the time. So does any of this really matter? As far as getting the right parts the first time, yes. But other than that I guess not really. It matters to me because it’s another interesting layer in the history of the truck, and it clears things up in my mind.
Now I have the correct carburetor kit, plug wires, distributor cap, rotor, and points ordered and on the way!
This just leaves one mystery on the engine tune up at this point….
My research showed the float should look like this.
The float in my carburetor looks like this.
I have no idea why.
You have to find a new old stock float to replace it and they aren’t readily available.
So I’m going to follow the method
@Gordy
explained in his post and see if I can find the hole in mine and fix it. Certainly would be more satisfying to repair what I have rather than replace it.
@propane1 Noel if you say Seal All works I definitely believe you, but I’m just scared to use something like that on a part that will be submerged in gas. I’m going to try and solder it up and maybe keep Seal All as a back up.
Sorry for the long ramble, I guess I’m just excited to be putting the pieces together!
I really enjoy sharing this project with you all, and learning from you! Thanks for coming along for the ride!
Re: 1961 Ford F500 project.
Posted: Mon Feb 13, 2023 8:46 pm
by JSinMO
Gordy wrote: ↑Mon Feb 13, 2023 9:53 am
I did find a couple pictures of the throttle cable set up, but on a f700 and a different / holley carb
I'll look some more
It may be helpful to get a better side shot picture of your carb linkage.
Gordy
Thank you for looking. I’d like to see what you found. I’m sure it will help if I have to make what I need.
What did you type in to search? I haven’t found any good pictures yet.
I will get a couple of pictures of my linkage as soon as I can.
Thank you!
Re: 1961 Ford F500 project.
Posted: Mon Feb 13, 2023 11:24 pm
by Jancoe
I fixed a 96 chevy cavalier steel tank with Seal All. Was leaking at the seam bad. Smeared it on and sealed it up. That stuff is awesome. Resists gas well. I have some on the shelf now.
Sent from my SM-S906U using Tapatalk
Re: 1961 Ford F500 project.
Posted: Tue Feb 14, 2023 12:44 am
by Gordy
JSinMO wrote: ↑Mon Feb 13, 2023 8:46 pm
Gordy wrote: ↑Mon Feb 13, 2023 9:53 am
I did find a couple pictures of the throttle cable set up, but on a f700 and a different / holley carb
I'll look some more
It may be helpful to get a better side shot picture of your carb linkage.
Gordy
Thank you for looking. I’d like to see what you found. I’m sure it will help if I have to make what I need.
What did you type in to search? I haven’t found any good pictures yet.
I will get a couple of pictures of my linkage as soon as I can.
Thank you!
I was starting to wonder about a carb or engine swap
I entered "1961 ford f500 carburetor linkage" in a google search then clicked on "images" under the search box. Here's the links to the pictures there is a visit site button you might be interested in for "Ford Truck Enthusiast Forums"
https://www.google.com/imgres?imgurl=ht ... B0AAAAAEBs
https://www.google.com/imgres?imgurl=ht ... egUIARD1AQ
Gordy
Re: 1961 Ford F500 project.
Posted: Tue Feb 14, 2023 9:58 am
by propane1
Jancoe wrote: ↑Mon Feb 13, 2023 11:24 pm
I fixed a 96 chevy cavalier steel tank with Seal All. Was leaking at the seam bad. Smeared it on and sealed it up. That stuff is awesome. Resists gas well. I have some on the shelf now.
Sent from my SM-S906U using Tapatalk
I always have some around. Just not for sealing liquids. Good adhesive too.
Noel
Re: 1961 Ford F500 project.
Posted: Tue Feb 14, 2023 7:28 pm
by JSinMO
Well I have turned, twisted, and shook this float in every conceivable way I can think of. I followed Gordy’s instructions
too, and I’ll be darned if I can find the hole!
I can clearly hear liquid inside of it.
There’s not much liquid inside of it and it still floats, so I guess the question is what the heck do I do with it?
A) Drill a small hole in the top, drain it, reseal the hole and try to add some solder to the seams too.
B) Leave the liquid in it and just add some solder around the seams.
C) Do nothing to it, slap it back in the carburetor and see how long it floats.
D) Try some other ideas you are thinking of.
What do you guys think?
Also here’s a couple of pictures of the linkage I said I would post.
Re: 1961 Ford F500 project.
Posted: Tue Feb 14, 2023 7:59 pm
by propane1
One thing is. You don’t want to add to much weight no matter which method you use to seal the hole. It may add to much and the float may not float properly.
I would try drying it well, take a big black marker and blacken the whole float. Then turn it around so the liquid gets to all parts inside. The leak will be easier to see on the black than on the tin. Just a thought.
Noel
Re: 1961 Ford F500 project.
Posted: Tue Feb 14, 2023 8:42 pm
by MattA
Can the float be slowly heated to help vaporize the gas creating pressure to force it out the tiny hole? Might want to look up what temp gas vaporizes at. It you do heat it, be careful.
Re: 1961 Ford F500 project.
Posted: Tue Feb 14, 2023 10:07 pm
by Spike188
Matt, I thought about heating it also. My thought was put it into a pan of water that is just below boiling point. As the float heats the vapours should cause a visible bubble trail as it exits the float.
As word of caution, even a something as small as a float can be dangerous if it over-pressures and ruptures. Also do not let the water temperature drop before removing the float from the bath. Water bath canning experience talking there. You don't want the cooling float to draw water back in if there is a hole. I would suggest removing the float from the bath as soon as a bubble trail appears to reduce the possibility of a small flash fire. As a preteen my siblings and I learned to lay empty aerosol cans on a trash fire seam down. They usually ruptured along the seam and would launch higher with a more predictable flight path.
Re: 1961 Ford F500 project.
Posted: Wed Feb 15, 2023 12:03 am
by Gordy
JSinMO wrote: ↑Tue Feb 14, 2023 7:28 pm
Well I have turned, twisted, and shook this float in every conceivable way I can think of. I followed Gordy’s instructions
too, and I’ll be darned if I can find the hole!
I can clearly hear liquid inside of it.
A61727D6-441F-4B77-AC90-2662100C5762.jpeg
There’s not much liquid inside of it and it still floats, so I guess the question is what the heck do I do with it?
A) Drill a small hole in the top, drain it, reseal the hole and try to add some solder to the seams too.
B) Leave the liquid in it and just add some solder around the seams.
C) Do nothing to it, slap it back in the carburetor and see how long it floats.
D) Try some other ideas you are thinking of.
What do you guys think?
Also here’s a couple of pictures of the linkage I said I would post.
C69560F5-D25E-4563-9A54-15E9D7A76A49.jpeg
A95C70F8-EEBB-46C9-93D2-F0DCE20AB2E3.jpeg
Hard to tell, but in the picture it looks like you did not have enough water in the pan to fully submerge the float under water. If that is the case I would try the test again with enough water to completely submerge the float.
It looks like the Holley carb in my pictures had another arm on the throttle shaft for the auxiliary throttle cable.
Gordy
Re: 1961 Ford F500 project.
Posted: Wed Feb 15, 2023 6:53 am
by DavidBarkey
I would clean it so all varnish and oxides are gone ( suitable for soldering ) . Gently heat with hair drier on high and cool in dry environment to get the fuel to evaporate and be replaced with air . This may take a few cycles until no fuel is present anymore . Then with plumbers solder and flux re-solder the seam . Use an iron , not a torch , just in case there are still fumes inside .
Re: 1961 Ford F500 project.
Posted: Wed Feb 15, 2023 2:05 pm
by Eugen
I find this float problem very interesting and the ways to tackle that you guys came up with are quite ingenious. Nothing to add, but I'm curious what'll work in the end.
Re: 1961 Ford F500 project.
Posted: Wed Feb 15, 2023 8:17 pm
by JSinMO
I want to thank all of you for your input!
I appreciate it more than you know!
At this point I have completed the hot water bath test twice. I know the picture doesn’t show it good, but the float was completely submerged in both tests with the same result. No visible air bubbles. I also have no gas coming out no matter how I position the float. The only indication I have is an intermittent smell of bad gas at the front of the float.
This makes me believe I have a very small hole. Working on that theory I don’t feel comfortable trying to heat and vent the old gas out. This is a pressure vessel, all be it a small one so I fear over pressurizing it with a hole that small and either rupturing the body or damaging otherwise good seals.
I have decided on this course of action. I’m going to drill a small hole through the original vent hole and drain the old gas out. Then re solder that hole shut.
Then I’m going to go with
@propane1 and
@Jancoe product of choice. I stopped by o’Reillys on the way home and I’ll be, there it is!
I’ve never used it before, but I think this situation will be a good opportunity to test it! I believe my trouble is in the seam so I’m going to run a thin bead around the seam and see how it does.
I’m quite curious to see how much gas come out!
Re: 1961 Ford F500 project.
Posted: Wed Feb 15, 2023 8:59 pm
by Eugen
Sounds like a good plan to me. But since you make a bigger hole, are you not tempted to resolder all around?
Jeff, do you have a sensitive kitchen scale to see the difference before and after you get the gas out?
Re: 1961 Ford F500 project.
Posted: Wed Feb 15, 2023 9:40 pm
by JSinMO
Eugen wrote: ↑Wed Feb 15, 2023 8:59 pm
Sounds like a good plan to me. But since you make a bigger hole, are you not tempted to resolder all around?
Jeff, do you have a sensitive kitchen scale to see the difference before and after you get the gas out?
Yes i am tempted to just resolder all around. But I think im even more curious to know if Seal All can do the job. At this point I’m confident my trouble is in the seam so that is where I plan to test it. If it works as well as the guys have said, it would be mighty handy to keep on hand! If it doesn’t the float is as easy to get to as the ones on our tractors so no big deal to pull the top of the carburetor and resolder it then.
Unfortunately I don’t have a scale sensitive enough to weigh the before and after. I plan to try to capture what come out just to see how much was in there!
Re: 1961 Ford F500 project.
Posted: Wed Feb 15, 2023 11:35 pm
by Eugen
Keep the set course Jeff! An idea did come to me when I saw that blob of solder in the middle.
I would melt that blob with a soldering gun and suck the solder with this tool
because I have one. Then I would drill a tiny hole there if the original hole was not open. Would fill the float with water and then keep the float with hole downwards so the water inside gathers at the hole and either suck or push air in with a syringe with thin needle, which would force the water out. I happen to have a syringe too from giving the dog injections.
Then I'd heat the seam all around with a mini butane torch, as I have one of those too, and take the two halves apart. If it didn't come apart I'd just do fresh solder with the torch all around, just like in plumbing, and wipe excess solder with a wet rag.
If it did come apart I'd clean up both halves and solder them back together.
To solder the remaining hole I'd keep the float with the hole downwards and heat up the spot with the torch touching the spot with solder from time to time until a blob sticks nicely at the hole. I'd keep the float with the blob down as the weight of the blob counteracts the possible sucking that might happen there. How's that for a hairy suggestion?!
I'm not done though. I would also silver plate it. Don't laugh, I've done it to parts of a boat carb I used to have.
Re: 1961 Ford F500 project.
Posted: Thu Feb 16, 2023 5:12 am
by propane1
Good luck Jeff.

Noel
Re: 1961 Ford F500 project.
Posted: Thu Feb 16, 2023 9:04 am
by JSinMO
Eugen wrote: ↑Wed Feb 15, 2023 11:35 pm
Keep the set course Jeff! An idea did come to me when I saw that blob of solder in the middle.
7EF843DC-5FC9-4641-8E2B-011FB5DB64AD.jpeg
I would melt that blob with a soldering gun and suck the solder with this tool
46BC3F8C-2720-4B53-9BF0-17A0FF60E5AD.jpeg
because I have one. Then I would drill a tiny hole there if the original hole was not open. Would fill the float with water and then keep the float with hole downwards so the water inside gathers at the hole and either suck or push air in with a syringe with thin needle, which would force the water out. I happen to have a syringe too from giving the dog injections.
Then I'd heat the seam all around with a mini butane torch, as I have one of those too, and take the two halves apart. If it didn't come apart I'd just do fresh solder with the torch all around, just like in plumbing, and wipe excess solder with a wet rag.
If it did come apart I'd clean up both halves and solder them back together.
To solder the remaining hole I'd keep the float with the hole downwards and heat up the spot with the torch touching the spot with solder from time to time until a blob sticks nicely at the hole. I'd keep the float with the blob down as the weight of the blob counteracts the possible sucking that might happen there. How's that for a hairy suggestion?!
I'm not done though. I would also silver plate it. Don't laugh, I've done it to parts of a boat carb I used to have.
Dang, I wish there wasn’t 700 miles between us because you’re hired!
That’s a good plan for sure.
If I can’t make it work don’t be surprised if you get a package in the mail with a float it, with a note asking you to fix it! No silver plating necessary.
Re: 1961 Ford F500 project.
Posted: Thu Feb 16, 2023 10:50 am
by Eugen
One thing that comes to mind is the weight of the float. Whatever the fix is, the weight should probably not increase too much. Some deviation would be fine as you can adjust the tab so the float closes the gas intake as it should. Easy with the goo, I guess that's what I'm saying, but I'm sure you'd have been careful with that anyway.
Re: 1961 Ford F500 project.
Posted: Sun Feb 19, 2023 4:58 pm
by JSinMO
Well the float has been empty and vented for a few days now so I got the soldering gun out and closed the hole I drilled.
Then I applied the Seal All to the seam all around the float. It’s clear and spreads nice and thin. I went with one coat so I don’t think I changed the weight enough to hurt anything.
I followed the instructions and waited well past the full cure time and then I tested it. I submerged it in gas for several hours, (this time in a gas resistant container!).
I can report that
@propane1 and
@Jancoe are absolutely correct!
I cleaned off the float and no leaks! The gas appears to have no effect on the Seal All! Good call guys
So I’m calling the float ready to install.
I did some cleaning on the carburetor, and intake. Then I decided to take a look at that front wheel cylinder.
Dug around till I found a grease fitting that was a close match to the treads. It took some pressure but the piston came loose!
I immediately cleaned all the grease up and believe it or not the seal and bore look great! I don’t see a problem with them. I looks like the aluminum piston was stuck to the bore.
It did clean up but the very edge of it is rotted away.
I really think it’s reusable! So now the question is do it try it?
I do have new ones ordered but I haven’t got confirmation of shipment yet, so I’m thinking I’ll wait to see if the new ones come and keep this for a spare. Hopefully the other side turns out as good!
Re: 1961 Ford F500 project.
Posted: Sun Feb 19, 2023 6:08 pm
by propane1
That’s all great news Jeff.
Noel
Re: 1961 Ford F500 project.
Posted: Mon Feb 20, 2023 12:36 am
by Eugen
Glad you fixed it
@JSinMO, nicely done! I will get myself some of that allseal! Seems to be the kind of thing you want to have around. Thank you Noel for mentioning it!
Re: 1961 Ford F500 project.
Posted: Mon Feb 20, 2023 9:02 am
by DavidBarkey
Eugen wrote: ↑Mon Feb 20, 2023 12:36 am
Glad you fixed it @JSinMO, nicely done! I will get myself some of that allseal! Seems to be the kind of thing you want to have around. Thank you Noel for mentioning it!
Ya , me too . Googled it . Watch where you buy it .
2 oz. / 59.1 ml
Amazon reseller $39.08 can
CTC $8.49
Local hardware store range $8-$9 for that size .
Re: 1961 Ford F500 project.
Posted: Mon Feb 20, 2023 10:10 am
by Eugen
DavidBarkey wrote: ↑Mon Feb 20, 2023 9:02 am
Ya , me too . Googled it . Watch where you buy it .
2 oz. / 59.1 ml
Amazon reseller $39.08 can
CTC $8.49
Local hardware store range $8-$9 for that size .
Thanks for the tip Dave! I'll look for it next time I go to Canadian tire.
Re: 1961 Ford F500 project.
Posted: Mon Feb 20, 2023 7:29 pm
by JSinMO
DavidBarkey wrote: ↑Mon Feb 20, 2023 9:02 am
Eugen wrote: ↑Mon Feb 20, 2023 12:36 am
Glad you fixed it @JSinMO, nicely done! I will get myself some of that allseal! Seems to be the kind of thing you want to have around. Thank you Noel for mentioning it!
Ya , me too . Googled it . Watch where you buy it .
2 oz. / 59.1 ml
Amazon reseller $39.08 can
CTC $8.49
Local hardware store range $8-$9 for that size .
I found that to be the case south of the border as well. Lowe’s was twice as much as the auto parts store.
Re: 1961 Ford F500 project.
Posted: Sat Feb 25, 2023 10:10 pm
by JSinMO
What I hope will be the last of the parts I need arrived Thursday afternoon noon.
it sounds kinda dumb I guess but knowing I’d be reassembling things today made it hard to sleep last night!
I can get things done but there is no doubt I wouldn’t make it in a real shop, I’m SLOW
! I usually set the bar to high as to what I can accomplish in a day, and today was no exception. I thought I should take may time and get it right so that’s what I did, but Id hoped I be bleeding brakes today, nope.
New right front wheel cylinder installed. New seal, re checked my bearings and adjusted the brakes.
Cleaned the right rear bearings, installed the new seal and installed the rear drum and axel back on the truck.
Put the tires on that side.
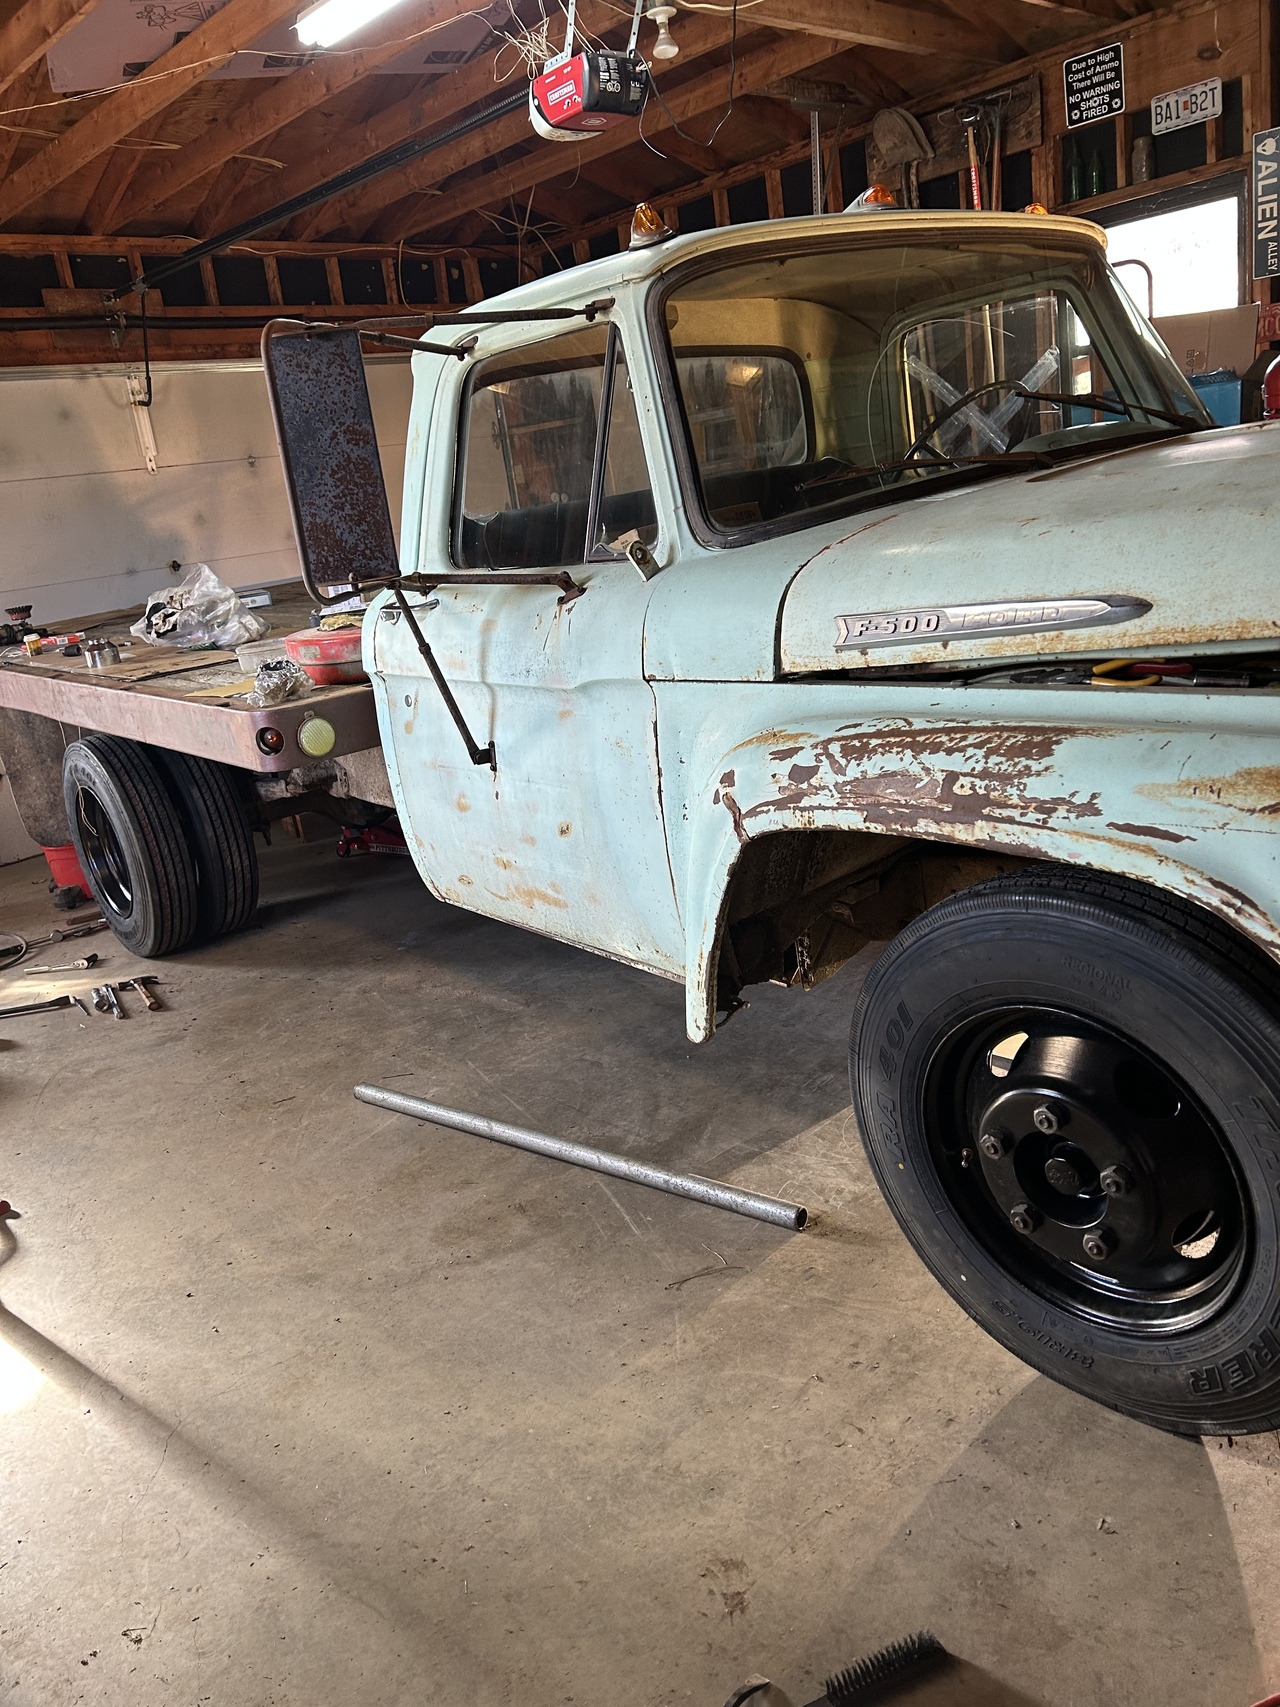
- C7F8AE32-AC03-4D2F-BA74-206FC43BA960.jpeg (999.78 KiB) Viewed 5542 times
There’s really no need to put the duel on yet, but I just had to see how it looks! I like it!
I only put a couple of nuts on the axel for now, just in case it has to come back apart for some reason and all the lug nuts will need to be torqued, but the passenger side is together.
Moved my jacks and cribbing to the left front and took it apart. Other than a leaking seal and the stuck cylinder it looks good.
New wheel cylinder installed. I cleaned and painted the drum and cleaned the bearings so tomorrow its ready to go back together. That leaves one wheel left to disassemble and clean up then finally I can start bleeding.
The old drivers side wheel cylinder was the same as the other one, piston stuck but seal in good shape. I used the grease trick again and got it apart and cleaned up. I have no doubt these could be put back into service if I ever needed to.
The question to you guys is; Does anyone know a good way to preserve the rubber seals and boots for storage?
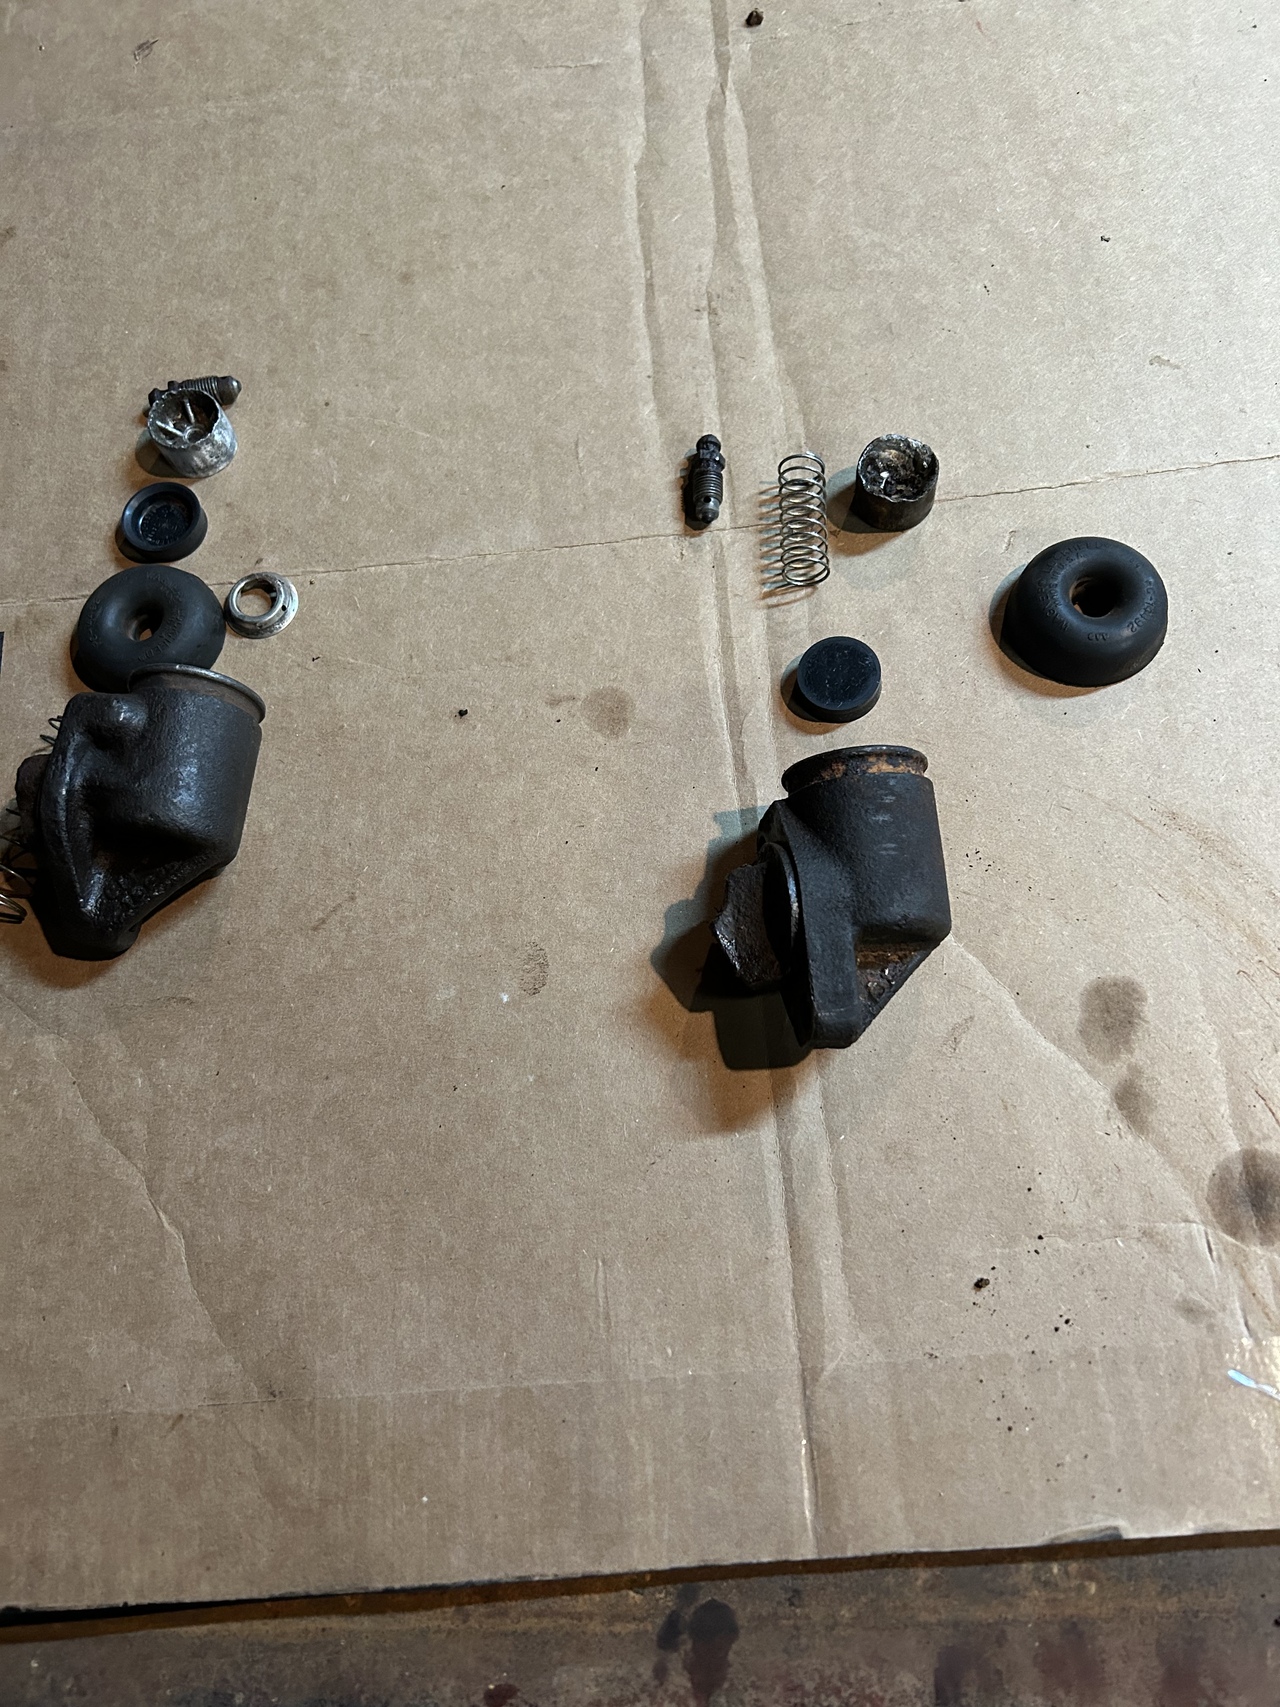
- C8801EA7-4FF2-40E8-9E33-1C039442D955.jpeg (982.41 KiB) Viewed 5542 times
Re: 1961 Ford F500 project.
Posted: Sun Feb 26, 2023 12:07 am
by Eugen
You got a lot done Jeff! The truck's starting to look well, especially with the duals at the back. I have no particular experience with storing rubber but definitely sun will not help. I'd say in a contractor garbage bag taped so it's almost sealed, and kept in a dark place.
Re: 1961 Ford F500 project.
Posted: Sun Feb 26, 2023 7:26 am
by DavidBarkey
Sil glyde brake lube . Coat all surfaces metal and rubber both sides in tin coat before reassembly then a dab over the line hole to keep the moister out of the inside . Bag and Tag in jip loc bag for storage . Sil Glyde under the dust boot helps reduce corrosion in the cylinder as well .
Re: 1961 Ford F500 project.
Posted: Sun Feb 26, 2023 10:11 am
by Jancoe
I use silicone paste on rubber components. Will not dry out and cause cracking or swelling of the rubber.
Sent from my SM-S906U using Tapatalk
Re: 1961 Ford F500 project.
Posted: Sun Feb 26, 2023 10:14 am
by RoamingGnome
JSinMO wrote: ↑Sat Feb 25, 2023 10:10 pm
What I hope will be the last of the parts I need arrived Thursday afternoon noon.
it sounds kinda dumb I guess but knowing I’d be reassembling things today made it hard to sleep last night!
I can get things done but there is no doubt I wouldn’t make it in a real shop, I’m SLOW
! I usually set the bar to high as to what I can accomplish in a day, and today was no exception. I thought I should take may time and get it right so that’s what I did, but Id hoped I be bleeding brakes today, nope.
@JSinMO - really enjoying your progress updates - It's nice to be able to work on a job at a pace you decide and are comfortable with. Not feeling pressure to rush the process - so often that leads to damaged components or tools when people "push" a little harder
instead of stepping back and being able to figure out why something isn't going according to plan...
Gerry
Re: 1961 Ford F500 project.
Posted: Sun Feb 26, 2023 7:38 pm
by JSinMO
Todays truck update.
Greased bearings, new seal, and reassembled driver side front. The lugs on the drivers side are clearly marked L for left hand threads, yet I found myself turning them the wrong way at least a half dozen times!
One last filthy wheel to take apart.
Disassembly went smooth with no issues. I am glad I left the other axel loose since after looking at this side I realized I made a mistake with the axel nuts and lock washers on the passenger side. Shouldn’t be a big deal just slip it back out and correct it.
As I dig into this truck it appears to me it was fairly well maintained before it was parked up for 35 years. The brake components all look good. The frame and bed stringers are all solid, no rust holes, no sketchy welds or alterations. Sure it’s dirty, but in good shape.
Wheel cylinders were the same as the other side stuck but just in need of a good cleaning and a very light hone. I cleaned them up and reassembled them.
Then I moved on to the drum. You know when i listen to your tips and knowledge the job just goes smoother
A dab of grease and two self tapping screws and the old seal came right out without mangling it!
I got the drum all cleaned up and painted, and had to stop for the day.
So the next time I get to work on it I should be down to reassembling that last wheel and then start bleeding brakes and see if I have leaks and or working brakes!
I feel like I keep saying this, but I don’t think it can be overstated. Thank you all for your help, tips, and thoughts on this project, it really means alot to me and I appreciate it!
Even though I didn’t get as far as I wanted this weekend I still made good progress and that is very satisfying!
Re: 1961 Ford F500 project.
Posted: Mon Feb 27, 2023 12:13 am
by Eugen
As I dig into this truck it appears to me it was fairly well maintained before it was parked up for 35 years. The brake components all look good. The frame and bed stringers are all solid, no rust holes, no sketchy welds or alterations. Sure it’s dirty, but in good shape.
This is great news. Perfect candidate for a restore like you do, and can be real useful once you finish. It's good that you don't feel rush and take your time. Not long ago I was stressed by having too many things to do and too little time, so I rushed most of the time and inevitably made mistakes or injured myself. So, I think you're doing it the right way.
Re: 1961 Ford F500 project.
Posted: Sat Mar 04, 2023 8:53 pm
by JSinMO
Had a good day working on the old truck. Started out putting the last wheel back together. Went easy and I just put a couple of nuts on the axle just in case it had to come back off.
Then I moved back to the passenger side and pulled the axel back out and fixed my screw ups. I had the hub nut too loose and I forgot to tighten up the axel studs.
With that done it was time to start bleeding!
I tried to rig up a vacuum bleeder, it didn’t work.
Luckily my trusty assistant was available to pump the brakes for me, so we did it the old fashioned way.
I started at the vacuum booster and then worked my way around the truck furthest to closest wheel. It went faster than I expected. If you remember I installed all new lines and
hoses. I ended up with two leaks that I was able to take care of pretty easily. With the crappy flairs I made I’m calling that a win!
The work I’ve done so far appears to have paid off, we now have brakes!!! I’m figuring on blending them again just to make sure they’re good once I have the truck running again and can test drive it. And with that Herbie is back on his feet!
I sure made a mess on this job, time to take a break and clean up before I continue.
When you have tools all over and can’t find the wrench you’re looking for it’s time to clean up!
With that done it’s time to go after the carburetor.
I cleaned all the ports and reassembled. It was dirty, and the accelerate pump was frozen in place. I got it put back together and started adjusting but the stupid sheet that came with the kit is almost unreadable, had to take a picture of it and blow it up.
Naturally it doesn’t list this truck, and it doesn’t list my engine so I had to make a few guesses. We’ll see how it runs, I’ll have to do some tuning once it’s back on the truck.
That’s about the stopping point for today. Now that the brakes are back together I think the next step will be tackling the drive train starting with the engine.
Re: 1961 Ford F500 project.
Posted: Sat Mar 04, 2023 9:47 pm
by Eugen
You'll have a nice truck soon Jeff! What are your plans with the engine? What's it's compression like? Any idea?
Re: 1961 Ford F500 project.
Posted: Sat Mar 04, 2023 10:24 pm
by JSinMO
Eugen wrote: ↑Sat Mar 04, 2023 9:47 pm
You'll have a nice truck soon Jeff! What are your plans with the engine? What's it's compression like? Any idea?
The engine runs pretty good considering the ignition components all look bad and the carburetor was plugged up and had a hole in the float! I haven’t bothered with a compression test yet. The truck has been sitting so long it’s likely there are still some stuck rings. The plugs are really oil soaked.
This may also be from valve seals that I’m sure are hard as a brick, or both! I haven’t run the engine long enough to bring up to operating temperature yet, I think I’ll do that before I do a compression test. A little heat from running will hopefully loosen any stuck rings.
This is the first Ford Y- block I’ve worked on so I’m leaning as I go! I have read that these engines sometimes have a problem getting oil to the rockers.
The list so far is:
Get the carburetor back on, with manual choke, and auxiliary throttle attached.
Pull the valve covers and see if the top of the engine is getting oil, if not I may have to add an external oiling set up.
Check valve seals and replace if needed.
New valve cover gaskets and grommets.
Replace, points, distributor cap, wires, and plugs.
Make sure the thermostat is working.
It looks like the radiator has a small leak so I need to track that down.
Drop the oil pan to inspect the bottom of the engine, replace the pan gasket, and clean the sludge out of the bottom that I’m sure is in there. I don’t want a bunch of crap getting sucked into the pick up and in the engine if I can help it.
Then fire it up and see where we’re at!
Gee now that I look at the list I wish you hadn’t asked, I got a lot to do!
Re: 1961 Ford F500 project.
Posted: Sat Mar 04, 2023 11:07 pm
by Eugen
Oh no, I hope I didn't ruin your evening!

On the other hand, you seem to enjoy getting Herbie the truck in good shape! Plus, spring is almost there, think about those robins!
Re: 1961 Ford F500 project.
Posted: Sun Mar 05, 2023 10:11 am
by JSinMO
Eugen wrote: ↑Sat Mar 04, 2023 11:07 pm
Oh no, I hope I didn't ruin your evening!
On the other hand, you seem to enjoy getting Herbie the truck in good shape! Plus, spring is almost there, think about those robins!
No worries Eugen, you didn’t ruin my evening. I hadn’t actually wrote that list down. Up until now it was just rolling around in my head! As I was writing, more things kept coming to mind! I do like working on Herbie, the robins remind me spring is coming and other projects will need to be worked on!
Re: 1961 Ford F500 project.
Posted: Sun Mar 05, 2023 10:34 am
by RoamingGnome
@JSinMO - Great progress, and awesome photos - I have problems remembering to do before and after photos... It's great to see a record of your work.
When I don't have a helper to bleed the brakes I would fill the system with brake fluid, pump the pedal with the bleed screw open until I saw fluid come out, then close off the bleed screws, pump the brakes until they got hard, jam a stick between the driver's seat cushion and the brake pedal to hold the pedal down once it had pressure on it - then with the pedal locked in place go to the corner and crack the bleed screw to let the fluid/air out - repeat the process until the air was out and the brakes were firm or I got frustrated enough to get some help... (don't have young helpers around and
gets a little grumpy about getting dirty / greasy sometimes
)
Re: 1961 Ford F500 project.
Posted: Sun Mar 05, 2023 11:05 am
by JSinMO
@RoamingGnome Thanks, I appreciate that!
I’m grateful son can help me for sure. I figured I needed a helper since the system was dry except for the master cylinder, I bench bled that. But it actually went pretty quick.
The problem is I let him go play then got in the truck to feel the pedal and it seems a bit soft to me so I’m thinking I’ll rebleed after I get it running again.
Re: 1961 Ford F500 project.
Posted: Sun Mar 05, 2023 9:47 pm
by Gordy
Probably 30 years ago i picked up a pressurized brake bleeder with a variety of master cylinder adapters, at an auction for cheap. Yah it is one of those tools I don't use often, but is a great tool to have. It looks something like this.
Gordy
Re: 1961 Ford F500 project.
Posted: Sat Mar 11, 2023 10:20 pm
by JSinMO
Got to spend some time in the shop this afternoon and made a little more progress on Herbie.
It seemed to me that the brake pedal was a little low. I figured I had the rear brake shoes about right, but thought I should double check the fronts. I adjusted them up I little more, and now I have a nice firm pedal! Last thing to do is a test drive when I have the rest of the work done and make sure they function. I’m not anticipating issues, but you never know.
I have the carburetor put back together and the intake cleaned up, so I mounted it back on the engine. The P.O. Had the choke on the carburetor bypassed and was using a manual choke cable on the dashboard. I have no problem with that so I hooked it back up that way.
I was going to fill the bowl by running gas down the vent tube, but I couldn’t find a bottle that would work without spilling gas all over so I just cranked the engine over to fill it up. I guess the battery was down because that little bit of cranking drained it.
It’s been quite some time since I had a vehicle with the battery mounted under the floor board!
With the battery charged up I hopped into the driver’s seat, set the choke, pumped the gas 4 times, and hit the key. The truck fired up immediately!
Now the accelerate pump work great, no hesitation. If you remember the adjustment chart that came with the carburetor kit didn’t list the set up for this engine, so I had to guess. I think I got really lucky, it seems all I need to do is idle it up just a little bit!
I thought I’d try to hook up the auxiliary throttle cable. I cleaned up the bolt hole in the intake and found a piece of steel in my scrap pile to make a bracket out of.
I know this is cobbled together, but I think it will work.
I just need to come up with a connection for the cable and wire I have vice gripped together in the picture.
I have it in my mind what I want to do, but I can’t think of what the hardware is called to able to look it up.
Im thinking of a brass barrel with a set screw in the side of it. Ive used them in the past. Do any of you know what I’m talking about? Or do you have another idea?
There’s todays old truck ramble, thank you for the help!
Re: 1961 Ford F500 project.
Posted: Sun Mar 12, 2023 12:35 am
by Eugen
Wish I could help but I don't really understand what needs to be done. To lock two wires together? Crimping maybe not strong enough. A copper pipe over it and then nut and bolt?
Re: 1961 Ford F500 project.
Posted: Sun Mar 12, 2023 10:04 am
by JSinMO
Eugen wrote: ↑Sun Mar 12, 2023 12:35 am
Wish I could help but I don't really understand what needs to be done. To lock two wires together? Crimping maybe not strong enough. A copper pipe over it and then nut and bolt?
Sorry, I know I’m not explaining this well. Yes essentially I’m trying to hook two solid wires together. I can picture it in my head, but I’m having trouble putting into words! I’ll try to take a better picture, that may help.
Re: 1961 Ford F500 project.
Posted: Sun Mar 12, 2023 10:38 am
by DavidBarkey
@JSinMO
Move your cable back some and go with a ball chain like what is on the crapper flapper .
Re: 1961 Ford F500 project.
Posted: Sun Mar 12, 2023 3:49 pm
by RoamingGnome
@JSinMO If you have the space and are trying to connect two cables you might be able to use a SetScrew style Marr wire connector - to tie them together... electrical dept at your local hardware store...
- SetScrew Mar.jpg (57.49 KiB) Viewed 5396 times
Wow - How did this picture end up being so big?
Re: 1961 Ford F500 project.
Posted: Sun Mar 12, 2023 3:56 pm
by Gordy
JSinMO wrote: ↑Sat Mar 11, 2023 10:20 pm
Got to spend some time in the shop this afternoon and made a little more progress on Herbie.
It seemed to me that the brake pedal was a little low. I figured I had the rear brake shoes about right, but thought I should double check the fronts. I adjusted them up I little more, and now I have a nice firm pedal! Last thing to do is a test drive when I have the rest of the work done and make sure they function. I’m not anticipating issues, but you never know.
I have the carburetor put back together and the intake cleaned up, so I mounted it back on the engine. The P.O. Had the choke on the carburetor bypassed and was using a manual choke cable on the dashboard. I have no problem with that so I hooked it back up that way.
0D361359-AFF5-4433-8FEB-1EBB8B0F948A.jpeg
I was going to fill the bowl by running gas down the vent tube, but I couldn’t find a bottle that would work without spilling gas all over so I just cranked the engine over to fill it up. I guess the battery was down because that little bit of cranking drained it.
It’s been quite some time since I had a vehicle with the battery mounted under the floor board!
BA8357C0-2EDC-45B3-98B9-B81E37484B5A.jpeg
With the battery charged up I hopped into the driver’s seat, set the choke, pumped the gas 4 times, and hit the key. The truck fired up immediately!
Now the accelerate pump work great, no hesitation. If you remember the adjustment chart that came with the carburetor kit didn’t list the set up for this engine, so I had to guess. I think I got really lucky, it seems all I need to do is idle it up just a little bit!
I thought I’d try to hook up the auxiliary throttle cable. I cleaned up the bolt hole in the intake and found a piece of steel in my scrap pile to make a bracket out of.
I know this is cobbled together, but I think it will work.
22C76A59-F19D-48D6-ADA4-3E06DFF9E862.jpeg
I just need to come up with a connection for the cable and wire I have vice gripped together in the picture.
I have it in my mind what I want to do, but I can’t think of what the hardware is called to able to look it up.
Im thinking of a brass barrel with a set screw in the side of it. Ive used them in the past. Do any of you know what I’m talking about? Or do you have another idea?
There’s todays old truck ramble, thank you for the help!
With what you have rigged up with the vise grips, does this allow normal movement of the gas pedal, except when the cable is locked back of coarse? If not go with the chain connection.
Gordy
Re: 1961 Ford F500 project.
Posted: Sun Mar 12, 2023 5:37 pm
by JSinMO
Thanks guys! With the way I have it rigged the normal throttle has full movement, and this won’t affect it unless I engage it. I found these shaft collars and I’m going to give them a shot. Kind of similar to what Gerry suggested. If it won’t hold I’ll probably have to reconfigure my cable and try the chain like Dave and Gordy suggested.
I’ll try to get a better picture next time I’m in the shop.
Re: 1961 Ford F500 project.
Posted: Sun Mar 12, 2023 10:46 pm
by Eugen
JSinMO wrote: ↑Sun Mar 12, 2023 5:37 pm
Thanks guys! With the way I have it rigged the normal throttle has full movement, and this won’t affect it unless I engage it. I found these shaft collars and I’m going to give them a shot. Kind of similar to what Gerry suggested. If it won’t hold I’ll probably have to reconfigure my cable and try the chain like Dave and Gordy suggested.
I’ll try to get a better picture next time I’m in the shop.
5B9DC201-9087-42B9-B641-332E6F11A6E3.jpeg
Yes, something like this I was talking about, but there are all kind of styles too. I have used something like this, very strong:
Re: 1961 Ford F500 project.
Posted: Sun Mar 12, 2023 11:06 pm
by JSinMO
Eugen wrote: ↑Sun Mar 12, 2023 10:46 pm
JSinMO wrote: ↑Sun Mar 12, 2023 5:37 pm
Thanks guys! With the way I have it rigged the normal throttle has full movement, and this won’t affect it unless I engage it. I found these shaft collars and I’m going to give them a shot. Kind of similar to what Gerry suggested. If it won’t hold I’ll probably have to reconfigure my cable and try the chain like Dave and Gordy suggested.
I’ll try to get a better picture next time I’m in the shop.
5B9DC201-9087-42B9-B641-332E6F11A6E3.jpeg
Yes, something like this I was talking about, but there are all kind of styles too. I have used something like this, very strong:
Screenshot 2023-03-12 at 22.45.46.png
Ahhh. I see what you saying now. I don’t know if I have the room to try that, but maybe. These collars i found are 1/8 inch I.D. so I’m hoping they’ll slip in where I need them. I just hope they hold!
Re: 1961 Ford F500 project.
Posted: Fri Mar 17, 2023 8:03 pm
by JSinMO
I don’t know if you guys feel this way, but i always get excited when parts come in! Almost like Christmas!
I didn’t really want to open the engine up till I had gaskets in hand and they came in today. I think I’m going to make templates of these so I can make my own in the future. So I guess the next step will be checking it out to hopefully give it a better chance of running for a good while yet. Fingers crossed we don’t find anything crazy!
Re: 1961 Ford F500 project.
Posted: Fri Mar 17, 2023 8:10 pm
by Eugen
I feel like that too! Looking forward to the Grand opening!
Re: 1961 Ford F500 project.
Posted: Sat Mar 18, 2023 5:54 pm
by JSinMO
I’ve been fighting a nasty cold this week but I still wanted to make some progress so I cranked up the heater and let the shop warm up and worked for a little while today.
I wanted to finish the auxiliary throttle set up first and try it out.
I tried to take pictures to show what I did. In this first one the rod to the left is the normal throttle linkage to the foot control. The cable to the right is the auxiliary cable to the dashboard.
Here is the rod and shaft collar I’m attempting to attach to the cable.
A little fussing around and I got it into position.
It worked but it slides up the throttle linkage as you actuate it. I added a clip to keep my rod in place.
This is about as crude as you can get, and I’m not particularly fond of the looks of it, but it does work just fine with no binding of the throttle so I’m calling it a win!
I started the engine to test the cable and I was very happy to see it cranked up as soon as I bumped the starter! It may not be true, but it makes me feel like I’m doing something right!
I took the radiator cap off and I see no flow. I did not run the engine long enough to get it warmed up so I’m figuring at point that I either have a thermostat that is closed as it would be when cold and hopefully it’s not stuck, or I have a complete blockade, which I doubt. I’ll have to go over the cooling system later.
Once I shut the engine down I thought it would be a good time to pull the valve covers and see what we have.
Thankfully it looks like I’m getting oil to the top of the engine! It also looks like I have moisture on the rockers, they look milky. I have no indication of water getting into the oil so I’m thinking this is condensation from sitting for 35 years.
I just did a quick check of the valve lash on the closed valves and the all seem to be at 19 thousandths, right where they should be.
So all in all I’m not seeing anything yet thats really worrying me.
So do I just clean it up a bit and button it back up?
I was considering replacing the valve seals but I don’t know. It would be a fair amount of work and I’m not sure how necessary it really is. I pulled numbers one spark plug to take a look. This is a fresh plug and the engine has only been run for a few minutes with these plugs in.
Doesn’t look bad to me. I think I’ll roll this around in my head for a bit and try and decide if I do it now or run the truck for awhile and see what happens.
As always any thoughts or advice you guys have is greatly appreciated and welcome.
That’s it for today, I think I’ll go in the house and take a nap!
Re: 1961 Ford F500 project.
Posted: Sun Mar 19, 2023 5:53 am
by propane1
Me, I think I’d run it. But first change the oil. I’d put new oil and rislone in the oil to clean up the sludge. I’d run it a little bit and do the same oil change again.
Just my thought.
Noel
Re: 1961 Ford F500 project.
Posted: Sun Mar 19, 2023 11:21 am
by JSinMO
propane1 wrote: ↑Sun Mar 19, 2023 5:53 am
Me, I think I’d run it. But first change the oil. I’d put new oil and rislone in the oil to clean up the sludge. I’d run it a little bit and do the same oil change again.
Just my thought.
Noel
I’m kinda leaning that way too Noel. I feel like if it ain’t broke why fix it. This is the first Y-block I’ve messed with and I’ve done a lot of research on it. Apparently Ford had some issues getting oil to the top of the engine on these. The heads get oil through tubing from the center cam bearing so I’m a little hesitant to add a de slugging agent. I don’t want to block those passages. I think I need to do some more reading and see if I find any other issues I shouldn’t be concerned with.
Thanks!
Re: 1961 Ford F500 project.
Posted: Sun Mar 19, 2023 11:50 am
by propane1
JSinMO wrote: ↑Sun Mar 19, 2023 11:21 am
propane1 wrote: ↑Sun Mar 19, 2023 5:53 am
Me, I think I’d run it. But first change the oil. I’d put new oil and rislone in the oil to clean up the sludge. I’d run it a little bit and do the same oil change again.
Just my thought.
Noel
I’m kinda leaning that way too Noel. I feel like if it ain’t broke why fix it. This is the first Y-block I’ve messed with and I’ve done a lot of research on it. Apparently Ford had some issues getting oil to the top of the engine on these. The heads get oil through tubing from the center cam bearing so I’m a little hesitant to add a de slugging agent. I don’t want to block those passages. I think I need to do some more reading and see if I find any other issues I shouldn’t be concerned with.
Thanks!
Understood Jeff. So if you run detergent oil the same thing will happen. Just slower. That rislone stuff works good.
So you might have to run a non detergent oil. Does the engine have an oil filter. ?
Noel
Re: 1961 Ford F500 project.
Posted: Sun Mar 19, 2023 12:32 pm
by JSinMO
propane1 wrote: ↑Sun Mar 19, 2023 11:50 am
JSinMO wrote: ↑Sun Mar 19, 2023 11:21 am
propane1 wrote: ↑Sun Mar 19, 2023 5:53 am
Me, I think I’d run it. But first change the oil. I’d put new oil and rislone in the oil to clean up the sludge. I’d run it a little bit and do the same oil change again.
Just my thought.
Noel
I’m kinda leaning that way too Noel. I feel like if it ain’t broke why fix it. This is the first Y-block I’ve messed with and I’ve done a lot of research on it. Apparently Ford had some issues getting oil to the top of the engine on these. The heads get oil through tubing from the center cam bearing so I’m a little hesitant to add a de slugging agent. I don’t want to block those passages. I think I need to do some more reading and see if I find any other issues I shouldn’t be concerned with.
Thanks!
Understood Jeff. So if you run detergent oil the same thing will happen. Just slower. That rislone stuff works good.
So you might have to run a non detergent oil. Does the engine have an oil filter. ?
Noel
Yes it has the old style paper filter in a canister. This engine really reminds me of old tractor engines. The oil filter, the valve lash adjustment, etc. This has a flat tappet cam, the lifters are solid with a large flat face. I’m planning to run Shell Rotella diesel oil because it has zinc in it. I’ve read the zinc will help protect the cam. So I’m thinking, (as of now at least) to run that oil and keep an eye on it. Now that you say that I don’t know if that is a detergent oil or not. I have to crawl under the truck and make sure but I think it also has an external oil pump. I’m thinking I’ll still drop the oil pan and clean it out and replace gaskets. I’m also running lead substitute in the gas for the valve seats. If this truck had been running all these years I probably wouldn’t worry about it, but the last time this thing was on the road non-detergent oil with zinc, and lead gas were still readily available!
I’m thinking I may just be pulling the valve cover now and then to make sure I have oil getting to the rockers. I’ll have to look up rislone and do some reading on it, and see if Rotella is detergent or not.
Re: 1961 Ford F500 project.
Posted: Sun Mar 19, 2023 10:58 pm
by Eugen
Following with interest!
Re: 1961 Ford F500 project.
Posted: Sun Mar 19, 2023 11:10 pm
by Eugen
On the subject of sludge. My Massey Harris 33 came to me with a lot of sludge, so much that the oil pressure was low due to the screen on the pick up of the oil pump being full of sludge. Took the valve cover off, quite a bit of sludge there too. Cleaned up as much as I could with a screwdriver. Did not take the oil pan off. Put new oil and a can of seafoam in the oil after the engine warmed up. Then ran it for a few minutes and replaced the oil. Oil pressure issue fixed. But the real sludge fix is to pull the pan off and properly clean it, for sure.
Hope you get over that cold soon! Me and the boys went through it about two weeks ago.
Re: 1961 Ford F500 project.
Posted: Mon Mar 20, 2023 9:36 am
by Eugen
Having thought about it a little more, I guess I wanted to mention the use of seafoam but was quite tired. I'm not actually recommending you do that, though I think it's quite safe. Since you're not in a hurry, if it's not too difficult to take the oil pan off, that would make most sense to do. For sure I'd clean the rocker area well by scraping and then wiping excess sludge and stuff like that. I wonder what shape the valves and seats are in too, but that would be a lot more work. Seafoam is also used through the intake for cleaning some of the carbon. I've done that procedure to several of my cars over the years. I think it does help somewhat, and some people swear by it. Again, nothing compares to head disassembly and scraping the carbon off.

Re: 1961 Ford F500 project.
Posted: Mon Mar 20, 2023 10:01 am
by JSinMO
Eugen wrote: ↑Mon Mar 20, 2023 9:36 am
Having thought about it a little more, I guess I wanted to mention the use of seafoam but was quite tired. I'm not actually recommending you do that, though I think it's quite safe. Since you're not in a hurry, if it's not too difficult to take the oil pan off, that would make most sense to do. For sure I'd clean the rocker area well by scraping and then wiping excess sludge and stuff like that. I wonder what shape the valves and seats are in too, but that would be a lot more work. Seafoam is also used through the intake for cleaning some of the carbon. I've done that procedure to several of my cars over the years. I think it does help somewhat, and some people swear by it. Again, nothing compares to head disassembly and scraping the carbon off.
I’m a big fan of Seafoam too. I’ve also done the Seafoam through the intake procedure on my vehicles, and I do think it helps. At this point I have no plan to remove the heads. You’re right that a good cleaning would help, but I’m thinking getting some run time on the engine may be fine too, and I really don’t want to get into that much work if I don’t need to. I believe the milky stuff on the rockers is probably condensation from sitting, but also from the engine running for short periods of time and being up to operating temperature.
The rockers really don’t have that much sludge on them. I’ve definitely seen a-lot worse! So like you said a clean up is in order. And the plan is to drop the oil pan. Any sludge or shiny bits, or god help me chucks of metal will be in the bottom!
I have to try and look up the procedure though. I still have to look, but if this is an external oil pump then it’s not as simple as just pulling the pan bolts. I think you have to get at least the pump cover off to remove the pick up tube as it runs into the side or the oil pan! Interesting design. I’ll put up pictures when I get that far.
So I need to do a little more reading and looking then I guess I’ll start pulling it apart!

Re: 1961 Ford F500 project.
Posted: Mon Mar 20, 2023 10:37 am
by propane1
I’ve heard of people draining the oil. Then fill with kerosene. Start engine and let run for a minute or so. Then drain. Refill with oil. Do when engine is warm. More thought for you Jeff.
Noel
Re: 1961 Ford F500 project.
Posted: Mon Mar 20, 2023 10:42 am
by Eugen
propane1 wrote: ↑Mon Mar 20, 2023 10:37 am
I’ve heard of people draining the oil. Then fill with kerosene. Start engine and let run for a minute or so. Then drain. Refill with oil. Do when engine is warm. More thought for you Jeff.
Noel
Well, that's where I would draw the line, I see no need for this. Seafoam in oil is supposed to do the same thing and a lot less potential for damage. But that's just me.

Diesel or kerosene in the gears box of a tractor, that's different. And I've done it to the MH33 after cleaning the sludge at the bottom. Also done it on the 644 gear box.

Re: 1961 Ford F500 project.
Posted: Mon Mar 20, 2023 11:18 am
by propane1
Well, doesn’t matter what you use to put in the oil to clean the sludge. Once it starts cleaning the sludge, it will be in the oil, which then will be getting to the bearings , pistons, rings and other moving parts. And just hopefully the filter can get most of the dirt and grit before it does any damage. I would be making sure to put a new filter on each oil change and do the first few oil changes quite often.
Transmission oil would be a good cleaner too.
Any way , it’s up to Jeff as to what he wants to do. I’m just rambling on about ideas and things I’ve heard over the years.
Noel
Re: 1961 Ford F500 project.
Posted: Mon Mar 20, 2023 11:51 am
by Eugen
@propane1 maybe I didn't understand you well, but I thought you said drain the oil, and fill with kerosene. Adding a can of seafoam to the oil is just making it thinner, but still you have lubrication. Completely replacing the oil with kerosene means you got zero lubrication in that engine. To each his own, for sure, but I would not run an engine even for a few minutes this way.
Here are instructions from Seafoam themselves on how to do it. Basically they say add 1 ounce for every quart of oil and replace the oil 100 to 300 miles after that.
https://seafoamworks.com/knowledge-base ... kcase-oil/
Re: 1961 Ford F500 project.
Posted: Mon Mar 20, 2023 12:21 pm
by propane1
Eugen wrote: ↑Mon Mar 20, 2023 11:51 am
@propane1 maybe I didn't understand you well, but I thought you said drain the oil, and fill with kerosene. Adding a can of seafoam to the oil is just making it thinner, but still you have lubrication. Completely replacing the oil with kerosene means you got zero lubrication in that engine. To each his own, for sure, but I would not run an engine even for a few minutes this way.
Here are instructions from Seafoam themselves on how to do it. Basically they say add 1 ounce for every quart of oil and replace the oil 100 to 300 miles after that.
https://seafoamworks.com/knowledge-base ... kcase-oil/
Yes Eugen. Drain the oil, then fill with kerosene. Run for a minute give or take a few seconds. Then drain the kerosene. Fill with oil. Replace filter. I watched a fella do this each oil and filter change on his car. 1965 Ford Galaxy two door. Hard top I believe.
Noel
Re: 1961 Ford F500 project.
Posted: Mon Mar 20, 2023 3:52 pm
by Eugen
Thank you Noel. With respect I'd like to say that while I'm not that careful with my engines as to think that this procedure would badly damage an engine, I would not do it because I don't really see the point. I mean, with today's detergent oils I really doubt a kerosene wash every oil change does anything good. I also doubt and old engine full of sludge would benefit from just one minute of running with kerosene. Again, I respect everyone's decision to do whatever they want to their engine, as I do some stuff that other people would frown upon.
Re: 1961 Ford F500 project.
Posted: Mon Mar 20, 2023 5:20 pm
by propane1
Ya well everybody has there own opinions. And that’s fine.
I was just rambling.
Noel
Re: 1961 Ford F500 project.
Posted: Mon Mar 20, 2023 8:15 pm
by JSinMO
propane1 wrote: ↑Mon Mar 20, 2023 10:37 am
I’ve heard of people draining the oil. Then fill with kerosene. Start engine and let run for a minute or so. Then drain. Refill with oil. Do when engine is warm. More thought for you Jeff.
Noel
It’s funny you mention this. I was just talking to a fellow this morning about this project and he brought up the same thing!
I hadn’t heard of running kerosene in the engine to clean it up before. His formula was 4 quarts of motor oil and 1 quart of kerosene or diesel fuel. And run the engine for a few minutes. Said he learned it while working at a Chevy dealership.
On a side note I would love to have a 65 Galaxy 2 door hardtop! I’ve looked at few but they’re beyond my budget. But you never know, I’m sure there’s one hiding in a barn out there somewhere waiting for me to find it!
I can pretty much figure what this truck did in its working life on the typical farm in the 70s and 80s. It brought square bales of hay and straw from the field to the barn, it brought grain in to the bin, and they told me it wasn’t used to take grain to market much, they had a bigger truck for that. From my experience that means a lot of idling, and low rpm putting across the field in low gear. These were the days when you walked next to the truck and threw bales on the back as you drove across the field. To me that means carbon build up in the combustion chambers.
To my eye I don’t see enough sludge at least in the top of the motor to concern me. I’m not planning to do anything beyond dropping the pan and cleaning it up and slapping it together and running it at this point. As far as what carbon may or may not exist in the combustion chambers, to me getting it on the road and running it at higher rpm is step one and see how he does. If it has issues I’ll probably try the Seafoam treatment
@Eugen talked about. I’ve done that before and I seen positive results.
I can’t see tearing down an engine that starts right up, and makes no noise. If it does start having problems I would probably look for a newer FE motor to rebuild and put in as opposed to trying to rebuild an engine from 1957 that may not be easy to get parts for.
Wheww that’s one hell of a Monday evening ramble for me! If you read all that and are still with me, thank you!
I appreciate the conversation on this guys. Your input really matters to me and helps me proceed!
Re: 1961 Ford F500 project.
Posted: Mon Mar 20, 2023 8:42 pm
by propane1
I would put transmission oil in the engine oil and in the gasoline tank to clean up carbon in the cylinders.
Again, just my opinion.
Any body know when seafoam was invented ?
Noel
Re: 1961 Ford F500 project.
Posted: Mon Mar 20, 2023 8:56 pm
by JSinMO
propane1 wrote: ↑Mon Mar 20, 2023 8:42 pm
I would put transmission oil in the engine oil and in the gasoline tank to clean up carbon in the cylinders.
Again, just my opinion.
Any body know when seafoam was invented ?
Noel
That’s a good idea. I regularly add ATF and Seafoam to my tractor engines and gas. It works just fine.
I had to look up Seafoam. This says it was invented in the 1930s
https://seafoamworks.com/about-us/
Re: 1961 Ford F500 project.
Posted: Mon Mar 20, 2023 9:33 pm
by propane1
Well I never heard of seafoam until a few years ago.
Noel
Re: 1961 Ford F500 project.
Posted: Tue Mar 21, 2023 7:28 am
by Harry
JSinMO wrote: ↑Mon Mar 20, 2023 8:56 pm
propane1 wrote: ↑Mon Mar 20, 2023 8:42 pm
I would put transmission oil in the engine oil and in the gasoline tank to clean up carbon in the cylinders.
Again, just my opinion.
Any body know when seafoam was invented ?
Noel
That’s a good idea. I regularly add ATF and Seafoam to my tractor engines and gas. It works just fine.
I had to look up Seafoam. This says it was invented in the 1930s
https://seafoamworks.com/about-us/
I watched the video about Seafoam, interesting. Thanks for posting Noel.
Harry
Re: 1961 Ford F500 project.
Posted: Tue Mar 21, 2023 7:53 am
by DavidBarkey
@JSinMO Ok , heres so info from a guy how been around automotive engines for a few years . Over 30 with 17 doing tune up and Drive Clean repair before retiring from the bench. There are a lot of wive tails out there because some people have got lucky over the years .
Transmission fluid , water , Seafaom and other similar products done right will de-carbon an engine . Done wrong can cause- hydro lock and broken engine , large chunks of carbon caught under valves , blocked EGR and muffler passages , damaged spark plugs .
Cleaning of sludge done right will allow free flow of oil back to pan . Done wrong will plug the pick up and smaller passages back to the pan . Do not worry about oil gallery on the pressure side as the screen and filter will protect them . But running to much solvent can cause bearing failure .
Do NOT use tranny fluid though the combustion chamber of anything that has a O2/Cat. system . It WILL cause $$$ damage .
I personally "repaired " cars failing emotions testing with nothing more than seafoam treatments and a good run down the highway . Carbon build up on the cats/ O2 sendors will cause them not to work right . Same goes for the EGR sensors in some diesels . That being said I also watch a mechanic grenade an engine ( hydro lock) being impatient doing a de-carb with the "IV bottle" into the intake . Another one had the pull the heads because a carbon chunk was lodged under a valve .
Running anything though the engine to remove sludge is no longer necessary with today's oil if done regularly and can cause damage if not done correctly . Not knowing the history of an engine it is wise to drop the pan and see what you have . If the is a high amount of sludge . Clean the pan,oil pickup and anything else you can get with diesel fuel. Then with a drain pan underneath remove the intake and valve covers clean all that you can using rifle brushes to clean the oil return passages . Put back together with new modern oil and filter of the correct ratting and run at a "fast idle " for and hour or so . Change oil and filter again . From this point proceed as per regular oil changes . Yes the older engines do benefit from diesel grade oil .
If sludge in pan is minor , just do the "fast idle for an hour with new oil and filter . do regular oil and filter change again . Your all set .
If carbon build up is suspected in the cylinders . I personally recommend that after all oil changing is done and is ready to go on to road that you run with fresh gas double strength Seafoam in the fuel . Runn at "fast idle " for an hour then take it out and put load on it . Remember most of these things have not run in while . Don't drive it like you stole it .
Older / pre unleaded fuel engine that are not aluminum with valve seat inserts benefit from valve lube in the gas .
Wow that was a lot first thing in the am .

Re: 1961 Ford F500 project.
Posted: Tue Mar 21, 2023 9:23 am
by Eugen
That's the most complete and at the same time concise treatment I ever came across on this subject Thank you
@DavidBarkey
Re: 1961 Ford F500 project.
Posted: Tue Mar 21, 2023 10:32 am
by JSinMO
@DavidBarkey ive got a really busy day to today, but I wanted to hop on and thank you for an outstanding write up! With your experience I was really hoping you would weigh in on this. Thank you, i very much appreciate you taking the time to write this up!
Re: 1961 Ford F500 project.
Posted: Sat Mar 25, 2023 7:11 pm
by JSinMO
Here’s todays old truck update.
First item today was replacing the ignition system parts. I took the old cap off and took a look at the points. They’re actually in pretty good shape so a quick dressing and I decided to leave them in. I figured they’re probably better quality than the new ones I bought so we’ll run it for now. The rotor and cap on the other hand needed replacing.
The inside of the cap looked about the same, corroded and pitted.
Interesting wire loom for the spark plug wires. The were 4 of these bolted to the engine. The rubber was still in good shape so I reused them.
The routing of the plug wires is a little different to me. They come off the distributor, down the back of the engine and around the sides, then up to the plugs. Looks like this is necessary because the exhaust manifolds are too close the heads to route them across the top of the engine. It make for some long wires!
With Medusa out of the way and the new wires, cap, and rotor in place I started the truck to make sure I didn’t screw something up, and thankfully it kicked right off!
With that job done it’s time to drain the oil and prepare to drop the pan. The underside of this thing sure is dirty!
I’m not sure, but I think I have a seal or 10 leaking at the pump and cylinder for the bed hoist!
That’s work for a different day, on to the oil pan!
Here is the external oil pump and pick up tube that runs through the side of the pan.
The oil was black as coal but nothing other than oil came out, no chunks, nothing shiny in the oil.
With the oil drained I disconnected the pick up tube from the pump and dropped the pan.
Here’s the first look inside the oil pan.
To me it look phenomenal! No bits of metal, no thick sludge, no nothing except one cocklebur! How the hell did that get in there?
The bottom end of the engine appears to be fine as well, no real sludge to speak of, nothing broken or loose! This is all wonderful news! I’d have to say if a fellow isn’t happy with that, he’s damn hard to please!
Don’t get me wrong, the pan and pick up need a good cleaning, and I can see the gasket did fail, but that pretty easy to take care of!
So now I’m on hold, naturally the oil filter I bought is the wrong one!
Once I get the correct filters and the pan back on I plan to follow
@DavidBarkey advice run the engine at high idle for about an hour and change the oil and filter again.
It really feels like we’re getting close to a test drive!
Re: 1961 Ford F500 project.
Posted: Sat Mar 25, 2023 7:26 pm
by Timj
No big surprises, always a good thing.
a little drive sounds like fun.

Re: 1961 Ford F500 project.
Posted: Sat Mar 25, 2023 11:06 pm
by Eugen
The pan and the bottom are a nice surprise! I would not be worried about any thick stuff in the oil clogging things. It'll clean up well in no time.
Re: 1961 Ford F500 project.
Posted: Sun Mar 26, 2023 7:35 am
by propane1
Nothing wrong in that engine. Just driver.
Noel
Re: 1961 Ford F500 project.
Posted: Wed Mar 29, 2023 9:36 pm
by JSinMO
Had a little time to mess around this evening. I scrubbed, and scraped, and washed, and cleaned. I don’t know if I’d eat off it, but I think that’s about as clean as I’m gonna get it. Should be plenty fine to hold oil!
I don’t think I’ve ever seen something with so much dirt and grime caked to the outside side of it! I must have scrapped, sanded, and wiped 10 pounds of dirt and grease off! But once cleaned up, and a $5 paint job and it looks pretty good!
Once I get the pick up and the block clean I’ll be ready to slap it back together!
Re: 1961 Ford F500 project.
Posted: Wed Mar 29, 2023 10:20 pm
by MattA
Looking good
Maybe I missed it, any plans for the truck when its finished up?
Re: 1961 Ford F500 project.
Posted: Wed Mar 29, 2023 10:42 pm
by Eugen
Looks perfect to me!
Re: 1961 Ford F500 project.
Posted: Thu Mar 30, 2023 5:03 am
by propane1
Now you did it Jeff. You gotta paint the whole truck inside and out.
Noel
Re: 1961 Ford F500 project.
Posted: Thu Mar 30, 2023 9:13 am
by JSinMO
MattA wrote: ↑Wed Mar 29, 2023 10:20 pm
Looking good
Maybe I missed it, any plans for the truck when its finished up?
It’s just going to be for our personal use. Maybe haul what we need around here. There are a couple of small local car shows and tractor/ farm shows I might take it too once in awhile. Hopefully just enjoy using it!
@propane1 The thought of painting it up has crossed my mind!
I don’t know know that I want to fix it up too much, I might not want to put it to work if it’s all shiny!
Re: 1961 Ford F500 project.
Posted: Sat Apr 01, 2023 9:11 pm
by JSinMO
Here’s today Herbie the old truck update. I think I’ll call this one the good, the bad, and the odd!
Let’s start with the good.
I started the day making some templates of the oil pan gasket, and valve cover gasket in case I every need to make some.
With the oil pan cleaned painted and ready to go I sprayed the gasket with a some copper coat for a little extra protection, and so hopefully it would stay in place while I get the pan in place. I’m not sure if this is a common practice or not but I tie a little sewing string through to bolt holes to help keep the gasket in place too.
I slipped the pan into place and started the bolt. Once they are started I know my gasket is in the right place so I can cut my strings and put the last few in.
I attached the pickup tube with new seal to the pump. Ford recommends some thread sealer on the threads where the pick up goes through the pan. With that all loosely assembled
I ran up all the pan bolts.
Speaking of tools we don’t use anymore I dug out the old speed wrench for this job!
I got everything tight and put a new oil filter in and the filled it with 10W30 high mileage oil with a zinc additive for our run test. This is where I know I could never be a professional mechanic. Besides being way to slow, I get very nervous when it’s time to start something up after I’ve been in it. I usually check everything 10 times, stop and think if I’ve done everything I was suppose too and then check it all again!
I decided to crank the engine over with the coil wire disconnected so the engine could build oil pressure befor it started. That plan work well.
Now let’s throw in some of the bad!
First item.
I had one last look at the bottom end before I put the pan on. Everything seems fine to me, except for the timing chain.
I don’t know how much play a Ford 272 from 1955 is supposed to have but is really seem excessive to me.
What do I do about it? I thought about it for awhile and here’s what I came up with.
The engine runs fine, makes no noise, and runs at a relatively low RPM compared to modern engines. If I go after the timing set I might as well figure on an engine rebuild.
Having considered all this I decided to run it! At least for now and see where it goes.
Second item.
When I cranked the engine to build oil pressure it didn’t take lone to drain the battery dead.
I pulled the battery out and put the charger on it.
The cable connections were of course loose and dirty, with a terribly rusty ground!
Enough of that! Back to the good!
With the battery charged and clean, good connections it’s time to crank it up.
The engine immediately stated as soon as I bumped the key! And I’ve got oil pressure, I see my fresh oil on the rocker arms!
A quick check underneath and no leaks!
A couple more gaskets, and a couple of nuts and it looks like a complete engine again.
With that I fired it back up and drove it out of the shop. Things seem to be functioning as they should at this point!
And now for the odd
When I went into the shop yesterday I noticed brake fluid under the truck.
It’s coming from the passenger rear drum. That’s one of the cylinders I “reconditioned”. I wasn’t happy seeing that, but what can you do.
Well I checked it today and it’s not leaking. I drove the truck back and forth in front of the shop and I have brakes and no leaks! How does a wheel cylinder just spring a leak and then stop?
it’s been my experience that once they start leaking they don’t stop. One of you will have to explain this to me! I guess I’ll keep an eye on it and see if it start leaking again.
Next step will be the high idle run test. I’ll be checking these items.
Points dwell
Timing
Charging system
Cooling system
Another question for you guys, what am I not thinking of that I need to look at under the hood? I got to be forgetting something!
Before I do any of that I gotta clean up the shop, I made a heck of a mess again!
Re: 1961 Ford F500 project.
Posted: Sun Apr 02, 2023 12:45 am
by Gordy
So once you got the battery connections clean and tight, did the starter spin good and strong? With the oily/greasy engine like you described I have had starters that seemed real week. Oil had gotten in and formed a black layer on the commutator that acted as a insulator, some 400 git emery cloth cleaned that up, then run a pick between the commutator segments to ensure they are clean and no shorts can form.
Gordy
Re: 1961 Ford F500 project.
Posted: Sun Apr 02, 2023 6:23 am
by DavidBarkey
When I went into the shop yesterday I noticed brake fluid under the truck.
@JSinMO
from in side the drum or out side ?
Outside , bleeder screw or line not sealing .
Inside , cup seals hard from age . Will flair and seal when warm and under pressure . Will leak when cold and no pressure usually over night when cold and not in use . They may or may not soften with exposure to new fluid . After all they are just a hydraulic seal but made to alcohol based break fluid in stead of oil based fluid .
Re: 1961 Ford F500 project.
Posted: Sun Apr 02, 2023 9:11 am
by Eugen
Re: 1961 Ford F500 project.
Posted: Sun Apr 02, 2023 9:57 am
by propane1
The old put the string through the base pan holes to hold the gasket in place trick, ayyy. Hehe. I never heard of that before Jeff. Nice tip.
I like the speed handles. I have two on the top of my tool box. Great things.
I wouldn’t be to worried about the timing chain. But that just me.
I wonder if the rubber sealing lip was flipped over , then after, it flipped it self back to where it’s suppose to be.
Great progress Jeff.
Noel
Re: 1961 Ford F500 project.
Posted: Sun Apr 02, 2023 10:28 am
by JSinMO
@Gordy The outer case of the starter is filthy for sure. But it seems strong, and turns the engine over fast. The battery is a Neverstart from 2019 I’m thinking it’s getting weak. The connections were terrible. But to your point I’ve seen that on tractor starters before. They get really draggy. I’m not sure if I can measure the amp draw but it might be interesting to know.
@DavidBarkey it was running from inside the drum so it’s one of the wheel cylinders. Those seals look good but maybe they were harder than I thought. Hopefully that’s the end of it, and I don’t have to tear into it again! I’ll keep an eye on it.
Re: 1961 Ford F500 project.
Posted: Sun Apr 02, 2023 10:36 am
by JSinMO
Thank you, I appreciate you saying that. I enjoy sharing this with you all and the discussions and comments that have come with it. Fingers cross that it will keep going smoothly!
Re: 1961 Ford F500 project.
Posted: Sun Apr 02, 2023 10:43 am
by JSinMO
propane1 wrote: ↑Sun Apr 02, 2023 9:57 am
The old put the string through the base pan holes to hold the gasket in place trick, ayyy. Hehe. I never heard of that before Jeff. Nice tip.
I like the speed handles. I have two on the top of my tool box. Great things.
I wouldn’t be to worried about the timing chain. But that just me.
I wonder if the rubber sealing lip was flipped over , then after, it flipped it self back to where it’s suppose to be.
Great progress Jeff.
Noel
Thanks Noel! I hope you can use that string trick. I’m with you I’m not going to worry about the chain till I have too.
Now that you say that I makes me wonder if I got one of the seals in crooked. Hopefully it’s squared up now. I guess time will tell!
Re: 1961 Ford F500 project.
Posted: Sun Apr 02, 2023 11:05 am
by Gordy
JSinMO wrote: ↑Sun Apr 02, 2023 10:28 am
@Gordy The outer case of the starter is filthy for sure. But it seems strong, and turns the engine over fast. The battery is a Neverstart from 2019 I’m thinking it’s getting weak. The connections were terrible. But to your point I’ve seen that on tractor starters before. They get really draggy. I’m not sure if I can measure the amp draw but it might be interesting to know.
@DavidBarkey it was running from inside the drum so it’s one of the wheel cylinders. Those seals look good but maybe they were harder than I thought. Hopefully that’s the end of it, and I don’t have to tear into it again! I’ll keep an eye on it.
Here is one of those tools that don't get much use but are nice to have and not expensive. Dual range inductive amp meter, only draw back is you need a helper on the key or a remote starter button
https://www.ebay.com/itm/255638902174?c ... T5EALw_wcB
I did find an all plastic one at Ace hardware about 8 years ago for $5, it tested good against my $$$ Blue Point set.
Gordy
Re: 1961 Ford F500 project.
Posted: Sun Apr 02, 2023 11:39 am
by RoamingGnome
Ahhh... the old "string through the gasket hole trick..." a variation we used in the shop was to strip some small gauge wire and use a couple of the individual strands for holding the gasket in place - a little easier to poke through the holes and loosely twist in place - and the
doesn't get grumpy about dirty fingerprints on her sewing box (or a missing spool of thread...)
Re: 1961 Ford F500 project.
Posted: Mon Apr 10, 2023 9:27 pm
by JSinMO
Ever notice how you get faster at something when you have to do it more than once?
I mentioned the other day I had a wheel cylinder leak. Well it’s still leaking so I took the drum back off this evening. Had the axel out and the drum off a lot faster this time!
The top cylinder seems to be fine. But the bottom is surely leaking.
I took it apart and I don’t see much. I think one cup seal was in there crooked, how I managed that I don’t know. I could probably hone it just a touch more and clean it up a bit better. I just don’t want to home too much or I’m afraid I’ll never get it sealed. So I’m gonna clean it up a little more and make sure I get the seal in straight and slap it back together.
[attachment=0]62F928B1-3400-4D1A-B237-39FF835E9AE6.jpeg[/attachment
Hopefully that will be the end of the brake troubles!

Re: 1961 Ford F500 project.
Posted: Fri Apr 14, 2023 10:34 am
by Eugen
JSinMO wrote: ↑Mon Apr 10, 2023 9:27 pm
Ever notice how you get faster at something when you have to do it more than once?
I mentioned the other day I had a wheel cylinder leak. Well it’s still leaking so I took the drum back off this evening. Had the axel out and the drum off a lot faster this time!
Hopefully the leak is fixed for good this time! I know what you mean by getting faster when you do it multiple times. I once got rebuilt injectors for the truck from ebay. The vendor selling had multiple sets, obviously a business which specialized in rebuilding injectors and selling them. Made sure the right part number was ordered. I was not sure the injectors in the truck were bad, but I was troubleshooting really bad long term fuel trim numbers and was addressing multiple possible causes. Anyway, there was quite some labour involved in installing the injectors when they arrived. The next morning drive was terrible. I thought I made a mistake installing them, so I take them off and try and install them again, with much care to not make a mistake. Same thing, engine running really bad. At this point I thought, maybe, maybe, those injectors I got from ebay are not good. So, pulled them out and inspected them with a magnifier glass. They looked the same, yet they were different. In fact they had fewer spraying holes, instead of 6 on the original, these had 4. The model number showed they were for a Honda Civic!!! When I contacted the seller, they implied that I was trying to scam and insisted there is no way they made a mistake. Cleaned the old ones as well as I could and put them back, car ran nice. But back to what you were saying Jeff, it took a lot less time the last time I put the injectors in. Really show practice makes perfect eh?
Re: 1961 Ford F500 project.
Posted: Sat Apr 15, 2023 12:19 am
by JSinMO
@Eugen That sounds like a bad situation with those injectors. Yea I guess your right practice does make perfect, but it sure can be aggravating!
I went over that leaky cylinder again and put it back on the truck. I thought I’d test it with out the drum so I ran a heavy strap around the brake pads and bled that side.
Guess what? Now the drivers side rear is leaking!!

Well, what to do?
I could go through them all again. I could probably, maybe, possibly finally get them to seal, but would I trust them?
And if I go too far with honing them the seals won’t fit. From my research finding the right over size seals isn’t going to happen.
Who knows how much fiddling I’d have to do before I would call it good. Not to mention it’s kinda a pain in the
to keep taking it all apart.
So I’d did some looking online and Napa offered new ones at a 20% discount with free shipping! So that’s enough of this nonsense! New cylinders it is!
They came in today, so this evening I went to the shop and got to it.
I got the passenger side all buttoned up again and the new ones mounted on the drivers side and the drum back on. I’ll have to finish up tomorrow when I’m fresh, I’m done for the night.
Hopefully, finally this will be the end of the brake part of this project.
I’ve said before that I would rather rebuild things instead of just replacing them, but in this case I think it’s the right call. I gave it a shot and failed miserably. If it was some other less essential component I’d probably keep messing with it but I don’t think the brakes are something I want to not have confidence in!
I think that will do for a Friday night truck ramble!
Re: 1961 Ford F500 project.
Posted: Sat Apr 15, 2023 9:09 am
by Eugen
Good call Jeff! Sometimes getting a new part is the best option!
Re: 1961 Ford F500 project.
Posted: Sat Apr 15, 2023 6:33 pm
by JSinMO
I finish putting in the new brake cylinders this morning. Got everything buttoned up and the bled everything again. In a confident move I went ahead and mounted the duals! So far so good I now have brakes that don’t leak! I’ll keep an eye on the ground for awhile to make sure there’s no drips.
I noticed it was just about out of gas so I put 10 gallons in and I’ll be darned, the gas gauge works! Now it shows half a tank!
Re: 1961 Ford F500 project.
Posted: Sun Apr 16, 2023 9:28 am
by Toolslinger
No question new brake cylinders are a good choice. I fought and fought with my Diamond T brakes... The weird lazy L cylinders on the rears were no longer available new. I managed to find a NOS unit out of Israeli military surplus for one side., which was great, but only solved that one. Eventually I just pulled them all, and sent them out for bore/lining with stainless. All new rubber, and pistons too. That should be the end of brake issues as far as that goes... The rest of the system is another story.
That was several years ago. Last year or so, I found someone had put the cylinders back in production... Naturally... Probably still better with the stainless, but it sure would have been nice to just buy new at the time.
Re: 1961 Ford F500 project.
Posted: Sun Apr 16, 2023 5:27 pm
by JSinMO
@Toolslinger The Israelis must of had warehouses full of NOS stuff. There was a bunch that came in for these old Fords too several years ago. That’s how my luck runs too! At least with them rebuilt you won’t have to worry about it for a long time.
We had storms move through yesterday. After being in the 80s for a week 40s today feels awful chilly! So instead of working outside I went in the shop and made some more progress.
Gave everything a good greasing. I repaired the wiring to the brake switch and got them working again.
Now that I’m able to move the truck around I’m feeling a vibration coming from the throw out bearing on the clutch. I figured I should pull the inspection cover off and have a look.
I don’t think these pictures will show it very well but the clutch and bearing area are stuffed full of mouse nest!
I spent quite a bit of time with the shop vac, screwdrivers picks, and a piece of baling wire pulling it out. Nasty stuff

I think I’ll leave the cover of for know to make sure it all out.
I hope that’s all it was and the bearing is ok!
I want to change the oil in the transmission and rear end but looking at them I’m going to have to come up with a way to refill them. No easy way to get the oil back in! I might try a piece of hose and pour it in, or come up with a hand pump. Either way it’s probably going to be a mess.
Re: 1961 Ford F500 project.
Posted: Sun Apr 16, 2023 6:10 pm
by Eugen
Jeff, is there a reason a hand pump like this doesn't work? This is what I used for transmission and transaxle. It's slow but it worked fine.
- E9CC03CF-028F-455A-AD90-7DEEB88763B5.jpeg (98.29 KiB) Viewed 7037 times
Nasty stuff mice nests! Yuck! We're having a new problem with mice getting inside the truck. Found mouse crap all over the kids seats

so I setup traps and so far I caught 6. This started happening after work was done at the dealership on account of a recall. Boggles the mind. I hope that was the problem in the clutch area but I can't wrap my mind around how that would be.
Re: 1961 Ford F500 project.
Posted: Sun Apr 16, 2023 6:13 pm
by Jancoe
Trucks looking good. I like to pressurize the bottle with air to transfer lubes under vehicles. Hole in the bottle for your air nozzle and hose to diff. Little air and away it goes. No squeeze required.
Sent from my SM-S906U using Tapatalk
Re: 1961 Ford F500 project.
Posted: Sun Apr 16, 2023 6:32 pm
by JSinMO
Eugen wrote: ↑Sun Apr 16, 2023 6:10 pm
Jeff, is there a reason a hand pump like this doesn't work? This is what I used for transmission and transaxle. It's slow but it worked fine.
E9CC03CF-028F-455A-AD90-7DEEB88763B5.jpeg
Nasty stuff mice nests! Yuck! We're having a new problem with mice getting inside the truck. Found mouse crap all over the kids seats
so I setup traps and so far I caught 6. This started happening after work was done at the dealership on account of a recall. Boggles the mind. I hope that was the problem in the clutch area but I can't wrap my mind around how that would be.
Yes a hand pump like that would work fine.
You’ve got an infestation of mice! Yuck is right! I hope you get them all fast. They chew on everything. The dealership must have parked your truck next to a field!
The mouse nest was packed solid in the clutch and all around the throw out bearing so im hoping it was just not letting it move freely causing the vibration. I spent a lot of time getting it loose and pulling it out!
@Jancoe Thanks. good idea. I might have to try that!
Re: 1961 Ford F500 project.
Posted: Sun Apr 16, 2023 8:17 pm
by Gordy
I picked up one of those hand pumps at O'Reilly Auto Parts years ago for 5-6 bucks. Works great, and comes with a second hose for the bottom of the pump you can trim to length for the bottle you are using.
Gordy
Re: 1961 Ford F500 project.
Posted: Sat Apr 22, 2023 7:01 pm
by JSinMO
After our recent rain and storms the weather has turned quite chilly, a good day to be in the shop!
The brakes are still working fine so I figured it’s time to get oil in the rear differential. I crawled under the truck to get things cleaned off and I’ll be darn, the original tag is still there!
So this is a Rockwell rear axle. I was going to put 90 weight oil in, but the tag clearly says it wants SAE140 which of course I don’t have. I think it’s worth putting the right oil in so no draining the rear end today.
I did change the oil in the transmission with 90 weight. I didn’t get a hand pump or put air to the oil jug. I just ran a hose out of the transmission and up to a funnel.
Slow, but affective! I also checked the steering gear box, it’s dry!
i can see it’s been leaking. I went ahead and filled it with 90 weight. If it leaks out my plan is to fill it back up with combine corn head grease. It’s a vey light grease and I’ve used it before in tractor steering boxes, lubricates but doesn’t leak out.
Then I decided to start on my unexpected surprise. The fuel tank is leaking!
It didn’t leak till I put 10 gallons of gas in it. It seems to be seeping. I siphoned the gas back out and pulled it out of the truck. The filler neck hose is rotten but I have a piece for that.
I no pulled the tank out and turned it around and what the heck!?
Thats one heck of a patch in the middle of it. I guess I should be happy, as that’s the first real cobbled repair I’ve seen on this truck. I thought well I know where it’s leaking! But it doesn’t seem to be at that patch. In fact so far I haven’t found it. I pressurized the tank with some air and didn’t see anything. I know there’s a hole somewhere, the floor of the truck is wet.
So do you guys have a favorite way to find a leak? I figure if I can find it I’ll patch it too as a new tank isn’t in the budget right now. Thankfully it’s not hard to get it out so I can alway replace it later if I can seal it up for now.
Re: 1961 Ford F500 project.
Posted: Sat Apr 22, 2023 7:07 pm
by Eugen
The welding on that patch is like I've done it!
If you can pressurize the tank how about spraying it with soapy water?
Another thing to check is the line going from it.
Re: 1961 Ford F500 project.
Posted: Sat Apr 22, 2023 7:30 pm
by JSinMO
Eugen wrote: ↑Sat Apr 22, 2023 7:07 pm
The welding on that patch is like I've done it!
If you can pressurize the tank how about spraying it with soapy water?
Another thing to check is the line going from it.
Good idea. I’ll have to wait for an assistant to keep pressure on while I spray around the tank.
I didn’t look at the line very close. I need to do that. It’s a steel line that comes out of the top of the tank.
It looks like it’s leaking on the passenger side at least thats my best guess right now. That’s where the truck floor is wet. The line go through the floor on the drivers side and it’s not wet and no drips on the shop floor.
The other thing that I find curious is when I got the truck I put 5 gallons in it and no leaks. I just put 10 gallons in and now it leaks. Could be coincidence, I don’t know.
Re: 1961 Ford F500 project.
Posted: Sat Apr 22, 2023 8:02 pm
by Eugen
That sounds more like the leak is above the 5 gallons line. No coincidence. If it's already empty you could also fill 10 gallons of water and chase the leak. I would not ignore it, but if you decide to leave it as is check the floor before flicking the light switch. But you'll find the leak for sure.
Re: 1961 Ford F500 project.
Posted: Sat Apr 22, 2023 9:54 pm
by JSinMO
Eugen wrote: ↑Sat Apr 22, 2023 8:02 pm
That sounds more like the leak is above the 5 gallons line. No coincidence. If it's already empty you could also fill 10 gallons of water and chase the leak. I would not ignore it, but if you decide to leave it as is check the floor before flicking the light switch. But you'll find the leak for sure.
I thought that too but I see no evidence of a leak. More investigation is needed for sure.
That last part about checking the floor before flicking the light switch struck me funny! I needed that! And you’re right that’s a sure way to find the leak!
I won’t be ignoring it, this is a must fix. There may be a corner I’m willing to cut but it’s not with this. Keep in mind the tank mounts inside the cab with me. No leaks allowed!
Re: 1961 Ford F500 project.
Posted: Sat Apr 22, 2023 10:34 pm
by Gordy
I have used "Red-Kote" tank liner with good luck for rusty and seepy gas tanks.
https://www.oreillyauto.com/detail/c/re ... m1/redkote
There is a Q&A section. They say 1 quart is good for up to a 12 gallon tank.
Gordy
Re: 1961 Ford F500 project.
Posted: Sat Apr 22, 2023 11:10 pm
by JSinMO
I’ve never used a liner before. I’ve heard good and bad. Do you ever notice it flaking off or plugging the filter?
Looks like it’s certainly an option.
Re: 1961 Ford F500 project.
Posted: Sun Apr 23, 2023 12:09 am
by Gordy
JSinMO wrote: ↑Sat Apr 22, 2023 11:10 pm
I’ve never used a liner before. I’ve heard good and bad. Do you ever notice it flaking off or plugging the filter?
Looks like it’s certainly an option.
I heard some horror stories to about some brands too, but a trusted mechanics told me to go with the Red-Kote. The tank I did for a tiller 7-8 years ago still looks good, the others I can't see into but no filter issues yet. Following the cleaning instructions properly will affect the results too. The tiller tank was full of rust and crud, so I put dawn dish soap, water and a bunch of nuts and bolts in the tank over all about 1/2 full and shook the living crap out of it several times. Then I flushed it out with the garden hose, the several more times with acetone. Then blew it out the best I could with compressed air, and placed it on the dash of the truck facing the sun for several days just to make sure it was good and dry.
Another option, my Dad took the tank from a 63 Ford Falcon to a radiator repair shop and had them cook and line it. The Falcon had fuel delivery issues, the tank actually had a drain plug
When I drained it through a rag I got about 4 cups of rust & crud without shaking or rinsing the tank.
Gordy
Re: 1961 Ford F500 project.
Posted: Sun Apr 23, 2023 7:07 am
by DavidBarkey
@JSinMO . Are you able to see inside the tank at all ? What is the condition of the inside ? Has it been coated before ?
Re: 1961 Ford F500 project.
Posted: Sun Apr 23, 2023 10:50 am
by JSinMO
DavidBarkey wrote: ↑Sun Apr 23, 2023 7:07 am
@JSinMO . Are you able to see inside the tank at all ? What is the condition of the inside ? Has it been coated before ?
I can’t see inside very well. This is one of the times I wish I had one of those cameras to look inside engines. From what I can see it just look rusty. It doesn’t appear to have been coated to me.
Re: 1961 Ford F500 project.
Posted: Sun Apr 23, 2023 7:13 pm
by JSinMO
DavidBarkey wrote: ↑Sun Apr 23, 2023 7:07 am
@JSinMO . Are you able to see inside the tank at all ? What is the condition of the inside ? Has it been coated before ?
Scratch my last post. My eyes must be going. I got some better light on it today and it sure looks red to me. I would guess it has been coated?
I decided to hang the tank off the side of the truck and put 10 gallons of water in it.
@Eugen was on the money! I see the leak right here.
I’m gonna fill it up and let it sit and see if I have any more spring up.if not I’m thinking my course of action will be Seals All on the patched area and then maybe some JB Weld over that.
Re: 1961 Ford F500 project.
Posted: Mon Apr 24, 2023 8:10 am
by Eugen
I would clean up the area with the wire brush really well, then the glue will stick well.
Re: 1961 Ford F500 project.
Posted: Mon Apr 24, 2023 8:16 am
by DavidBarkey
What I can't figure out is why they would have cut out that section in first place . What were they trying to get to ?
Re: 1961 Ford F500 project.
Posted: Mon Apr 24, 2023 8:25 am
by Jancoe
Was thinking the same Dave. Did those tanks have baffles inside? Did something come loose? I'd pull the sending unit at the top and get a better look since it's close to it. Humm if all else and you decide to replace it I'd opt to install with a relocation tank under frame. Something about fuel to my back and an enclosed cab doesn't sit well with me.
Sent from my SM-S906U using Tapatalk
Re: 1961 Ford F500 project.
Posted: Mon Apr 24, 2023 9:09 am
by Eugen
He dropped the diamond engagement ring in!
Re: 1961 Ford F500 project.
Posted: Mon Apr 24, 2023 9:09 am
by Harry
I’ve used JB Weld a few times with favorable results. It seems to hold up well in gas and oil applications.
Harry
Re: 1961 Ford F500 project.
Posted: Mon Apr 24, 2023 10:02 am
by Gordy
JSinMO wrote: ↑Sun Apr 23, 2023 7:13 pm
DavidBarkey wrote: ↑Sun Apr 23, 2023 7:07 am
@JSinMO . Are you able to see inside the tank at all ? What is the condition of the inside ? Has it been coated before ?
Scratch my last post. My eyes must be going. I got some better light on it today and it sure looks red to me. I would guess it has been coated?
IMG_3550.jpeg
I decided to hang the tank off the side of the truck and put 10 gallons of water in it.
IMG_3551.jpeg
@Eugen was on the money! I see the leak right here.
IMG_3553.jpeg
I’m gonna fill it up and let it sit and see if I have any more spring up.if not I’m thinking my course of action will be Seals All on the patched area and then maybe some JB Weld over that.
I got some better light on it today and it sure looks red to me. I would guess it has been coated?
Sorry I should not laugh not knowing if you are joking
But that is red oxide AKA rust and some crud mixed in. The Red-Kote is a liquid plastic, the fumes smell like acetone, as they evaporate the Red-kote solidifies to a smooth shiny surface.
Gordy
Re: 1961 Ford F500 project.
Posted: Mon Apr 24, 2023 8:42 pm
by JSinMO
I only see that one place where it’s leaking. So i got on the back of the truck and cleaned it up the best I could. I put Seal All around the entire weld. I’ll give it 24 hours to cure then I think I’ll go over that with JB weld. I’m hoping that will do it.
@DavidBarkey @Jancoe I have no idea why they cut it open there. Once I got it on the back of the truck I was able to see inside a little better. It looks like crap inside but there’s nothing there. It’s just a tank, no baffles. Maybe Eugen is right, they were going after a diamond ring!
@Gordy No worries about laughing.
I’m this case I wasn’t joking. I don’t think it’s red oxide. I can see where they spilled the same stuff on the outside of the tank. I tried to get more pictures.
It looks like some kind of coating, but there it’s very possible that I’m wrong too!
Re: 1961 Ford F500 project.
Posted: Mon Apr 24, 2023 8:56 pm
by Spike188
@Jancoe We use to change car engines outside on a concrete slab. One evening we pulled a battery out of a car and placed it underneath the trunk area. The next step was lifting and placing jack stands under the front of the car. The next morning when arriving at work there was a tell tail vapor mark on the concrete. The tank had made contact with the top post battery terminals and burned two little holes through the tank. We mixed up JB weld on cardboard then taped the board loosely to the tank. Problem solved.
Re: 1961 Ford F500 project.
Posted: Sat Apr 29, 2023 12:03 am
by JSinMO
It’s a beautiful evening so I decided to spend some time on Herbie. The gas tank is all sealed up with Seal All and JB Weld and I got it back in the truck
I put gas back in and no leaks so far! Finger crossed it stays that way. That didn’t take too long so I went ahead and changed the oil in the rear end. I set up my oil IV and got the fresh SAE 140 in.
It’s about as thick as honey so it took awhile but it’s a warm night and there’s good music on the radio. Who knew watching thick oil run down a tube could be relaxing!
Hopefully we’re back on track to do a road test soon!
Re: 1961 Ford F500 project.
Posted: Sat Apr 29, 2023 7:46 am
by Eugen
That's good news about the tank Jeff!
Haha, your IV picture made me laugh! I like it! Sometimes a slower pace is what we all need!
Re: 1961 Ford F500 project.
Posted: Sat Apr 29, 2023 10:00 am
by Harry
The gas tank on my 444 had a lot of rust on the inside. I put some ball bearings on the inside and shook it really good. I used a product I purchased from Amazon called POR. First step was a acid etch liquid to clean the tank. After setting for 30 minutes on each side it was drained out and let set a few days. Next step was a sealer utilizing the same procedure. So far I have had no issues with the tank.
Harry
Re: 1961 Ford F500 project.
Posted: Sat May 06, 2023 8:13 pm
by JSinMO
Made some great progress on Herbie this morning!
I stared by changing the hoses.
I’d say the old ones were well past the use by date!
Added some antifreeze and gave everything a once over and started it up.
I decided to hook up the dwell meter to monitor.
RPM and points dwell are right on the money!
stayed between 500 and 600 RPM with a dwell of 25 degrees.
I ran the truck for about an hour at low and high idle checking the engine with a temperature gun. I’ll be the gauge in the truck works and reads the same as my gun!
The engine came up to about 160 degrees F and stayed there! I can see water moving in the radiator. It appears the the generator is working too, although I need to learn more about how this system works. I turned on the lights, blinkers, and heater to put a load on the system. I watched with my meter on the battery and saw the voltage drop to 11 volts, then go up to 13 bolts and finally hold at 12. Not sure if this is how the charging system is supposed to work or not but the battery stayed up.
The engine hummed along just fine , the only issue I saw was a small leak at the oil pump that will need some attention at some point.
I was so happy with the results I polished the chrome and went for a spin!
It was just up and down the driveway a couple of time but I’m counting it as the first drive!
Re: 1961 Ford F500 project.
Posted: Sun May 07, 2023 8:04 am
by Toolslinger
Generators need more RPMs to work than an alternator, assuming you have a generator.. After that it'll run through a vibrating regulator which is complete voodoo to me, but they do work just fine. 12+ volts should be about right on a generator system I believe. You'd be at 14+ on an alternator.
I will get to play this same game with my '65 F750 at some point since the electrical system is a train wreck...
Nice to see your gauges working well.
Re: 1961 Ford F500 project.
Posted: Sun May 07, 2023 8:35 am
by Eugen
Well Jeff, congrats on your first drive, hard work sure paid off! Is that a grin I see on your face?

Re: 1961 Ford F500 project.
Posted: Sun May 07, 2023 10:38 am
by JSinMO
@Toolslinger Thanks for the info. It seemed to be working but I wasn’t sure. I was pleasantly surprised that the gauges worked. I do have a couple of electrical problems to chase down, I suppose that will be next. I’d like to see your F750 when you get if you can.
@Eugen Yes, I couldn’t help it! I was grinning the whole time!
Re: 1961 Ford F500 project.
Posted: Sun May 07, 2023 10:50 am
by Toolslinger
Re: 1961 Ford F500 project.
Posted: Sun May 07, 2023 11:08 am
by RoamingGnome
That is SWEET !
Every time
finds me drooling over someone else's stuff...

Re: 1961 Ford F500 project.
Posted: Sun May 07, 2023 10:26 pm
by JSinMO
@Toolslinger That is awesome! I could really get into trouble with that set up!
I hope you can get it back in serviceable condition again.
I’d be interested in seeing you get it going again!
Re: 1961 Ford F500 project.
Posted: Sat May 13, 2023 10:25 am
by JSinMO
Playing around with the bed. Seem to work fine.
Of course it didn’t leak a drop till I moved it, now it’s dripping!
Not really unexpected given the looks of the cylinder and pump, just something else to look at!
Re: 1961 Ford F500 project.
Posted: Sat May 13, 2023 11:40 am
by Eugen
Not really unexpected that's for sure. Where does it leak?
Re: 1961 Ford F500 project.
Posted: Sat May 13, 2023 8:33 pm
by JSinMO
Eugen wrote: ↑Sat May 13, 2023 11:40 am
Not really unexpected that's for sure. Where does it leak?
I have no idea at this point. I just saw the drips on the floor, didn’t have time to investigate yet. Its a candidate for power washing then take a look. It’s covered in old oil and dirt.
Re: 1961 Ford F500 project.
Posted: Sat May 13, 2023 8:52 pm
by Eugen
Let's hope it's just a hose.
Re: 1961 Ford F500 project.
Posted: Sun May 14, 2023 6:34 am
by DavidBarkey
Old hydralics are like old men . There going to leak a little at times and if you at some point someone is going to get hosed .
Re: 1961 Ford F500 project.
Posted: Fri May 19, 2023 11:24 pm
by JSinMO
We had a rainy afternoon so I ended up in the shop tinkering around. I had a high beam burned out but I’ve got a couple extra headlights I took out of that old RV. That was an easy fix. I also have two marker lights not working on the bed. Thought Id take a look. It’s nothing too exciting, I just thought it was kinda neat to see the original cloth covered wiring still in place.
So this is an old style set up. Single power wire to the light and body ground to complete the circuit, just like an old tractor.
It’s a cool light, all metal and glass, not a single piece of plastic in sight!
They’re a little rough but I’m going to try and work them over and get them working again!
I will have to rewire the bed. The old cloth cover wire is falling apart in places.
I’ve got a roll of 14 gauge automotive wire that should work, and I think I might add a ground wire. Some new bulbs, a little sanding and soldering, and hopefully they’ll be working again.
Re: 1961 Ford F500 project.
Posted: Sat May 20, 2023 6:38 am
by propane1
Thats neat Jeff. When I fix up some thing like that, I spray the inside back reflector part with chrome paint. Makes the light brighter.
Noel
Re: 1961 Ford F500 project.
Posted: Sat May 20, 2023 7:51 am
by Toolslinger
I've got those glass marker lights all over the '48 Diamond T. They clean up reasonably well as long as the lamp socket is in good shape. I know my father did the King Bee marker lights up on the roof at one point, and they were a bit of a challenge, but they all work, don't leak, and look good. The T is still 6v, so any corrosion really can play havoc with lighting.
You'd think I would know what I've got on the F750... And yet, no, I can't recall what the lighting situation is on it other than non-functional... I do know I'm missing all the little maker lights that mount on the outriggers. They wouldn't matter most of the time, but it would be nice to have them for when I inevitably will be working near the road with them extended... Sadly, they're not the style you showed. I have a bunch of those, but they wouldn't fit the location.
Re: 1961 Ford F500 project.
Posted: Sat May 20, 2023 10:52 am
by Eugen
Like a trip back in time.
Re: 1961 Ford F500 project.
Posted: Thu Jun 22, 2023 10:26 pm
by JSinMO
Just a quick update on my lights. I took them all apart and cleaned them up. Had to solder.the wire inside them. These bed markers just use a hot wire and body ground so I did a very simple rewire and I did add a ground wire to them. It was a fun little project!
Re: 1961 Ford F500 project.
Posted: Thu Jun 22, 2023 10:54 pm
by Spike188
Sweet!
Re: 1961 Ford F500 project.
Posted: Fri Jun 23, 2023 7:48 am
by Eugen
Lights look great
@JSinMO . Little by little Herbie is getting back in good shape!
Re: 1961 Ford F500 project.
Posted: Sun Jul 30, 2023 5:47 pm
by JSinMO
Spent a little time today fixing a couple of small thing on Herbie. I’ve got all the lights working and including brakes, blinkers, headlights, and running lights but no hazards. I believe they were optional in 61 but this truck is equipped so I wanted to try and make them work.
I traced a few wires and replaced a blown fuse and just like that the hazards work!
With that done I went after the horn. It works but you have to really juggle the button.
I took the switch apart on the steering wheel and as I suspected it was just dirty contacts on the ring. Cleaned them up and put it back together and now it works great!
I’ve said it before but it’s worth repeating, it’s very nice to work on things you can repair instead of just replacing parts!
I took her for a spin and got up to 50MPH! I know that doesn’t sound like much but that’s around the upper end for this old truck. It would really benefit from one more gear or a 2 speed rear end but that’s not how it was made!
I think I’m ready to apply for license plates! I’ve started the paperwork and I’m hoping to send it off to the state soon!
Re: 1961 Ford F500 project.
Posted: Sun Jul 30, 2023 5:57 pm
by Eugen
@JSinMO You're making good, steady progress. It'll be useful to have around for sure, and I agree with you, I wish more stuff was made now that way, so one could fix it at home.


